Standalone Python API
Overview
The Standalone Python API can be used in Python for communicating with the HTTP API (documented in REST Overview). In order to use the HTTP API you must have the Web Service running on a machine whose address and port number you know. For a list of the API’s functions and how they are used go to the Deadline Downloads page and download the documentation. Essentially, our Standalone Python API is a Python wrapper API around our RESTful HTTP API.
Note, as all communication to Deadline travels through the machine running the Web Service and not the local host, there are consequences that should be considered carefully. Any file paths provided need to be valid on the Web Service machine, including any differences between operating systems if for example, your local host is running Windows but the Web Service machine is Linux. In the case of submitting a job, the job’s username will be the user account currently running the Web Service, NOT the submitting local user, unless a UserName is provided in the job info.
Set-up
In order to use the Standalone Python API you must have Python 3.10+ installed. Copy the “Deadline” Folder containing the Standalone Python API from \\your\repository\api\python to the “site-packages” folder of your Python installation and the API is ready to use.
Note
If you are using the Deadline Python API version 10.1.15 or older, it is highly recommended to upgrade to version 10.1.16 or newer. The newer server supports secure TLS and has many performance improvements.
Web Service configuration in Deadline Client Installation
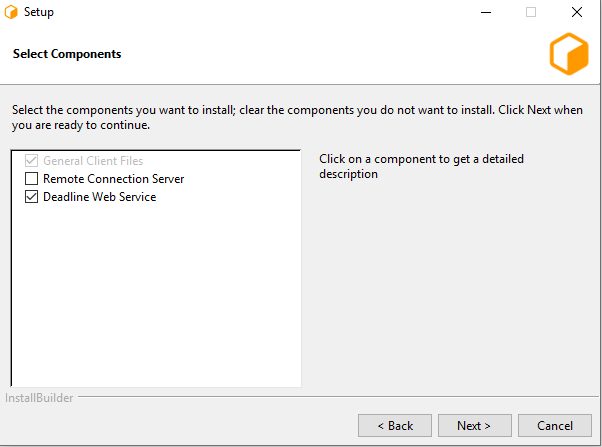
As part of the Client Installation, you can also choose to configure the current machine as a Web Service Server. In general this is not necessary, and as such is an optional part of the configuration – it must explicitly be selected at the Component Selection screen.
If you have selected the option to configure the current machine as a Web Service server, you will be prompted with configuration screens for the Web Service.
Note
These configuration screens only come up once the regular configuration screens have been filled out. They do not appear immediately after the Component Selection screen.
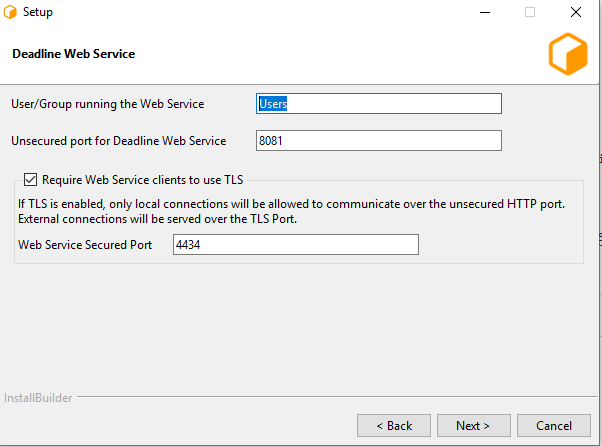
The first page consists of a few different settings:
User/Group running the Web Service: This is the user (or user group) that will be expected to run the Web Service server process. This value will dictate the initial permissions on files needed by the Web Service server, and the user listed on the HTTP.SYS URL Reservation (Windows only).
Unsecured port for Deadline Web Service: This is the port on which the Server will listen for incoming HTTP requests. On Windows, this will also be the port listed on the HTTP.SYS URL Reservation created by the installer.
- Require Web Service clients to use TLS: If enabled, the Web Service server will serve Web Service clients exclusively over an encrypted connection. It will require Web Service clients to provide a valid x509 certificate when connecting.
Secured Port: If TLS is enabled, remote connections will need to connect to this TLS port (and not the unsecured HTTP port).
Warning
HTTP-only configurations should only be used internally within a closed network, and should not be exposed to the internet.
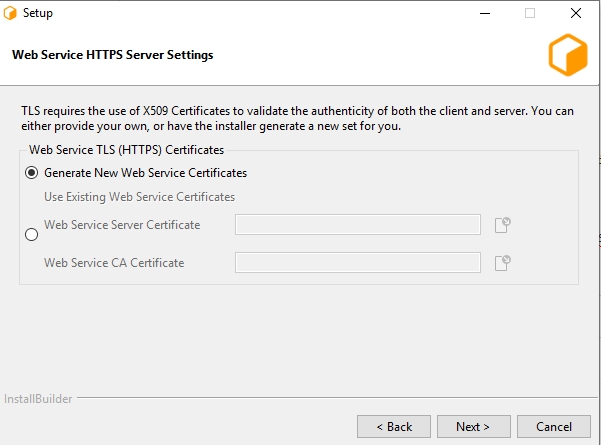
If TLS was enabled, this next page allows for configuration of the x509 certificates that the Web Service server will use to serve Web Service clients over TLS.
Generate New Web Service Certificates: Select this option if you do not have a set of certificates to use.
- Use Existing Web Service Certificates: Select this option if you’ve already generated a set of certificates to use (either externally or previously through the installer).
Server Certificate: The path to a Server x509 certificate, in PKCS#12 (*.pfx, *.p12) format. This must include the private key alongside the certificate.
CA Certificate: The path to a trusted root CA that should be used to validate incoming client certificates.
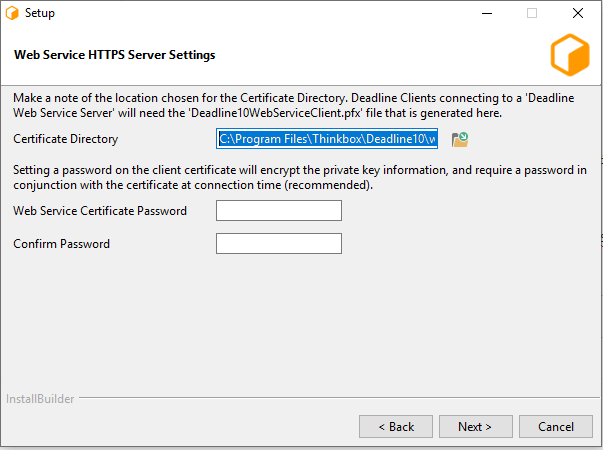
This page is the final page for configuring the Web Service, and only appears if ‘Generate New Web Service Certificates’ was selected in the previous step. It contains settings related to generating the CA, server, and Web Service client certificates.
Certificate Directory: This is the directory in which the set of generated certificates will be placed.
Web Service Certificate Password: You may specify a password that will be used to encrypt the Client certificate and key. If specified, it will need to be provided by Web Service clients connecting using this certificate. If you do not wish to set a password, leave this field blank.
Note
Once the certificates have been generated, the ‘Deadline10WebServiceClient.pfx’ file should be securely moved to client machines that are expected to connect to this Web Service Server; it will be needed at connection time. In addition, the user(s) running the Web Service client processes will need to be granted Read access to the file (the installer creates the file with restrictive permissions).
Using the API
A DeadlineCon object must be created which is used to communicate with the web service to send and receive requests. First enter “import Deadline.DeadlineConnect as Connect”, then create your connection object “connectionObject = Deadline.DeadlineConnect.DeadlineCon(‘WebServiceName’, WebServicePortNumber)”, where ‘WebServiceName’ is the DNS name or IP address of the machine currently running the web service and ‘WebServicePortNumber’ is the web service port number as configured in the Web Service settings in the Repository Options. By default it is: 8081. The “connectionObject” variable can now be used to communicate requests to the web service.
Example: Getting group names and suspending a job
>>> from Deadline.DeadlineConnect import DeadlineCon as Connect
>>> con = Connect('WebServiceName', 8081)
>>> con.Groups.GetGroupNames()
[u'none', u'group1', u'group2', u'group3']
>>> jobId = validjobID
>>> con.Jobs.SuspendJob(jobId)
'Success'
Details on the API functions can be found in the Deadline documentation.
Using the API with TLS
Deadline Web Service now supports TLS connections. The connecting procedure is similar to non-TLS. A DeadlineCon object must be created which is used to communicate with the web service to send and receive requests. First enter “import Deadline.DeadlineConnect as Connect”, then create your connection object connectionObject = Deadline.DeadlineConnect.DeadlineCon(‘WebServiceName’, WebServiceTLSPortNumber, True, ‘Path/To/CAcert’, False), where WebServiceName is the DNS name or IP address of the machine currently running the web service and WebServiceTLSPortNumber is the web service tls port number can be configured through Command or through the Client Installation (Advanced). The first boolean value indicates whether or not to enable TLS. Path/To/CAcert is the ca certicate generated by client installer, you can also generate your own set of certificates. By default it is: 4434. The second boolean value sets whether or not the Web Service will validate responses and is highly recommended to be set to False. The connectionObject variable can now be used to communicate requests to the web service.
Example: Getting group names and suspending a job
>>> from Deadline.DeadlineConnect import DeadlineCon as Connect
>>> con = Connect('WebServiceName', 4434, True, "\Path\To\ca.crt", False)
>>> con.Groups.GetGroupNames()
[u'none', u'group1', u'group2', u'group3']
>>> jobId = validjobID
>>> con.Jobs.SuspendJob(jobId)
'Success'
Authenticating
If your Web Service has authentication enabled then you must set up authentication for the Python API. This can be achieved through the “EnableAuthentication” and “SetAuthenticationCredentials” functions. Setting your authentication credentials allows the Python API to use them for as long as that instance of python is running.
>>> from Deadline.DeadlineConnect import DeadlineCon as Connect
>>> con = Connect('WebServiceName', 8081)
>>> con.Groups.GetGroupNames()
"Error: HTTP Status Code 401. Authentication with the Web Service failed.
Please ensure that the authentication credentials are set, are correct, and
that authentication mode is enabled."
>>> con.AuthenticationModeEnabled()
False
>>> con.EnableAuthentication(True)
>>> con.AuthenticationModeEnabled()
True
>>> con.SetAuthenticationCredentials("username", "password")
>>> con.Groups.GetGroupNames()
[u'none', u'group1', u'group2', u'group3']
By default “SetAuthenticationCredentials” also enables authentication, so it is not actually necessary to explicitly call “EnableAuthentication” as well. If you want to store your credentials without enabling authentication you may do so as well using the optional third parameter.
>>> con.SetAuthenticationCredentials("username", "password", False)
API Functions
All of the Standalone Python API functions return a Python dictionary, a Python list, or a Python string. Lists often contain dictionaries.
Examples: Getting a list, a list containing dictionaries, a dictionary, and a string back.
>>> groupNames = con.Groups.GetGroupNames()
>>> groupNames[0]
group1
>>> jobs = con.Jobs.GetJobs()
>>> jobs[0]['FailedChunks']
12
>>> task = con.Tasks.GetJobTask(jobId, 0)
>>> task["Errs"]
8
>>> root = con.Repository.GetRootDirectory()
>>> root
'C:/DeadlineRepository'
Example: Getting a job, changing the pool and priority then saving it.
>>> job = con.Jobs.GetJob(jobId)
>>> str(job['Props']['Pool'])
none
>>> job['Props']['Pool'] = unicode('jobPool')
>>> str(job['Props']['Pool'])
jobPool
>>> print(str(job['Props']['Pri']))
50
>>> job['Props']['Pri'] = 75
>>> str(job['Props']['Pri'])
75
>>> con.Jobs.SaveJob(job)
'Success'
>>> job = con.Jobs.GetJob(jobId)
>>> str(job['Props']['Pool']) + ' ' +str(job['Props']['Pri'])
jobPool 75
Example: Submitting a ‘reserve’ VraySpawner job using Python dictionaries.
import Deadline.DeadlineConnect as Connect

if __name__ == '__main__':

    Deadline = Connect.DeadlineCon('WebServiceName', 8081)

    JobInfo = {
        "Name": "Submitted via Python",
        "UserName": "UserName",
        "Frames": "0-1",
        "Plugin": "VraySpawner"
    }

    PluginInfo = {
        "Version": "Max2014"
    }

    try:
        newJob = Deadline.Jobs.SubmitJob(JobInfo, PluginInfo)
        print(newJob)
    except:
        print("Sorry, Web Service is currently down!")
The Manual Job Submission page documents all the Job Info options available, which can be used in the above example in the Python JobInfo dictionary. Please consult the specific Application Plugin for the required and optional Plugin Info KEY=VALUE pairs required for the PluginInfo dictionary. Note, when submitting a job, the JobInfo and PluginInfo dictionaries should contain ALL the minimum necessary KEY=VALUE pairs to successfully run this plugin job type in Deadline. As the KEY=VALUE pairs are internal and change depending on the application plugin, it is recommended you submit a job normally to Deadline and then inspect the job’s Submission Params to see what KEY=VALUE pairs should be submitted for this job type. You can also use the “Export” button to take a copy of the JobInfo and PluginInfo files to submit the job using these files instead of via Python dictionaries.
