Krakatoa MY Modifiers and Particle Repopulation
Introduction
- When rendering in particle mode, Krakatoa MY requires a lot of particles to produce a smooth result.
- In many cases though, the particles might be coming from a source that cannot produce dozens or hundreds of millions of particles, or the data has already been produced and cached to files and cannot be resimulated to generate Partitions.
- For these cases, and especially when the particles represent a fluid simulation coming from an application like RealFlow, Naiad, or even Maya itself, Krakatoa MY provides a render-time Particle Repopulation feature that can use an existing particle distribution to seed new particles with arbitrary spatial density.
- The particle count that could be achieved this way is limited only by the available system memory.
The Test Scene
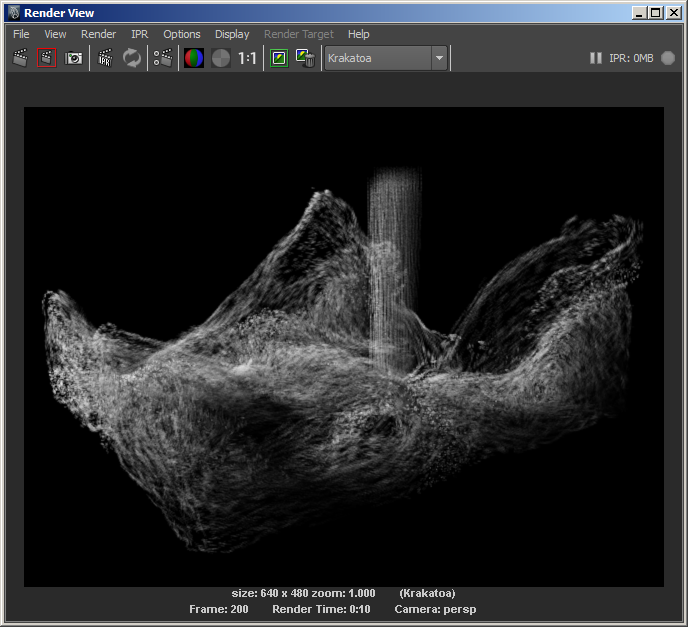
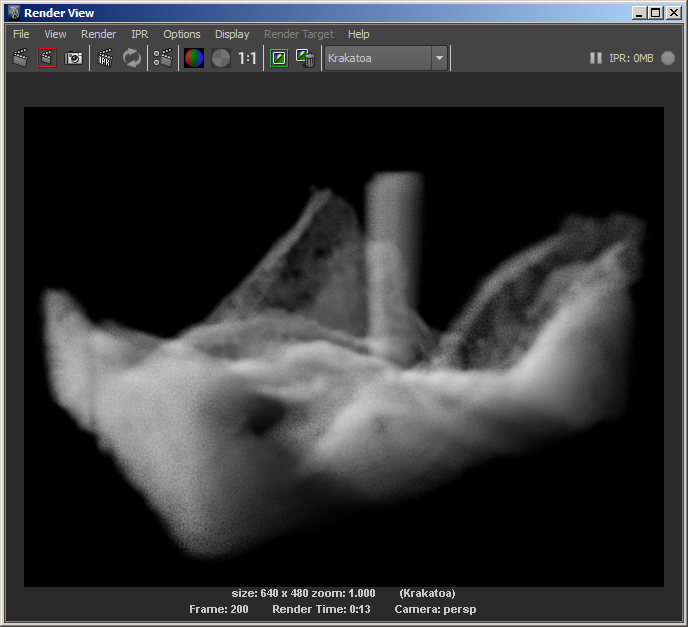
- For our test, we will use a very simple RealFlow simulation saved as 200 .BIN particle files containing less than 100,000 particles on each frame.
Click here to download a ZIP file with the sequence (439 MB).
- Download the sequence and unzip it.
- Create a PRT Loader and load the above BIN sequence.
- Create a single Spot light to illuminate the particles.
- Here is a rendering of frame 200 with 87,648 particles:

- Final Pass Density was set to 1.0, Final Pass Exponent was set to 0, and the Draw Point Filter was set to Bicubic.
- Rendering with 16 passes Jittered Motion Blur can somewhat smooth out the result, but we still don’t have enough particles to create a solid volume:
Adding A Repopulation Modifier
- To activate the Particle Repopulation feature of the Krakatoa renderer, all we have to do is add a Repopulate Particles Krakatoa Modifier to the PRT Loader.
- Select the PRT Loader in the scene.
- Click the MOD icon on the Krakatoa shelf to open the Krakatoa Modifiers Editor.
- Click the +Repopulate Particles button.
- A new node will be connected to the PRT Loader, exposing the Repopulation parameters.

WARNING! In versions of Krakatoa MY prior to 2.4.1, the PRT Loader did not respect the Length Unit Scale value of BIN files. The scene data was always loaded “raw”, one file unit equaling one Maya scene unit.
However, in Krakatoa MY 2.4.1 and higher, that metadata value of BIN files will be respected. Since the provided BIN file sequence was saved as 1 unit = 1 Meter, and Maya defaults to 1 scene unit = 1 Centimeter, loading the same data now produces a point cloud that is 100x larger than in the original tutorial.
If you are using Krakatoa MY 2.4.1 or higher, you MUST enter 10.0 for Fill Radius in the Repopulate modifier. Alternatively, you can scale down the PRT Loader to 0.01, 0.01, 0.01.
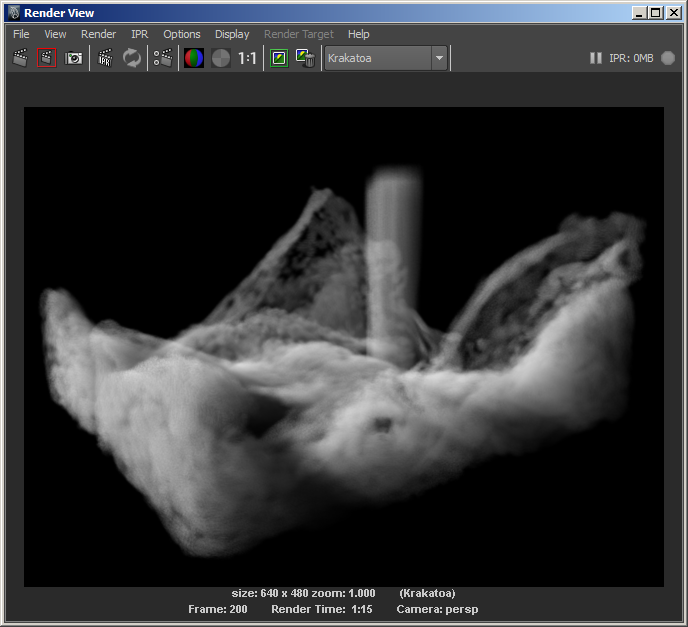
- Rendering the PRT Loader with no Motion Blur produces the following result:

- The number of particles generated is 13,418,021.
- The particle repopulation took 15.772s, the total render time was 29.391s, including 1.061s Lighting Pass Sorting, 4.274s Lighting Pass, 1.232s Final Pass Sorting and 3.027s Final Pass Drawing.
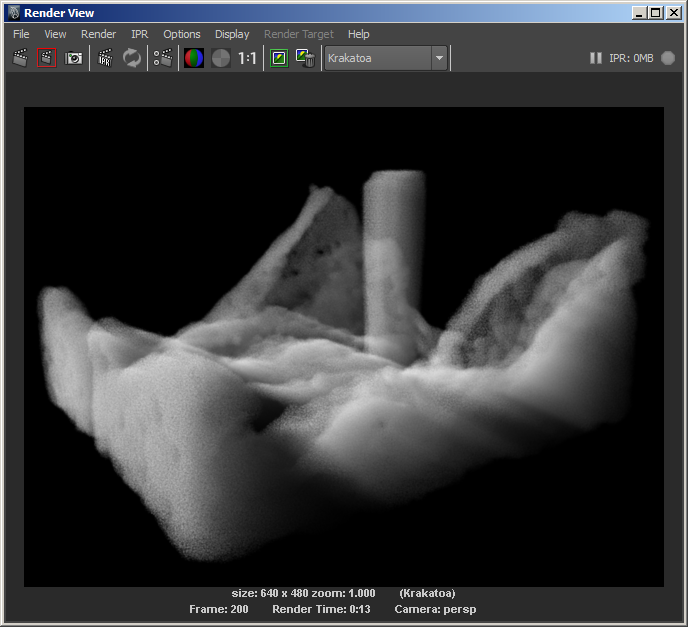
- We could speed this up by reducing the number of particles per subdivision from 2 to 1.
- This will generate only 6,709,021 particles (approximately half the count) in only 3.261s for a total rendering time of 9.766s:

- The result has slightly more noise, but looks pretty good for a quick preview. It would get even smoother if we would enable Motion Blur and render 8 passes:
- The total render time was 74.365s.
Tweaking The Repopulation Modifier Settings
- The Repopulate Particles modifier provides the following parameters:
- The Fill Radius defines the sperical area around each source particle to fill with particles.
- The Radius Subdivs defines the Voxel Spacing to use as a fraction of the Fill Radius. In other words, a Radius Subdiv of 1 means that if the Fill Radius has a value of 1.0, this value will be divided once, producing a Spacing of 0.5 units. Each subdivision increases the number of voxels in a cubic manner, in other words, Subdiv 1 means 2x2x2 = 8 voxels within the Fill Radius volume, a value of 2 means 3x3x3=27 voxels and so on.
- The Particles Per Subdiv value defines the number of particles to seed randomly inside each Voxel. Increasing the number two times (e.g. from 1 to 2 particles) will produce roughly twice as many particles (some particles might not be generated if inside a Voxel but outside of the Fill Radius).
- The Density Falloff value can range from 0.0 to 1.0 and defines the falloff of the Density channel based on the distance from the “surface” of the volume defined by all Fill Radii. When the value is 0.0, all particles will get the same Density regardless of their distance to the surface. A value of 1.0 produces a linear falloff. A value of 0.5 produces constant density if the new particle is farther away from the surface than half of the Fill Radius value, and linear falloff in the range from half the distance to the actual surface.
- Let’s see how changing these values affects the particle generation.
Changing Subdivs
- Here is the result of Fill Radius 0.1 (in Krakatoa MY 2.4.1 and higher Fill Radus 10.0), Subdivs 2, Particles Per Subdiv 1, Falloff 0.1, No Motion Blur:

- This generates 22,643,842 particles that look a lot smoother than the default Subdivs 1, Particles Per Subdiv 2 we got in the beginning, but renders in about the same time, because creating more subdivisions is faster than seeding more random particles per sub-division.
- The Retrieving Particles time which includes the Repopulation was 10.983s, the total render time was 30.093s, including 2.075s Lighting Pass Sorting, 7.971s Lighting, 2.122s Final Pass Sorting and 4.774s Final Pass Drawing.
Increasing The Fill Radius
- Changing the Fill Radius from 0.1 ot 0.15 (in Krakatoa MY 2.4.1 from 10.0 to 15.0) provides more thickness in the thin sheeting areas of the flow.
- Here is the rendering of 9,617,881 particles at Subdivs 2, Particles Per Subdiv 1, Falloff 0.1, No Motion Blur:
- The render time was 12.839s, including 4.695s for Retrieving Particles / Repopulation.
Increasing The Density Falloff
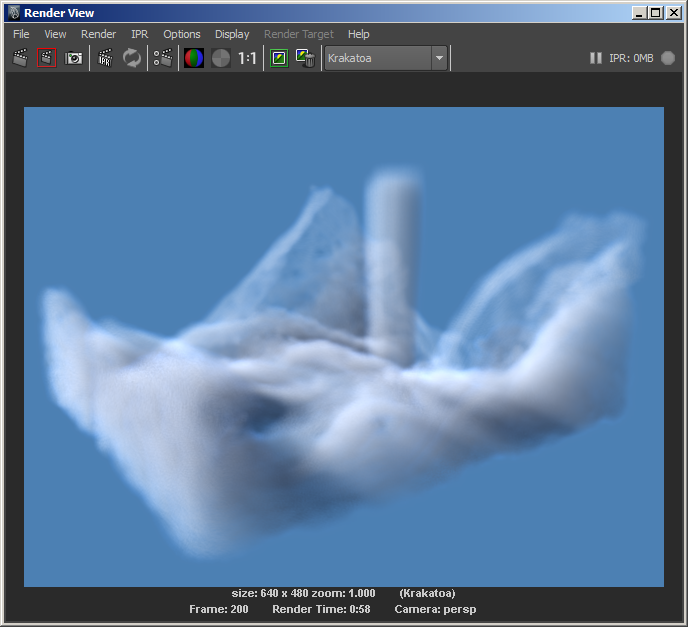
- Let’s increase the Density Falloff to 1.0 to produce a linear falloff and thin out the fluid in the sheeting areas:
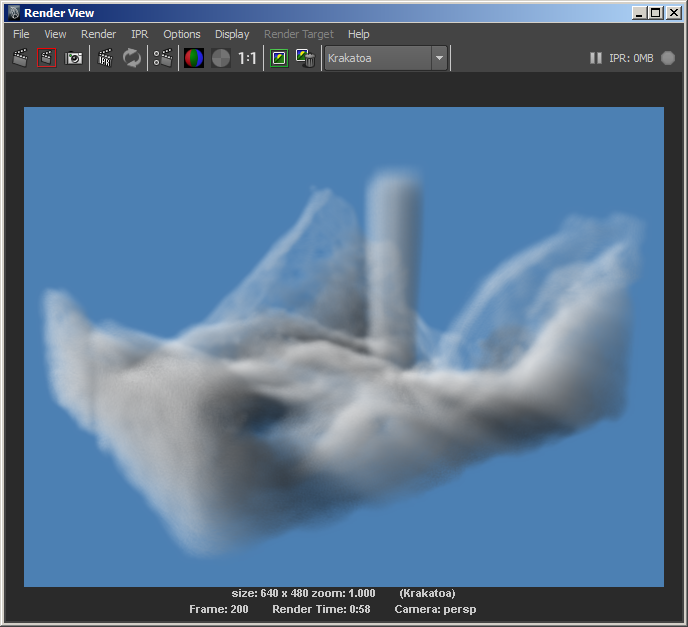
- And here is the same, but with 8 passes Motion Blur which cleans up the noise:

Channel Propagation
- As you can see from the above examples, the particle data channels are correctly propagated from the source particles to the newly generated particles - each new particle has the correct velocity inherited from the surrounding particles.
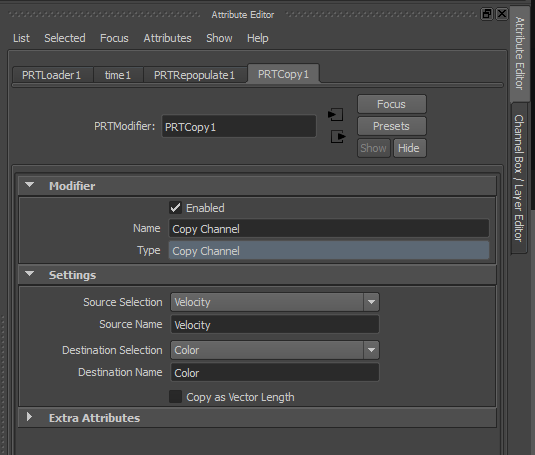
- This is true for all channels found in the source particles, including Color, Emission, Mapping coordinates and so on. We can test this by assingning a custom Color value to the source particles based on their Velocity.
- Click the MOD icon again to open the Krakatoa Modifiers Editor.
- Press the +Copy Channel button to add a new modifier.
- In the new tab of the PRT Loader, select “Velocity” from the “Source Selection” list and “Color” from the “Destination Selection” list.
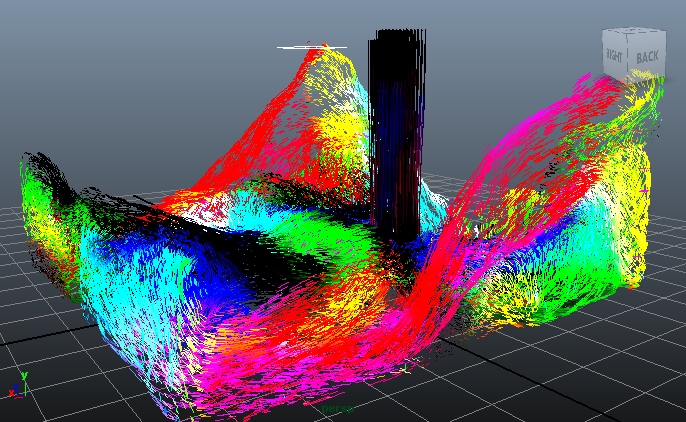
- The viewport particles should now show the Velocity as Color:
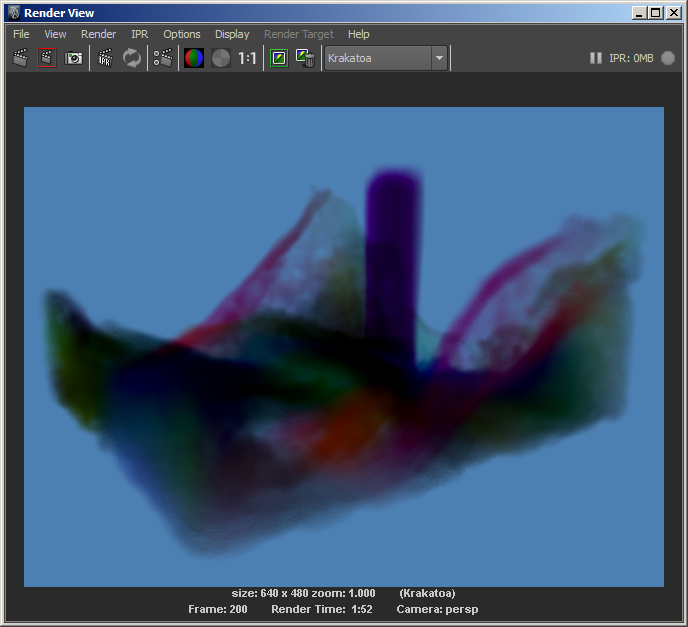
- These are just the source particles saved by RealFlow. Let’s now render to see the millions of repopulated particles in the final image. Since some of the Velocities have a negative sign and are thus black, we will enable the Override Background Color option in the Global Render Values panel of the Krakatoa Settings:
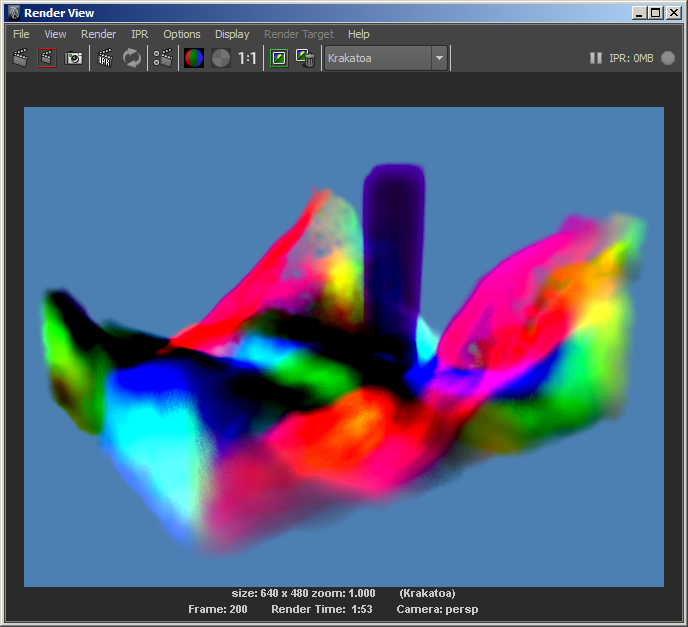
- As expected, the colors of the 88K source particles are correctly represented by the 9.6 million particles generated from them.
- To reduce the intensity of the Colors, we can scale the Color channel by a factor of 0.1
- Click the +Scale Channel button in the Krakatoa Modifiers Editor.
- Enter 0.1 in the Channel Scale field.
- Render again:
- Note that the black areas where the Velocity has all three components negative, as well as some of the color areas where one or two components might be negative, are all correctly saved as negative color values in the output image, assuming it is an OpenEXR file. Nothing gets clamped!
- One could load the resulting image in any post processing application and multiply by -1 to produce the inverse of the velocities.
- We will look into more advanced ways to colorize particles in the next tutorial…
Setting The Emission Channel
- So far we used the Repopulation Modifier and the Copy Channel Modifier. Let’s take a look at the simplest Modifier of them all - the Set Channel Modifier.
- First, we will disable the Copy Channel modifier to return the Color back to default. There are two ways to disable a Krakatoa Modifier - you can uncheck the Enabled checkbox in Modifier Node’s panel, or you can double-click the entry in the Krakatoa Modifiers Editor dialog to toggle modifiers on and off.
- Once the Copy Channel modifier is off, press the +Set Vector Channel button. This will add a new modifier to the PRT Loader.
- Change the Channel Selection list to Emission.
- Enter 0.05, 0.1 and 0.2 in the Channel Value fields.
- In the Krakatoa Settings > Rendering Controls, check the Use Emission option.
- In the Krakatoa Settings > Lighting and Drawing Pass Density and Filtering panel, check “Use Emission Strength” and enter 1.0 for Emission Strenght Value and -5 for Emission Strength Exponent.
We have to scale the Emission Strenght because each of the newly generated particles will receive the full color, while the Density value is equally distributed from the source particle to all new particles. Without the scaling of the Emission Strength the rendering will be overblown!
- Rendering the 9.6 million particles with 8 passes Motion Blur produces the following result.
- Below is the same rendering with Use Emission turned off for comparison:
- How about using the Krakatoa Settings > Global Render Values overrides?
- Checking the Override Emission option and specifying the same RGB value will produce the same result, but it will apply to the whol scene.
- So when the scene contains more than one particle source and you want to override the channel of each one individually, you can use the ‘Set … Channel’ Modifiers.