PRT Hair Object
Available in Krakatoa MX v2.0.0 and higher
Overview
- The Krakatoa PRT Hair object distributes particles along splines to represent hair as volumetric particle cloud in Krakatoa.
- The PRT Hair object sources include individual 3ds Max Spline objects with multiple shapes, HairFarm objects converted to Spline on top of the stack, as well as all splines generated by all scene 3ds Max Hair&Fur objects.
- The PRT Hair object provides controls over the particle distribution at render time and in the viewport.
- The Density of the particles can be controlled procedurally along the spline’s length.
- The particle positions on a reference frame can be generated in a separate channel for sticky camera mapping effects.
User Interface
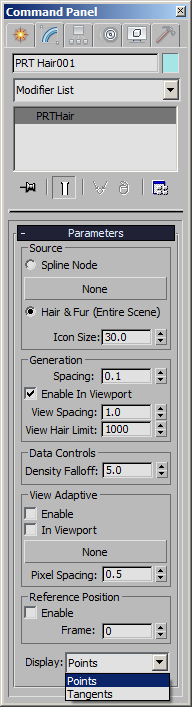
Source controls
- The Spline Node radio button option lets you use the pick button to select from the scene a Spline object or a HairFarm object converted to spline on the stack. The particles will be placed in object space, requiring the PRT Hair to be aligned and eventually parented to the source object.
- The Hair & Fur (Entire Scene) radio button lets you convert to particles all active 3ds Max Hair Modifiers found in the scene. The particles will be placed in world space, making the transformations of the PRT Hair irrelevant. NOTE: This is a side effect of the way the Hair&Fur modifiers (do not) expose their data to the SDK.
- The Icon Size spinner controls the size of the PRT Hair’s icon.
Spacing spinner
- The Spacing value controls the distance between the particles in world space at render time.
- The default value is 0.1 units.
Enable In Viewport checkbox
- The Enable In Viewport checkbox is checked by default.
- When checked, the PRT Hair object will generate particles in the viewport based on the View Spacing value and respecting the View Hair Limit value.
- When unchecked, no particles will be generated in the viewport.
View Spacing spinner
- The View Spacing value controls the spacing between the particles in the viewport.
- It is always decoupled from the render-time spacing since the viewports require generally less particles.
- The default value is 1.0 unit.
View Hair Limit
- The View Hair Limit value defines the maximum number of hair strands to generate particles on in the viewport.
- The default value is 1000 hair strands.
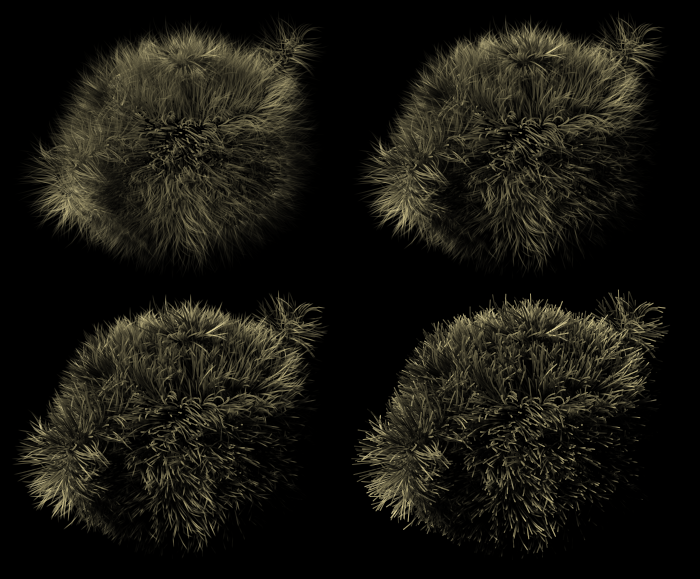
Density Falloff spinner
- The Density Falloff value defines the Exponent of the Density Falloff function.
- The default value is 5.0.
- A value of 1.0 produces a Linear falloff.
- A value of 0.0 produces no falloff at all.
- Values between 0.0 and 1.0 produce a very thick base and fast falloff to a very thin hair.
- Values above 1.0 produce a slower falloff with very thick base and slight tapering at the very tip of the hair.
- The image below shows Density Falloff values of 0.3, 1.0, 5.0 and 0.0:
View Adaptive controls
- The Enable checkbox causes the particle distribution to be performed with respect to the specified camera (if specified) and using Pixel Spacing instead of absolute units.
- The In Viewport checkbox enables the View Adaptive distribution in the viewports.
- The pickbutton lets you select the camera to perform the View Adaptive distribution against.
- The Pixel Spacing value defines the distance between particles in render image pixels. Default is 0.5.
Reference Position controls
- The Enable checkbox turns on the ReferencePosition channel generation.
- The Frame value defines the frame number to generate the ReferencePosition data on.
- The PRT Hair will be evaluated once on the Reference Frame and once on the current frame and will generate matching particle distributions, then the positions of each particle on the Reference Frame will be stored in a ReferencePosition channel in the same particle on the current frame.
Display drop-down list
- The Display option controls the drawing of the particles in the viewport.
- The default setting is Points - the PRT Hair particles will be displayed as large dots (to produce correct Z-Depth sorting)
- The other option is Tangents - lines will be drawn to display the tangent vectors at the particlels’ positions.
- NOTE that you can also use a Magma modifier set to output to the PRTViewportVector channel to visualize ANY vector data channel as a line beyond the options of the PRT Hair object’s UI.