Casting Shadows on Geometry
Applicable to Krakatoa v1.6.0 and higher.
- Your final composites will likely contain other geometric objects to be integrated with your particle passes.
- To assist in casting shadows on geometry rendered with other 3ds Max renderers, Krakatoa can store a special kind of maps for each shadow-casting light using a dedicated Krakatoa Shadows Generator.
- The same Shadows Generator can be then used in other renderers like Scanline and VRay to generate shadows from particles on geometry objects and combine them with a secondary 3ds Max Shadows Generator to handle geometry to geometry shadow casting.
- Note that the Shadow Generator is currently not supported under mental ray.
- The following tutorial demonstrates the basic workflow to combine particle passes from Krakatoa with geometry passes from other renderers like Scanline or VRay using the Krakatoa Shadows Generator.
- It also provides link in the middle of the page to the now obsolete Light Projection Map workflow used in Krakatoa v1.5.1 and earlier.
Aladdin’s Lamp
The Scene
- Let’s start with a simple 3ds Max scene containing
- A Plane primitive as the ground plane
- A scaled and tapered Teapot primitive as the lamp
- Some more Teapots with different modifiers and settings as pottery scattered around the lamp
- A Particle Flow system was added to the scene.
- The Emitter was aligned to the spout of the teapot.
- The emitter was set to Circle and the Diameter to 1.0. Using Scale, it was adjusted to match the shape of the spout.
- The PFlow was set to emit 200,000 particles over 200 frames.
- An inverse Gravity force (buoyancy), a turbulent Wind and a Drag force were added to the PFlow via a Force Operator.
The result is a particle system that moves in an interesting way. These are the particles we will render in Krakatoa.
You can download the ZIP file with the initial source 3ds Max 9 scene from here.
Saving the Particles to Partitions
To speed up test renders, we will save 5 partitions with 200K particles each for a total of 1 million particles at the end of the shot.
- Set Krakatoa to override the particle color with white:
- Check >Override Color in the Global Render Values rollout,
- Make sure the Override Color swatch is set to white.
- Change the Particle Render Mode to Save Particles To File Sequence
- Right-click the SAVE PARTICLES button and select the animation range from 0 to 200.
- Enter a save path in the Save Particles To File Sequence field using the PRT file format.
- In the Particle Partitioning rollout, set the number of partitions to 5 and hit the Generate All Partitions Locally button.
- Wait for all partitions to be saved (takes about 10 minutes, YMMV depending on CPU and harddisk speed).
Loading the Particles
Now we can load the saved particles using a PRT Loader.
- Select the Particle Flow emitter and turn it off.
- Go to the 3ds Max Main Menu > Krakatoa menu, press and hold down SHIFT and select the item “Create a PRT Loader - Hold SHIFT to create at World Origin”.
- By default, the Select Particle File Sequences To Add file dialog will open at the last save location - select one file from the saved partitions and click Open. If the file dialog does not open due to different Preference settings, click the Add Files… button in the PRT Loader.
- You will be prompted about loading all 5 partitions - answer with Yes.
- The default viewport display settings only allow 1% of all particles to be drawn at once. Click on the “% of Render” button in the “Viewport” rollout of the PRT Loader and select 100.0 from the list to show them all.
If you move the time slider, you should see the particles in the viewport now.
Lighting the Particles
- To get a nice spooky atmosphere, we use a spot light with greenish color and Cast Shadows checked.
- The Shadow Map size is set to 1024 - this will be used by both Krakatoa to calculate the attenuation maps, and by the Scanline Renderer for the shadows casting of geometry onto geometry.
- A secondary fill light is hidden below the plane and is illuminating the scene using a blueish-violet color and a Multiplier of 0.5.
- It does not cast shadows from geometry, only from particles (Krakatoa always calculates shadows from particles because light attenuation is an integral part of the lighting and volumetric shading if particles)
- To demonstrate the shadow casting from objects onto particles, we place a large vase in the way of the spotlight.
- It will be casting shadows onto the particles as they come out of the lamp.
- To enable this, open the Matte Objects rollout, select the large vase at the right side of the lamp (called “LargeVase02”) and hit the Create/Update matte Selection Set - a new named selection set KrakatoaMatteObjects will be created and added to the list of Matte Named Selection Sets.
- We want the magic smoke coming out of the lamp to have relatively low density, but at the same time we would like to get good self-shadowing from particles onto particles.
- To achieve this, we will use different density values for the Lighting and the Final Pass.
- Check the >Use Lighting Pass Density Settings option
- Enter 5.0 / -2 in the Lighting Pass Density and 1.0 / -2 in the Final Pass Density controls.
Rendering the Particles and Shadow Maps
Applicable to Krakatoa v1.6.0 and higher
The camera will be static for the first 100 frames, watch the particles come out of the lamp, then it will move around the lamp over the next 100 frames.
- Switch the render mode to Render Scene Particles
- Right-click the QUICK RENDER button, select Render Output Filename and specify an image file name to render to, for example “Krakatoa_Genie_Lamp_Particles_.exr”
Before we render the scene, we will also have to set up our Lights to use the Krakatoa Shadow Generator introduced in Krakatoa v1.6.0.
- The Krakatoa Shadows Generator is found in the Shadows list of standard 3ds Max lights along with Shadow Maps, Advanced Raytraced shadows and so on.
- It is a composite Shadow Generator, as it hosts a second generator as a sub-type to provide shadows from geometry onto geometry when rendering outside of Krakatoa.
To enable the saving of Attenuation Maps,
- Check the >Save Attenuation Maps option in the Main Controls rollout.
- Click the Explore… button next to it to open the Krakatoa Shadows Explorer - it provides a quick interface for switching one or more lights to Krakatoa Shadows.
- In the Menu bar of the Krakatoa Shadows Explorer UI, click Selection>Select All
- In the Menu bar of the Krakatoa Shadows Explorer UI, click “Assign NEW Krakatoa Attenuation Map Save Path to Selected Lights”
Note that the Explorer will now show that both lights have a Krakatoa shadows generator with a Shadow Map sub-generator in it and the save path will be set based on the Render Output Filename specified previously in the Render Setup dialog. The names of the Attenuation Maps will be based on the names of the corresponding lights.
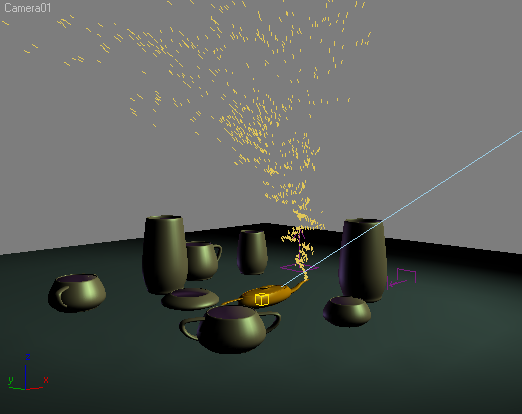
- Press the QUICK RENDER to render 201 frames to disk, including Attenuation Maps for all lights.
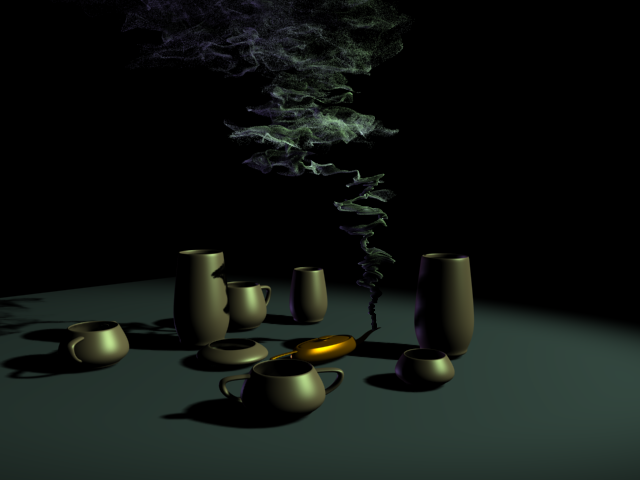
Frame 100 of the resulting image sequence will look like this:

Rendering the Geometry Pass
Now that we have the particle pass and the attenuation maps saved to disk, we can render a Geometry pass in the Scanline Renderer.
- Select “Default_Scanline_Renderer” from the drop-down list in the Switch Renderers group of controls.
- Press the Assign Renderer button next to the list - the renderer will be switched to Scanline.
- Open the Render Setup Dialog and check “Force 2-Sided”
- In the Render Output group of controls, press the Files… button and select a NEW file name to save to, for example “Krakatoa_Genie_Lamp_Scanline_.exr”
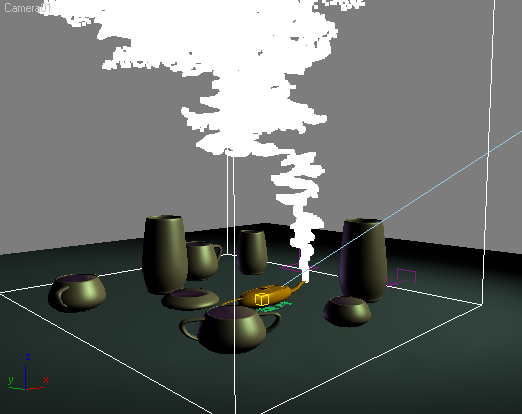
- Render the frame range from 0 to 200 as usual.
The resulting frames should show the shadows from the particles on the scene geometry:
Final Compositing
We now have the two passes - the Geometry rendered in Scanline and the Particles rendered in Krakatoa.
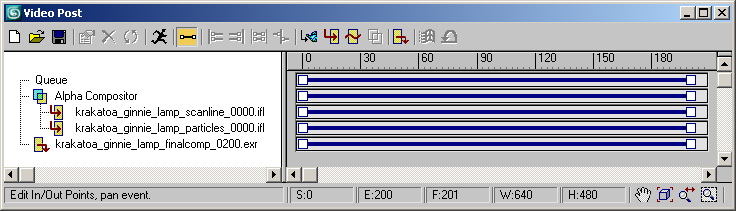
- Open Main Menu > Rendering > Video Post.
- Load the Geometry Sequence first - click the Add Image Input Event icon (arrow into rectangle), select the first frame of the Scanline rendering and make sure to check the “Sequence” checkbox in the Open File dialog to create an IFL from 0 to 200.
- Deselect the new entry in Video Post, then repeat the above operation, this time loading the Krakatoa rendering sequence.
- Select both entries and press the Add Image Layer Event icon (cyan and yellow intersecting rectangles). Select Alpha Compositor from the list and press OK.
- Deselect again and add an Image Output Event (arrow out of rectangle) and specify to file name and path to save to.
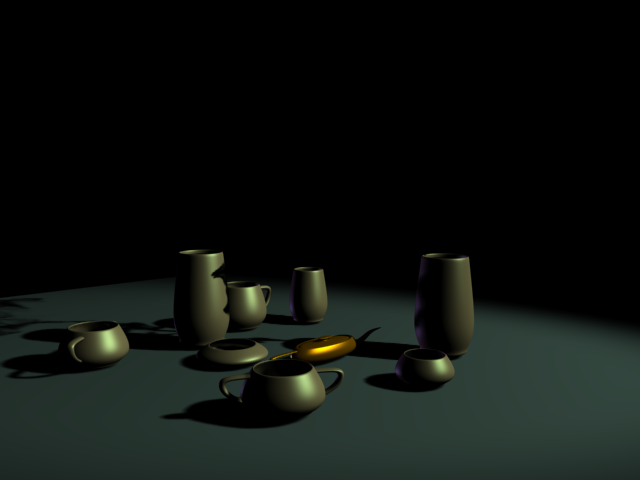
- Press the Execute Sequence icon (running man), make sure the Time Output > Range is set to 0 to 200 and press Render.
The resulting composite images should look like this:
Here is the final animation as Quicktime Movie