Saving Particles to File
Applicable to Krakatoa v1.5.0 and higher.
Some illustations might show older controls layout, but the same principles apply in Krakatoa MX 2.0.0 and higher.
- In the previous introductory tutorial, you have seen how Particle Flow caches the current frame in order to minimize repeated particle system calculations. This process can be taken a step farther, allowing you to store the entire animated sequence to disk files.
- Once the particles are saved to disk, you can turn off or even delete the particle system from your 3ds Max scene, and simply focus on settings specific to improving your rendering: cameras, lighting, density settings and matte objects.
- Loading frame 50 or even 100 from disk will happen in just seconds without any preroll because Krakatoa saves one file par frame and thus provides direct access to any frame while Particle Flow, which is a history-dependent system, has only sequential access to frames and has to calculate all previous frames first.
To save particles to disk:
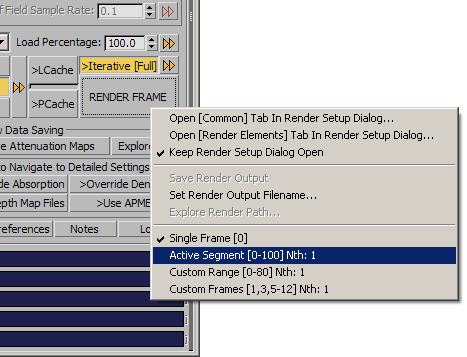
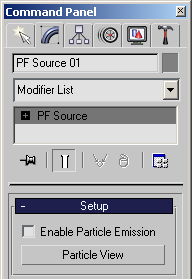
- In the Krakatoa GUI > Main Controls rollout, right-click the RENDER FRAME button and select the item “Active Segment [0-100] Nth:1”
- Alternatively, in the Render Scene dialog, you can choose the Common tab and set the Time Output to the desired frame range as with any 3ds Max renderer.
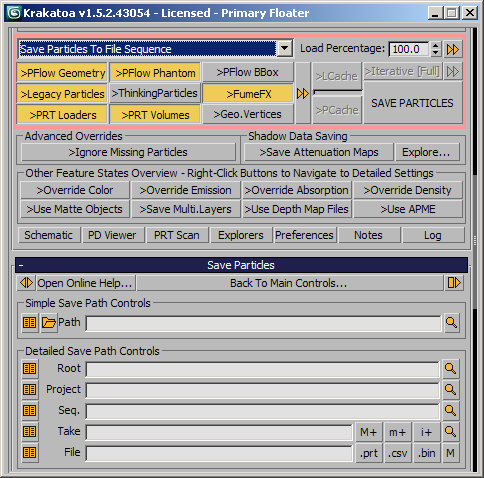
- Set Particle Render Mode drop-down list to “Save Particles To File Sequence” - the RENDER button will change its caption to SAVE PARTICLES and the Save Particles rollout with the file sequence fields will be expanded automatically. Note that the >Iterative [Full] option is now grayed out - it is ignored by the Save Particles To File Sequence mode!
Note:
Based on input from long-time users, it was determined that the most common mistake in the Krakatoa workflows is saving particles instead of rendering or vice-versa. To reduce the chances for an error, a red border line has been added around the Rendering controls in v1.5.0 to show the user that the system has been set to Save Particles To File Sequence mode.
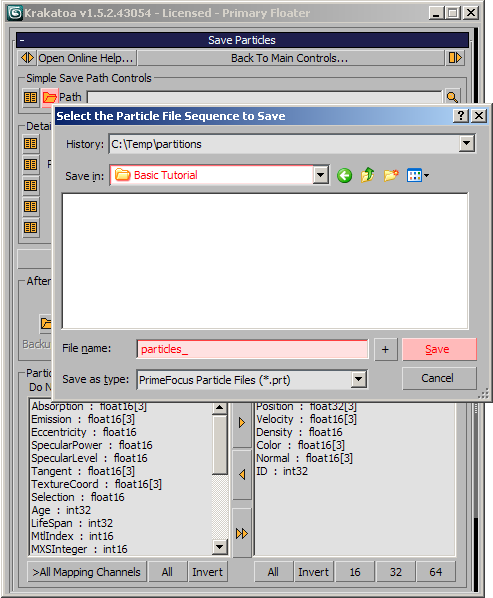
- In the Save Particles rollout, type a path and name for your file. More conveniently, you can click the folder icon and browse to a path for your file.
Optional Channels Customization
- The default settings of Krakatoa already specify most common channels to be saved to disk.
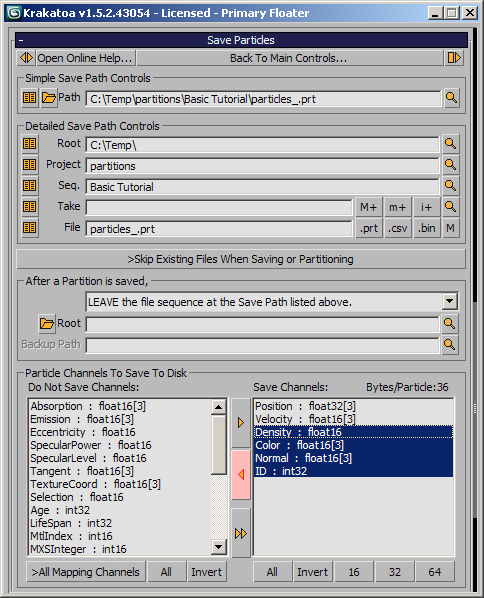
- Depending on what data you anticipate will be needed when loading the particles, you can add or remove channels from the Channels rollout - Particle Channels To Save To Disk group of controls.
- For example,
- Saving a color per particle where every particle is simply green does not make much sense and would expand the file size a lot - you already know that the color could be overridden at render time, but it could also be specified using the object color of the PRT Loader object, a Krakatoa Channels Modifier or Material assigned to the PRT Loader. Thus we won’t save the color for now.
- Same applies to Normals - we have not prepared any in the Particle Flow. Krakatoa would save the X axis of the particle transformation matrix as the normal, but unless we align the particles to some geometry, it makes no sense to store this channel.
- IDs are useful when intending to load particles back into Particle Flow, but for now we can skip this channel too.
- The Density of all particles will be assumed 1.0 unless specified by other means. This would be yet another redundant channel - if we don’t save the channel, Krakatoa will assume the value is 1.0 anyway.
- We can select all these channels by holding the Ctrl key and then press the <| left arrow to move them to the list of channels not to be saved to disk.
Saving The Particles
- Click the SAVE PARTICLES button to begin processing particles.
Upon completion, all particles will be cached to disk files. This example, containing 1,000,000 particles and 100 frames takes approximately 1.6 Gigabytes of disk storage space and about 5 minutes to save (these numbers can vary depending on your system performance and the channels specified for saving).
Once particles are cached to disk, you can render them without the memory or processing overhead of Particle Flow. Removing this overhead will also allow more particles to fit into memory. See the topic High Particle Counts for details on loading multiple particle files for rendering.
Reusing Particles Cached To Disk:
- Select the Particle Flow system and turn it off:
- In the 3ds Max Main Menu, open the Krakatoa menu, press and hold the SHIFT key and select “Create a PRT Loader - Hold SHIFT to create at World Origin”
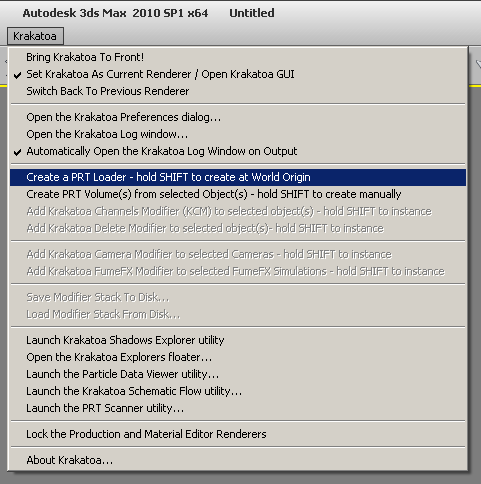
- A new Krakatoa PRT Loader object “PRT Loader01” will be created at the origin.
- By default, it will automatically pop up a file picker to select a particle file sequence to load.
- Since you have a valid saving path in the “Save Particles To File Sequence” fields, the PRT Loader will assume correctly you intend to load the particles you just saved and will display the content of the same directory automatically.
Note:
These automatic suggestions made by the PRT Loader can be customized using the Preferences rollout. The default BEGINNER settings provide the most convenient suggestions as the system is trying to anticipate your intentions.
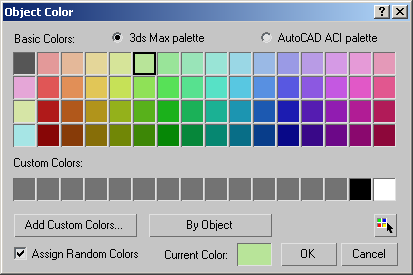
- Select any of the numbered particle files, for example, the one with number 0000, and press Open. The saved particles will appear in the viewport and will be displayed in the random object color of the PRT Loader (unless the Color channel was included in the PRT files in which case the saved particle colors will be used)
- You can change the object color of the PRT Loader to, say, light green using the regular 3ds Max Object Color dialog:
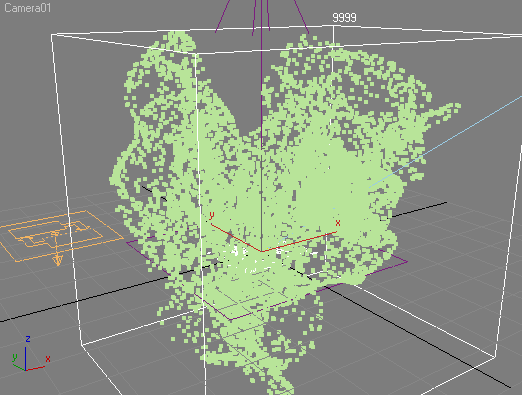
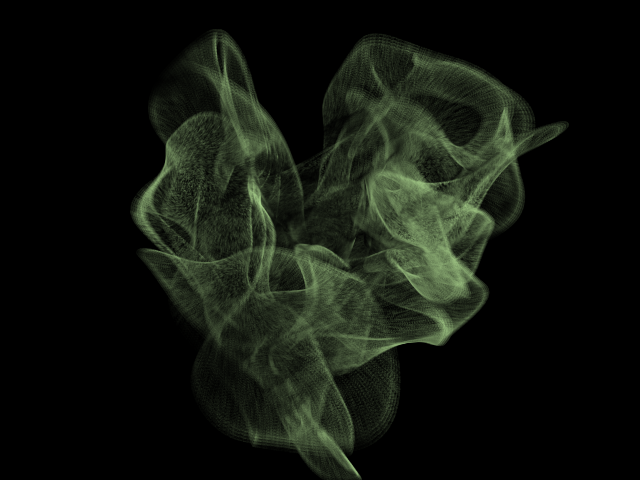
- Try moving the time slider - notice that the cached particles display in real time, loading by default only 1% of the saved particles (10,000 particles instead of a million).
- Here is frame 70 of the animation:
Advanced Tip:
The PRT Loader lets you pick any of the files in the sequence because the option “Load Single Frame” allows you to show the exact numbered frame you picked on every scene frame. This means that it is technically possible to load multiple frames of the same sequence and render them as a static cloud of time-offset particles.
Rendering the PRT Loader
- Switch the Particle Render Mode drop-down list back to Render Scene Particles.

Note that both >PFlow Geometry and >PRT Loaders are checked by default in the group of controls left of the RENDER button along with some other source types, so you can render immediately without changing any settings there.
- Drag the time slider to frame 50 and click RENDER FRAME.
- Compare your results to the tests from the previous tutorial.
- Even though Particle Flow has been disabled, Krakatoa renders exactly the same result from the disk-based particle files except for the color that we customized via the Object Color dialog.
Note:
Had we left the Color channel on the list of Channels To Save before dumping the Particle Flow particles to disk, the particles would have saved their color and would have rendered in exactly the same color as the Particle Flow.

- Move the time slider to frame 100 and click RENDER FRAME.
- Note that the last frame of the animation will render in about the same time as frame 50 or even frame 0 - Krakatoa loads the corresponding frame immediately from disk without any preroll. Typical render time should be around 2 seconds (this value may vary depending on your system performance).
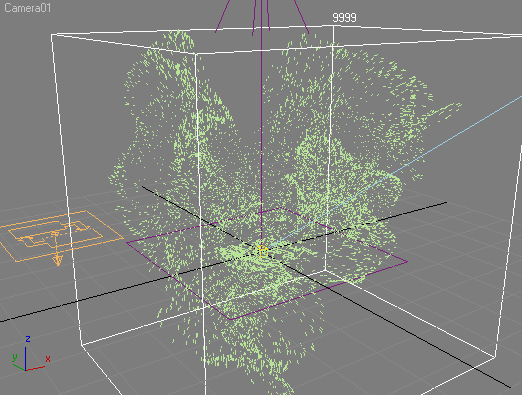
Visualizing Velocities
We have saved out the Particle Flow particles to disk as a cache representing the positions and velocities of the particles of the original system.
- The PRT Loader lets you see the positions of the particles but how about the Velocities?
- Select the PRT Loader and look in the Viewport Rollout - the drop-down list showing Display As Large Dots by default also includes the option Display Velocities which draws lines instead of points.
- This is similar to the Lines Display Mode of Particle Flow, but it performs approx. 30 times faster according to internal benchmarks.
- Now you can see how fast the particles are moving, where the one end of the line represents the current position and the other the next frame’s position according to the Velocity vector.
Note:
When the velocity is zero, the lines will have zero length and the particles will become practically invisible. Particle Flow falls back to small points drawing in this case, but Krakatoa tries to avoid costly per-particle condition checks and simply continues drawing zero-length lines. To see static particles with zero velocities, just switch back to Points Drawing.
Retiming Particle Animation
So far, our PRT Loader represents exactly the positions and velocities of the original Particle Flow. But one of the more powerful abilities of the PRT Loader is the retiming of the particle animation based on the data stored in the Position and Velocity channels.
- Let’s make the particle system play backwards!
- To do this, we have to enable the Graph [a] option in the PRT Loader’s Timing group of controls - you will notice that the particles previously shown as lines to represent the velocities will disappear from the viewport! This is because the Graph spinner is still not animated and is thus forcing all particles to play back frame 0 on every frame. Obviously, the particles are not moving in time now and as result the Velocities are scaled down to 0!
- You can switch the display to Display As Large Points again to see that the particles are still there, just not moving when you move the Time Slider. The Teapot of particles appears in the viewport and does not change.
- To the right of the Graph and Frame Offset spinners you will see a [>>] button. Press it and select Create LINEAR Playback Keys. If you would move the time slider now, the animation will play back just like before, but this time it is not driven by the changes of the scene time but by the keyframes set in the Graph spinner - two linear keys with value 0 on frame 0 and value of 100 on frame 100 have been created!
- Press the [>>] button once again and select INVERT Existing Animation. This will simply reverse all keys in the Playback Graph controller, resulting in a key with value of 100 on frame 0 and a key with value of 0 on frame 100. If you move the time slider, you will see the animation playing backwards!
- We can apply some other preset animation styles - for example selecting Create PING-PONG Playback Keys from the menu will set three keys (while replacing the existing ones) - first with value of 0 on frame 0, second with value of 100 on frame 50 and third on frame 100 with a value of 0. Playing back the animation will show the teapot exploding up to frame 50, then recombining into a teapot again on frame 100. If you enable Display Velocities in the PRT Loader, you will also notice that the lines around frame 45 represent faster Velocities - this is because the explosion plays back in half the time, requiring the particles to move twice as fast!
Of course, you can set ANY keys in the Graph spinner manually using the 3ds Max Animation and TrackView tools.
This is a very powerful feature of Krakatoa that can let you tweak the animation of particles after they have been cached to disk!
Using Velocities When Rendering
The Velocity information stored in the cached particle files is useful not only for the retiming we saw above, but mainly for generating Motion Blur when rendering the particles.
Krakatoa provides a built-in Motion Blur mode which calculates the illumination of particles just once, then draws multiple passes and combines them into a single final image.
- Check >Enable Motion Blur in the Krakatoa GUI > Main Controls rollout.
- Set the number of Particle Segments to 4, leave the Shutter Degrees at 180.0 (corresponding to Duration of 0.5 in 3ds Max terms)
- With the Graph mode still set to PING-PONG keys in the PRT Loader, move the time slider to frame 32 and render. The render time will increase proportionally to the particle segements count (minus the time to calculate the lighting which is processed just once). If the non-motion blurred image took 2 seconds to render, it would take around 7 seconds with 4 passes motion blur. This is equivalent to lighting 1 million particles but drawing 4 million on screen.

- Now let’s increase the Shutter to 360 degrees (1.0 frame Duration in 3ds Max terms) - click the [>>] presets button next to the Shutter spinner and select 360 from the list.
- If you render now, some obvious banding will appear since the distance between the particle passes is bigger than a pixel now:
- One way to counteract this banding without increasing the render time is to enable the >Jittered Motion Blur option - the particles will be jittered randomly along the velocity vector to produce a more noisy and less uniform picture:

You can also increase the number of Particle Segments to 8, but this will nearly double the render time:

Rendering The Saved Sequence To Image Sequence
You can adjust your lighting, camera placement and particle density settings to further refine your render quality.
- When satisfied with your image quality, you can begin rendering the final sequence.
- Uncheck the >Iterative [Full] option to enable the rendering of the whole animation segment.
- Right-click the RENDER button and make sure the frame range is still set to “Active Segment [0-100] Nth:1”.
- In the same right-click menu, select “Set Render Output Filename” and enter the filename and output file format settings.
- Note that the option “Save Render Output” will be checked automatically by Krakatoa if you selected a valid output path.
- Click the RENDER button to begin rendering all particles to final image files.
- When the sequence is complete, load the rendered image sequence into the RAM Player and enjoy the animation.
Summary
Using this relatively simple example, we have stepped through the fundamental features of Krakatoa. At only a million particles, you can begin to see the advantages of Krakatoa, but you will want to push quantities even higher.
See the tutorials entitled High Particle Counts and Using Krakatoa with Deadline for additional techniques for pushing Krakatoa to the next level. There are additional settings to refine your image quality and alter the results of your rendering. For detailed instructions on Krakatoa features, see the Feature Reference topics.
In the next exercise, we will look at the use of Matte Objects to occlude particles and help integrate the particle rendering with other rendered elements.