Surface Points Object
Overview
The Surface Points object can be used to generate synthetic point clouds from scene geometry by distributing points on the surface of one or more meshes.
The resulting point cloud will acquire relevant data like face Normals, Colors and UV coordinates from the source mesh.
Surface Points Rollout
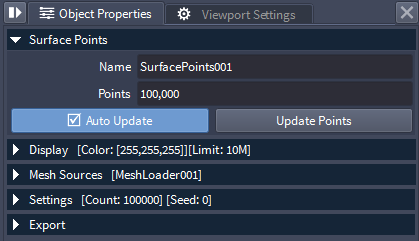
The Surface Points Rollout contains the general object controls including name, point count, and auto/manual updating.
Name Field
The Name field shows the name of the selected object.
The name is generated automatically in the form SurfacePointsNNN, where NNN is an integer padded to 3 digits, starting and 1 and incremented with each new Surface Points creation.
The name can be edited by the user to better describe the purpose/function of the object.
Points Field
The Points field shows the number of points created by the object.
The field is Read-only - you can select and copy the value, but cannot change it.
Auto Update Checkbutton
When unchecked, the re-generation of the point data can be triggered only manually by pressing the [Update Points] button (see below).
When checked (default), the point data will be recreated automatically after every change to the object’s properties, as long as the [Use Auto Update] global option in the Task Manager is also checked.
If a previous update task is already queued in the Task Manager, it will be replaced by the new task.
By default, the update will start 1 second (1000 ms) after the last change. This value can be modified using Options > Configuration > Auto Update Delay (milliseconds)
Update Points Button
Pressing this button will force the re-creation of the points using the current settings.
When pressed, a new Task will be added to the Task Manager and the loading will be performed asynchronously in the background without blocking the UI and Viewports.
Note that selecting the onject and pressing F5 or picking the Main Menu > Display > Update Selected Object menu item will have a similar effect, but will also update any dependent objects (for example Meshers or Mesh Loaders) in addition to rebuilding the points.
Display Rollout
The Display Rollout contains the controls over the viewport display of the points.
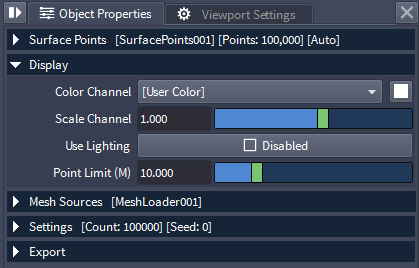
Color Channel Dropdown List
The Color Channels list defines the data source to be used to draw the points in the Viewport.
The Color Channel list contains the point data channels found in the file, plus a [User Color] entry which enables the override color swatch to the right.
When the point data contains a valid Color channel, the list will default to it.
The list typically contains one of the following color sources:
[User Color] - overrides the color of all points with the User Color value defined by the swatch next to the list
Color - uses the Color channel (will exist if the source mesh contained a vertex Color channel).
Position - the Position channel defining the 3D positions of the point samples in object space.
Normal - available in a Surface Points object with a valid mesh source, sampled from the face normals of the source mesh.
Note that switching to any of the optional Channels like Position or Normal requires the rebuilding of the data by pressing the [Update Points] button for the change to take effect.
Switching to [User Color] override does not require a rebuilding of the point data.
User Color Swatch
Defaults to White.
Defines a single override color to be assigned to all points when displaying in the Viewports.
Clicking on the swatch to open the Color Picker will also automatically switch the Color Channel list to [User Color] for the change to take immediate effect.
Scale Channel Slider
Scales the Color Channel values.
Defaults to 1.0.
Use Lighting Checkbutton
Only enabled when a Normal channel is found in the point data.
When disabled, it will list the reason (Missing Normal Channel) in its caption.
When enabled, it can be checked to allow the shading of the points using the scene lights (if enabled for the Viewport via the Viewport Lighting And Shading toolbar).
When unchecked, no lighting will be performed.
Mesh Sources Rollout
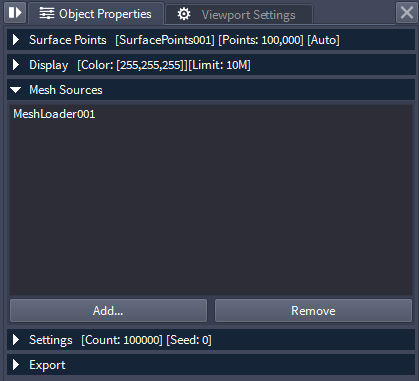
Lists the mesh source objects.
Double-click an entry from the list to change the selection to the respective object.
Add Button
Press to open the Object Picker Dialog listing all valid Mesh sources in the current document.
Highlight one or more sources and press [OK] to add them as inputs.
Objects that are already added to the Mesh Sources List will not appear in the Object Picker Dialog.
Alternatively, press [Cancel] to dismiss the dialog without adding.
Remove Button
Highlight one or more entries on the list and press the [Remove] button to disconnect the selected inputs.
Settings Rollout

Distribution Dropdown List
Controls the distribution method.
Possible values are:
By Count - the total number of surface point samples will be specified via a dedicated Count slider (see below).
By Spacing - the Spacing between the surface point samples will be specified via a dedicated Spacing slider (see below).
Count Slider
Only visible when the Distribution dropdown list is set to By Count.
Default is 100,000.
The slider range is from 1 to 1,000,000, but higher values can be entered via the value field.
Spacing Slider
Only visible when the Distribution dropdown list is set to By Spacing.
Default is 1.0.
The slider range is from 0.001 to 10.0, but higher and lower positive values can be entered via the value field.
Seed Slider
Defines the random seed for the point distribution.
The same seed value will produce the same random pattern from a specific mesh.
Default is 0.
The slider range is from 0 to 1024, but lower and higher values outside of the range can be entered by typing into the value field.
Export Rollout
The Export rollout lets you export the Surface Point data to a supported file format on disk.
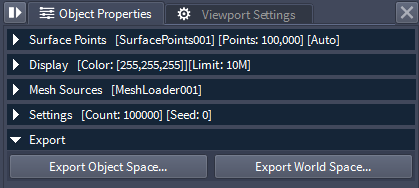
Export Object Space… Button
Pressing this button opens an “Export Point File” file save dialog.
Specify a file name and format and press the [Save] button to export, or [Cancel] to abort.
The data will be saved in object space, ignoring any world space transformations.
Export World Space… Button
Pressing this button opens an “Export Point File” file save dialog.
Specify a file name and format and press the [Save] button to export, or [Cancel] to abort.
The data will be saved in world space, taking into account world space transformations.