Worker
Overview
The Worker is the application that controls the rendering applications and should be running on any machine you want to to include in the rendering process.
Running the Worker
To start the Worker:
On Windows, you can start the Worker from the Start Menu under Thinkbox\Deadline, or from the Launcher’s right-click menu.
On Linux, you can start the Worker from a terminal window by running the deadlineworker script in the bin folder, or from the Launcher’s right-click menu.
On macOS, you can start the Worker from Finder by running the deadlineworker application in Applications/Thinkbox/Deadline, or from the Launcher’s right-click menu.
You can also configure the Worker to launch automatically when the Launcher starts up. To enable this, just enable the Launch Worker At Startup option in the Launcher menu.
The Worker can also be started from a command prompt or terminal window. For more information, see the Worker Command Line documentation.
Licensing (DEPRECATED)
Note
Starting with Deadline 10.1.23, Deadline and its components do not require a license. This section is left for operators of older versions of Deadline. Please see the Thinkbox Floating License Portal documentation if you require Deadline licenses.
The Worker requires a license to run, and more information on setting up licensing can be found in the Licensing Guide.
The Worker only requires a license while rendering. If a Worker cannot get a license, it will continue to run, but it won’t be able to pick up jobs for rendering. In addition when a Worker becomes idle it will return it’s license. The Worker’s licensing information can be found under the Worker Information tab (see next section).
If you have more then one Worker running on a machine they will all share the same licence.
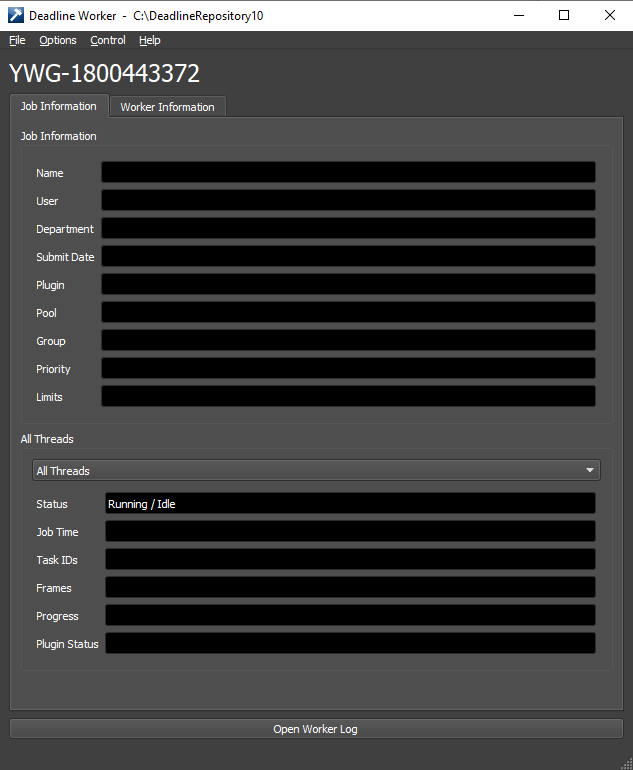
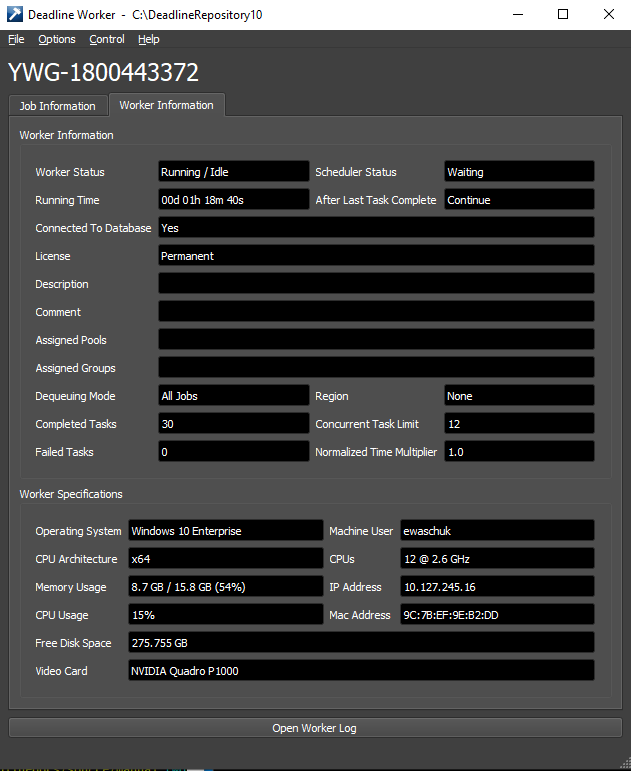
Job and Worker Information Tabs
The Job Information tab shows information about the job currently being rendered. By default, the tab will show information about all render threads combined, but the drop down control gives the option to show information about a specific render thread. The Worker Information tab shows information about the Worker and the machine that it’s running on, including license information and resource usage (CPU and memory).
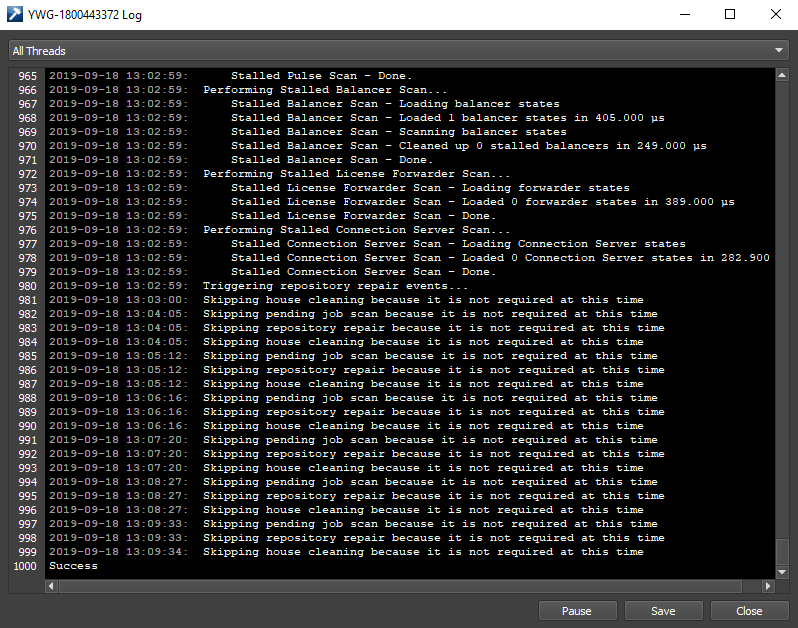
Viewing the Worker Log
To view the Worker’s current log, simply press the Open Worker Log button at the bottom of the Worker window. This will open the Worker’s log in a new window to avoid impacting the performance of the main Worker application.
If the Worker is running in the background or without an interface, you can connect to the Worker’s log from the command line. In a command prompt or terminal window, navigate to the Deadline bin folder (Windows or Linux) or the Resources folder (macOS) and run the following, where “WORKERNAME” is the name of the Worker you want to connect to:
deadlinecommand -ConnectToSlaveLog "WORKERNAME"
Command Line Options
To run the Worker from a command prompt or terminal window, navigate to the Deadline bin folder (Windows or Linux) or the Resources folder (macOS) and run the ‘deadlineworker’ application. To view all available command line arguments, you can run the following:
deadlineworker -help
Available Options
To start a new instance of the Worker, use the -name option. If you already have multiple instances of the Worker configured, use the -name option to start a specific instance:
deadlineworker -name "second-worker"
To start the Worker without a user interface, use the -nogui option:
deadlineworker -nogui
To start the Worker without the splash screen, use the -nosplash option:
deadlineworker -nosplash
To shut down the Worker if it’s already running, use the -shutdown option. This can be combined with the -name option if you have more than one Worker instance running and you want to shut down a specific instance:
deadlineworker -shutdown
deadlineworker -shutdown -name "second-worker"
To control what a running Worker should do after it finishes rendering its current task, use the -aftertask option. The available options are Continue, StopSlave or RestartSlave. This can be combined with the -name option if you have more than one Worker instance running and you want to control a specific instance:
deadlineworker -aftertask RestartSlave
deadlineworker -aftertask RestartSlave -name "second-worker"
Worker Local Data Storage
Note
The default location for job and plugin data has been moved as of Deadline 10.1.11. The default location used to be the same as the location of the **Per-User** deadline.ini Config File
When a Worker starts a job, it temporarily creates a local copy of the job’s “plugins” and “jobsData” folders, which are purged before starting the next job. Here are the default local job and plugin folder path locations for your Worker(s):
Windows: %PROGRAMDATA%\Thinkbox\Deadline[VERSION]\workers\[WORKERNAME]
Linux: /var/lib/Thinkbox/Deadline[VERSION]/slave/[WORKERNAME]
macOS: /Users/Shared/Thinkbox/Deadline[VERSION]/workers/[WORKERNAME]
Note that the [VERSION] in the path will change based on the Deadline version number, and [WORKERNAME] represents the Worker’s name (to support multiple Workers on the same machine).
This setting can be configured using the Auto Configuration Local Data Path option or via Client Configuration “SlaveDataRoot” INI setting.
Note that this should be a local path to avoid conflicts and maintain performance. As of Deadline 10.1.11, it must be accessible by all Deadline Users if the Render Jobs As User feature is enabled.
Local Data Storage with “Rendering Jobs As User” Feature
Note
These steps are deprecated as of Deadline 10.1.11. Follow the steps in Worker Local Data Storage <worker_local_data_storage_ref_label> to update the location where job and plugin data will be stored.
If you wish to relocate your local data storage (including each job’s plugins/jobsData folders and temporary job submission data via Monitor/DeadlineCommand) in combination with the Worker “Jobs Run-as User” feature Rendering Jobs As User; then the following configuration should be followed instead of relying purely on the Use ‘/tmp’ for Worker Data (Linux) setting in Worker Configuration. In the example below, you wish to redirect local data storage to a directory called: deadline under the generic /tmp location on your Linux machines:
Ensure
deadline.iniby default located here:/var/lib/Thinkbox/Deadline[VERSION]/deadline.inihas this property:SlaveDataRoot=set to nothing.Ensure Auto Configuration is not being used to set the above “Local Data Path”
SlaveDataRootvalue via Pulse.Ensure the directory path of your preferred root local ‘data’ path exists and has the correct read-write permissions for all users. In an ideal situation, the root ‘data’ folder
/tmp/deadlinein the example below is writable by everyone that will be impersonated. When the Deadline sandbox runs as a job user, it should create its own sub-folders, which should respect the currentumaskfor file/folder creation on the system. This sub-folder will also be owned by that particular Deadline job user, so they don’t need to rely on wider permissions:$ sudo mkdir -p /tmp/deadline
Based on the same approach as the Centrally Managed Linux
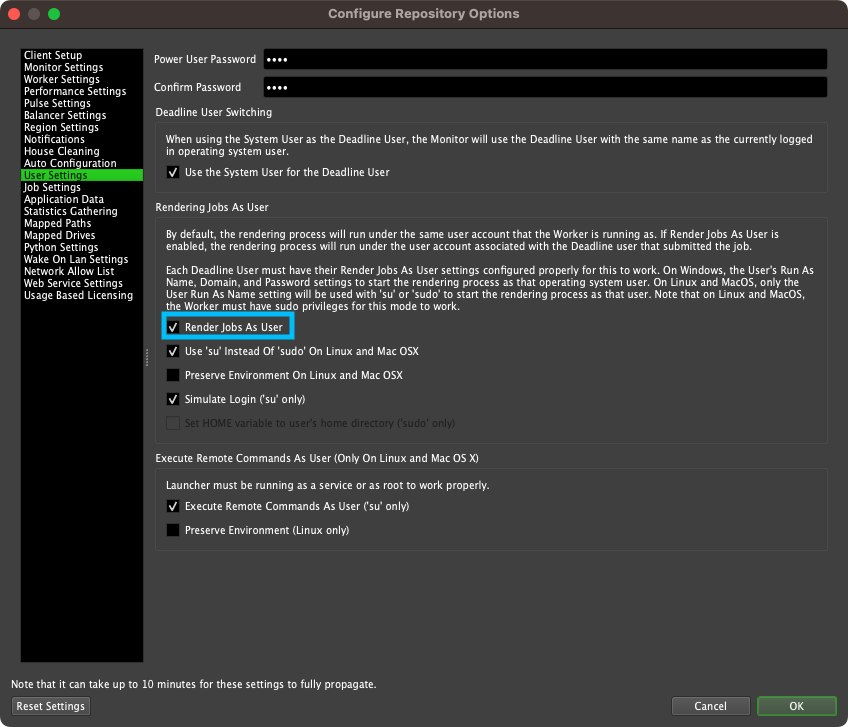
.configinstructions; create adeadline.configfile in the “../bin” directory of your Deadline client software (/opt/Thinkbox/Deadline[VERSION]/bin), which declares this environment variable:export DEADLINE_LOCAL_USER_PATH="/tmp/deadline/${USER}"
Ensure “Render Jobs As User” in Repo Options are as per the below image.
Configuring Network Compression Feature in Worker
The network compression feature compresses RCS messages increasing performance and reducing network bandwidth. This feature is on by default. To disable this feature:
Open
deadline.ini. On Linux, this file is typically:/var/lib/Thinkbox/Deadline[VERSION]/deadline.ini.Add the property:
NetworkCompressionEnabledClient=Falseand then save the file.Restart the Deadline Worker.
By default, network compression is done using the Brotli compression algorithm. This algorithm provides good overall performance. To switch to the alternate GZip compression algorithm:
Open
deadline.ini. On Linux, this file is typically:/var/lib/Thinkbox/Deadline[VERSION]/deadline.ini.Add the property:
NetworkCompressionProvider=gzipand then save the file.Restart the Deadline Worker.
FAQ
Can I run the Worker on an artist’s workstation?
Yes. On Windows and Linux, you can set the Affinity in the Worker Settings to help reduce the impact that the renders have on the artist’s workstation.
Can I run the Worker as a service or daemon?
Yes. If you’re running the Launcher as a service or daemon, then it will run the Worker in the background as well. See the Client Installation documentation for more information.
The Worker keeps reporting errors for the same job instead of moving on to a different job. What can I do?
You can enable Bad Worker Detection in the Repository Configuration to have a Worker mark itself as bad for a job when it reports consecutive errors on it.
What does it mean when a Worker is stalled, and is this a bad thing?
Workers become stalled when they don’t update their status for a long period of time, and is often an indication that the Worker has crashed. A stalled Worker isn’t necessarily a bad thing, because it’s possible the Worker just wasn’t shutdown properly (it was killed from the Task Manager, for example). In either case, it’s a good idea to check the Worker machine and restart the Worker application if necessary.
On Linux, the Worker is reporting that the operating system is simply ‘Linux’, instead of showing the actual Linux distribution.
In order for the Worker to report the Linux distribution properly, you need to have lsb installed, and lsb_release needs to be in the path. You can use any package management application to install lsb.
On Linux, the Worker crashes shortly after starting up.
Please ensure you comply with our System Requirements for Linux.
The Worker says that it is untagged, what does that mean?
Workers on EC2 will attempt to tag the EC2 instance that they are running on with the Deadline version that it is running. See AWS Worker Tagging for more information.
