Client Installation (Advanced)
Overview
Before proceeding with this installation, it is highly recommended to read through the Render Farm Considerations documentation, including the AWS Thinkbox Deadline Shared Responsibility Model. It outlines what AWS Thinkbox is responsible for and what customers are responsible for, and should be considered before installing and using Deadline.
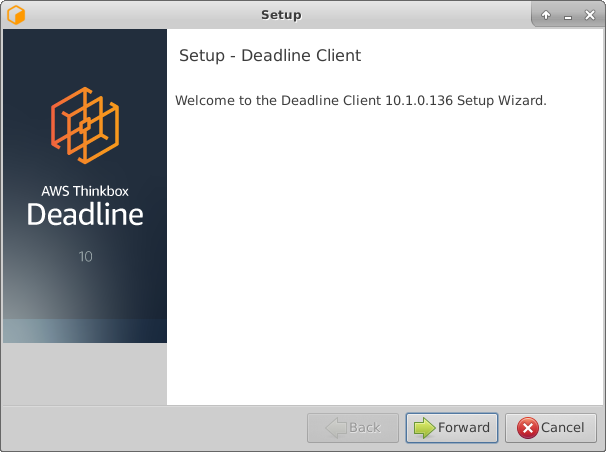
This guide will walk you through the installation of the Client. At this point, you should already have the Database and Repository installed. If you do not, please see the Database and Repository Installation (Advanced) documentation for installation instructions.
The Client consists of the following applications:
Launcher: Acts as a launch point for the Deadline applications on workstations, and facilitates remote communication on render nodes.
Monitor: An all-in-one application that artists can use to monitor their jobs and administrators can use to monitor the farm.
Worker: Controls the rendering applications on the render nodes.
Command: A command line tool that can submit jobs to the farm and query for information about the farm.
Pulse: An optional mini server application that performs maintenance operations on the farm, and manages more advanced features like Auto Configuration, Power Management, Worker Throttling, and Statistics Gathering. If you choose to run Pulse, it only needs to be running on one machine.
Web Service: An optional application that handles HTTP requests for information about the farm.
Remote Connection Server: An optional application that handles HTTP or HTTPS connections to a remote repository for use by Deadline applications.
License Forwarder: An optional application that acts as a license server for third party applications when using Third Party Usage-Based Licensing.
Note
Starting with Deadline 10.1.23, Deadline and its components do not require a license. For older versions note that the Workers are the only Client applications that require a license.
Note
It is recommended to run your operating system LANGUAGE as “ENGLISH” to ensure all the application plugin StdoutHandler/PopupHandler/Ignorer’s work correctly.
Pre Client Install Steps
Before installing the Client software, you must mount the Deadline Repository directory setup in the previous section:
Linux
NFS Server
You will need to install nfs-common on the node. On Ubuntu use:
>>> sudo apt-get install nfs-common
If you are using CentOS/RHEL use:
>>> sudo yum install nfs-utils
Note if you are unable to find the above package try updating apt-get and retrying.
>>> sudo apt-get update
As you want the directory to auto mount, as you do not want to worry about it every time the machine is restarted, we will create an entry in /etc/fstab. To do this, first we must create the folder to be mounted to:
>>> sudo mkdir /mnt/DeadlineRepository<VERSION>
Above we are creating a folder in /mnt, this is where we are going to mount the NFS server DeadlineRepository<VERSION> share. Now create the entry in /etc/fstab.
>>> sudo nano /etc/fstab
On the last line of fstab, enter the below line:
<Fully qualified server name or IP>:/opt/Thinkbox/DeadlineRepository<VERSION> /mnt/DeadlineRepository<VERSION> nfs rw,hard,intr 0 0
When the machine is rebooted, it will look to fstab for what drives to mount. If you want to mount drives listed in fstab outside a reboot, enter:
>>> sudo mount -a
To confirm the drive mounted correctly do a ls on the newly mounted directory, to verify it matches what is listed on the NFS server.
>>> ls /mnt/DeadlineRepository<VERSION>
Note: if you enter the above mount command and it just sits there, without error or success; try going onto your NFS server to restart the service, and try again.
>>> sudo /etc/init.d/nfs-kernel-server restart
Note
<VERSION> is the Deadline major version, such as: 10.
Installing The Clients
The Client should be installed on your render nodes, workstations, and any other machines you wish to participate in submitting, rendering, or monitoring jobs.
Note
Starting with Deadline 10.1.23, Deadline and its components do not require a license. For older versions, the Workers are the only Client applications that require a license. Before you can configure the license for the Client, the license server must be running. See the Licensing documentation for more information.
If you choose to run Pulse, you need to install the Client on the chosen machine. Note that if you wish to run it on the same machine as the Database and/or Repository, you still have to install the Client on that machine.
There are Client installers for Windows, Linux, and macOS. To install the Client, simply run the appropriate installer for your operating system and follow the steps.
Windows
Start the installation process by double-clicking on the Windows Client Installer. The Windows Client installer also supports silent installations with additional options.

Choose an installation location and press Next to continue.
To increase security, by default files and directories under the client installation directory cannot be modified by anyone but root/administrators. However, auto-upgrade will fail if a non-root/administrators user is used to run Launcher. To resolve that, you can either set the proper permission to the user you intend to run Launcher or check this box to bypass the security limitation at your own risk. It is recommended you set up a dedicated user with the proper file permissions to run Deadline Launcher.
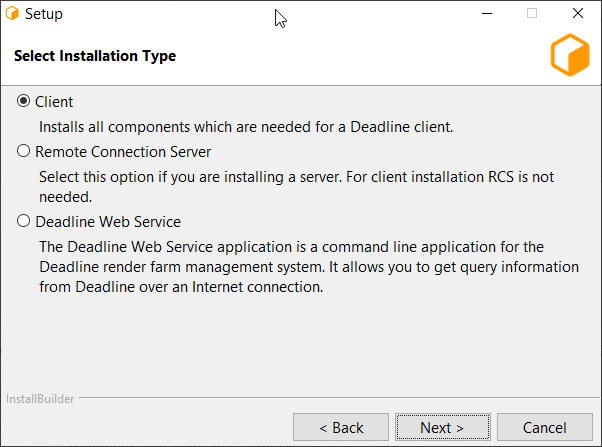
- You will be presented with a component selection screen. Typically, only the ‘General Client Files’ (mandatory) component is needed. Optional components are not part of the basic setup and are covered in their own sections:
Once you have selected any optional components you may wish to install, proceed to the next screen.
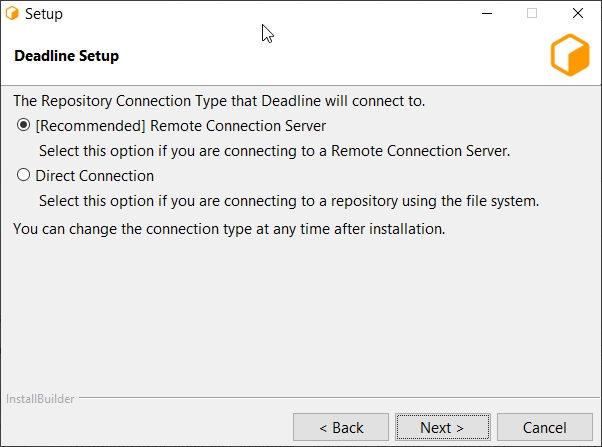
Choose a Connection Type (Direct or Remote).
Remote Connection is our recommended connection type as it includes more features and provides better separation between Deadline Database and Repository and Client machines.
The following settings are available for a Remote Connection:
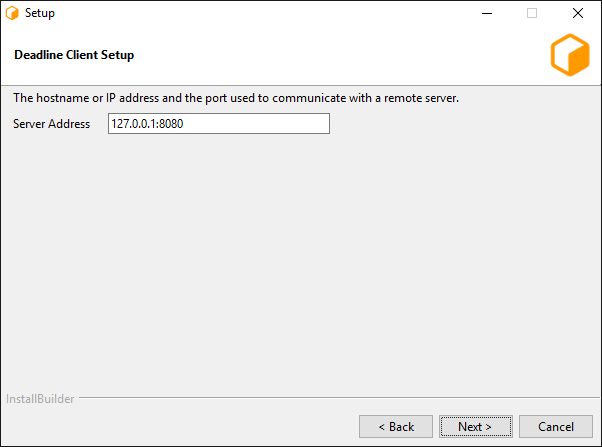
Server Address: This is the address (IP/Hostname and Port) of the Remote Connection Server.
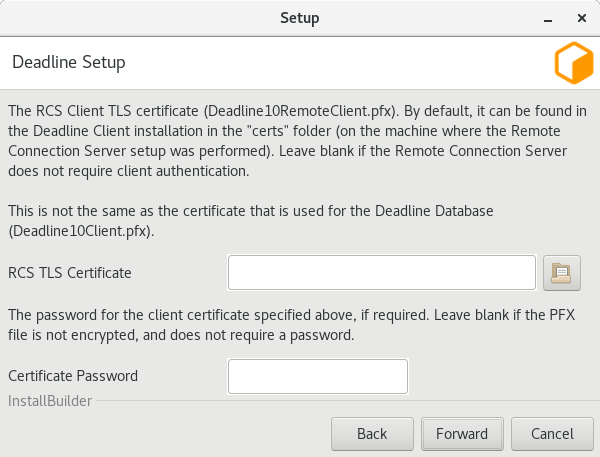
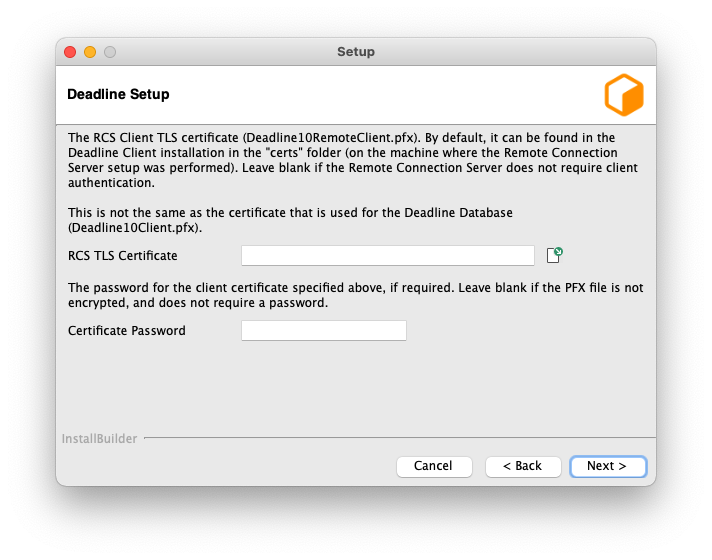
Client Certificate: This is the path to the SSL certificate required to connect to the Connection Server machine. If the Connection Server does not use authentication then this field must be left blank.

The following Launcher settings are available:
Launch Worker When Launcher Starts: If enabled, the Worker will launch whenever the Launcher starts.
Install Launcher As A Service: Enable this if you wish to install the Launcher as a service. The service must run under an account that has network access. In order for auto-upgrade to work, the account also needs the sufficient write permissions to access the Deadline client binary folder(
<Installation Directory>\bin). See the Windows Service documentation below for more information.
After configuring the Client and Launcher settings, press Next to continue with the installation.
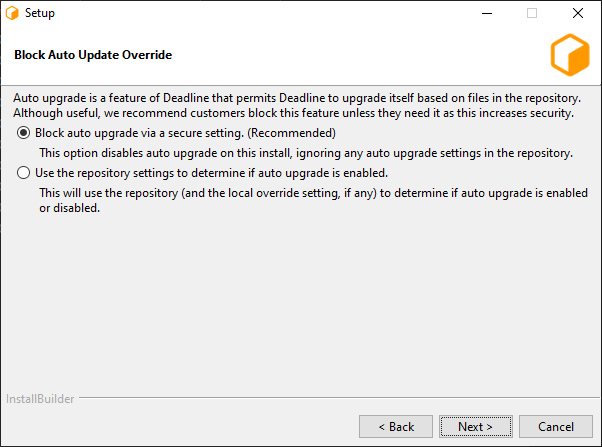
From 10.1.16, it is recommended to block auto-upgrade on Deadline client machines to improve the security. When it is blocked, AutoUpdateOverride setting will be ignored. No auto-upgrade will be performed on this machine even if auto-upgrade is enabled via Monitor Repository Options.
Linux
Before you start, it is highly recommended to go through Validation of Linux Installers.
Note that on Linux, the Deadline applications have dependencies on some libraries that are installed with the lsb (Linux Standard Base) package. To ensure you have all the dependencies you need, we recommend installing the full lsb package. Note, CentOS 7 by default, no longer has the LSB package installed, so this must be installed. In addition, the libX11 and libXext must be installed on Linux for the Deadline applications to run on your user-based WORKSTATIONS, even if running them with the -nogui flag. They’re required for the Idle Detection feature to work on your WORKSTATIONS. This means, that X11 is NOT required on your headless RENDERNODES. To check if libX11 and libXext are installed, open a Terminal and run the following commands. If they are installed, then the path to the libraries will be printed out by these commands.
>>> ldconfig -p | grep libX11
>>> ldconfig -p | grep libXext
Addtionally, libQtCommercialCharts requires OpenGL on your workstations. Normally this is shipped with your graphics card drivers, but a software-only solution called Mesa exists if users wish to use Deadline without a graphics card.
>>> ldconfig -p | grep libMesaGL1 (libgl1-mesa-glx on Debian)
If any of these libraries are missing, then please contact your local system administrator to resolve this issue. Here is an example assuming you have root access, using YUM (RedHat/CentOS) to install them on your system:
>>> sudo -s

# WORKSTATIONS
>>> yum install redhat-lsb libX11 libXext
# old version
>>> yum install libMesaGL1
# new version
>>> yum install mesa-libGL mesa-libGLU

# RENDERNODES
>>> yum install redhat-lsb
On Amazon Linux 2 (AL2):
>>> sudo -s

# WORKSTATIONS / RENDERNODES
>>> yum install lsb
On Ubuntu:
>>> sudo -s

# WORKSTATIONS
>>> apt-get install lsb libx11-6 libxext-6 libgl1-mesa-6

# RENDERNODES
>>> apt-get install lsb
Start the installation process by double-clicking on the Linux Client Installer. The Linux Client installer also supports silent installations with additional options.
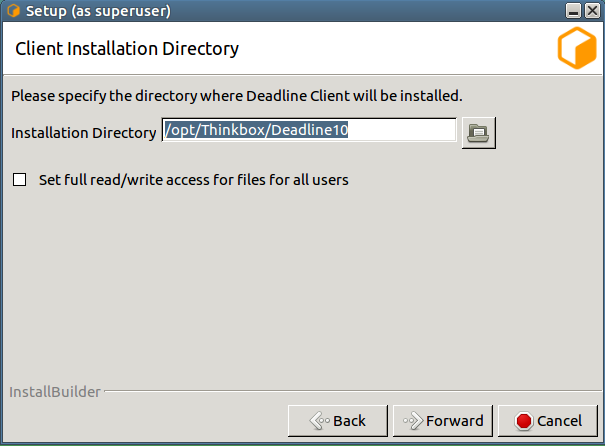
Choose an installation location and press Next to continue.
To increase security, by default files and directories under the client installation directory cannot be modified by anyone but root/administrators. However, auto-upgrade will fail if a non-root/administrators user is used to run Launcher. To resolve that, you can either set the proper permission to the user you intend to run Launcher or check this box to bypass the security limitation at your own risk. It is recommended you set up a dedicated user with the proper file permissions to run Deadline Launcher.
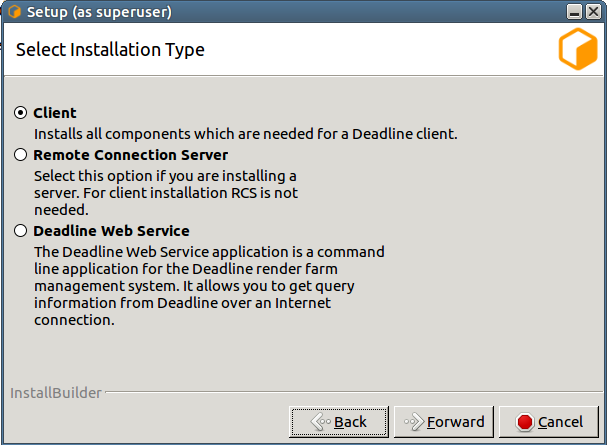
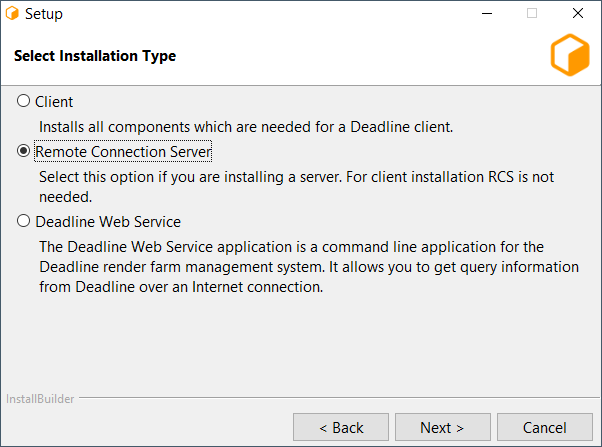
- You will be presented with a installation type selection screen. Client installation is the default option. Other options are covered in their own sections:
Once you have selected any optional components you may wish to install, proceed to the next screen.
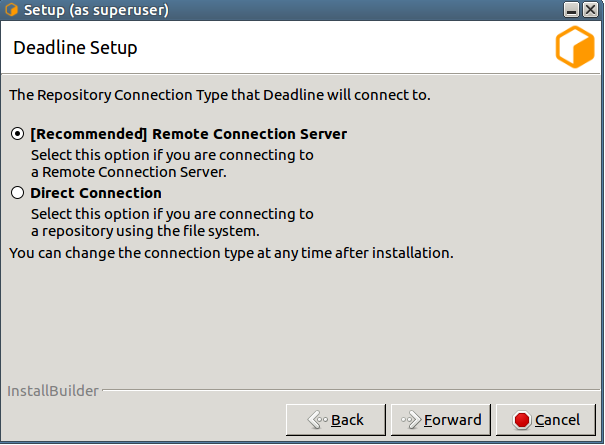
Choose a Connection Type (Direct or Remote).
Remote Connection is our recommended connection type as it includes more features and provides better separation between Deadline Database and Repository and Client machines.
The following settings are available for a Remote Connection:
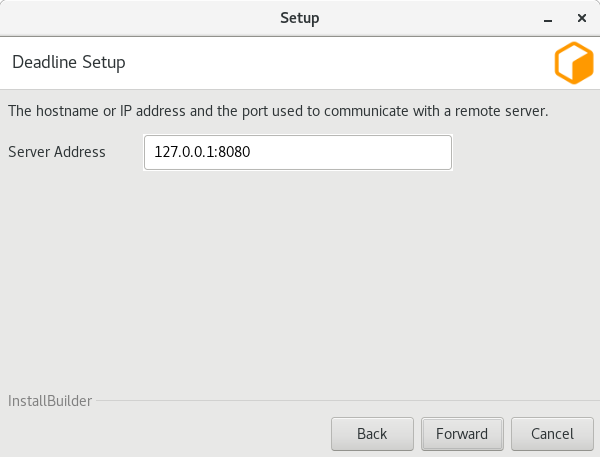
Server Address: This is the address (IP/Hostname and Port) of the remote Connection Server.
Client Certificate: This is the path to the SSL certificate required to connect to the Connection Server machine. If the Connection Server does not use authentication then this field must be left blank.

The following Launcher settings are available:
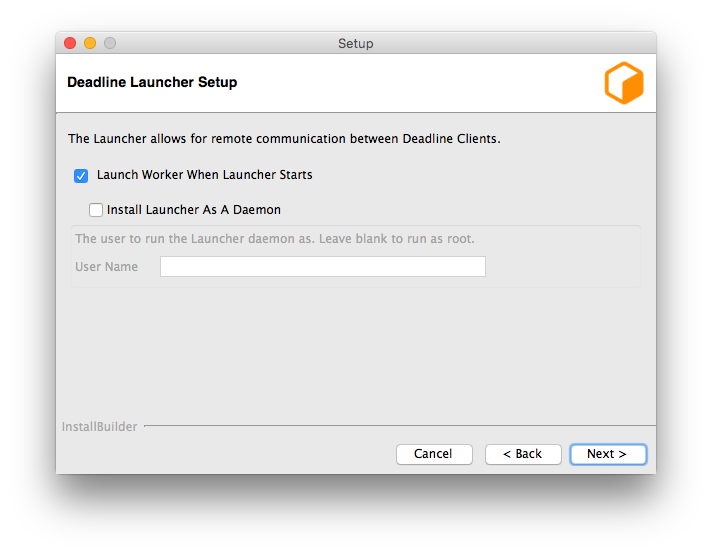
Launch Worker When Launcher Starts: If enabled, the Worker will launch whenever the Launcher launches.
Install Launcher As A Daemon: Enable this if you wish to install the Launcher as a daemon. You can also choose to run the daemon as a specific user. If you choose to run it as a non-root user, please make sure you give the user all the required file permissions to run it as a daemon. In order for auto-upgrade to work, the account also needs the sufficient write permissions to access the Deadline client binary/library folders(
<Installation Directory>/binand<Installation Directory>/lib) See the Linux Daemon documentation below for more information.
After configuring the Client and Launcher settings, press Next to continue with the installation.
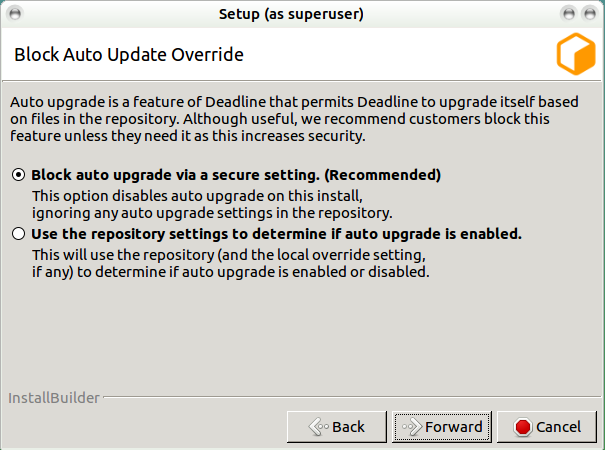
From 10.1.16, it is recommended to block auto-upgrade on Deadline client machines to improve the security. When it is blocked, AutoUpdateOverride setting will be ignored. No auto-upgrade will be performed on this machine even if auto-upgrade is enabled via Monitor Repository Options.
macOS
Start the installation process by double-clicking on the Mac Client Installer. The Mac Client installer also supports silent installations with additional options. If you are installing on macOS Catalina, you may see a warning that the installer ‘can’t be opened because Apple cannot check it for malicious software’. This is because the installer has not been notarized by Apple. In this case you need to right-click the installer icon, and choose “Open” in the pop-up menu that appears.


Choose an installation location and press Next to continue.
To increase security, by default files and directories under the client installation directory cannot be modified by anyone but root/administrators. However, auto-upgrade will fail if a non-root/administrators user is used to run Launcher. To resolve that, you can either set the proper permission to the user you intend to run Launcher or check this box to bypass the security limitation at your own risk. It is recommended you set up a dedicated user with the proper file permissions to run Deadline Launcher.
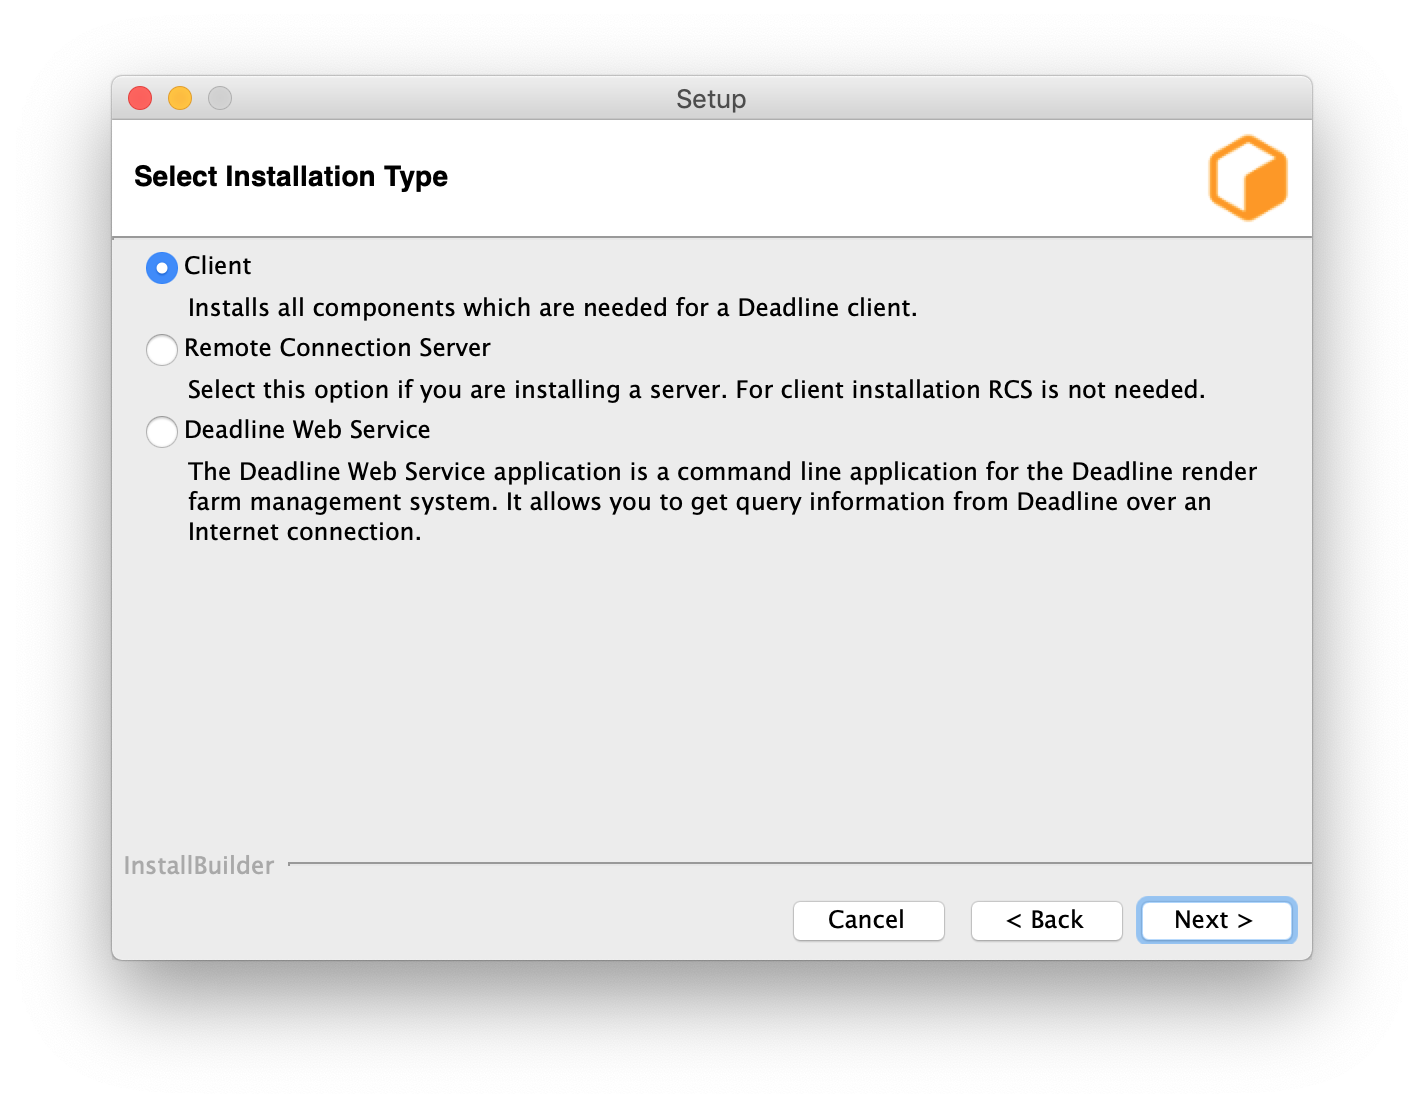
- You will be presented with a component selection screen. Typically, only the ‘General Client Files’ (mandatory) component is needed. Optional components are not part of the basic setup and are covered in their own sections:
Once you have selected any optional components you may wish to install, proceed to the next screen.

Choose a Connection Type (Direct or Remote).
Remote Connection is our recommended connection type as it includes more features and provides better separation between Deadline Database and Repository and Client machines.
The following settings are available for a Remote Connection:
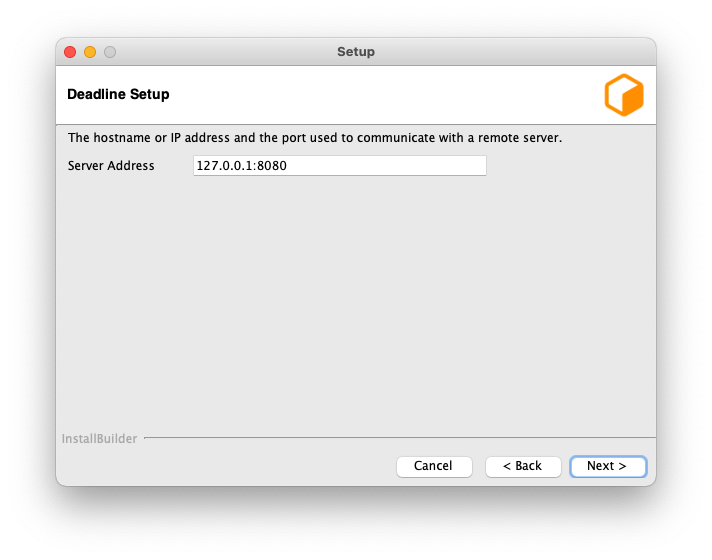
Server Address: This is the address (IP/Hostname and Port) of the remote Connection Server.
Client Certificate: This is the path to the SSL certificate required to connect to the Connection Server machine. If the Connection Server does not use authentication then this field must be left blank.
The following Launcher settings are available:
Launch Worker When Launcher Starts: If enabled, the Worker will launch whenever the Launcher launches.
Install Launcher As A Daemon: Enable this if you wish to install the Launcher as a daemon. You can also choose to run the daemon as a specific user. If you choose to run it as a non-root user, please make sure you give the user all the required file permissions to run it as a daemon. In order for auto-upgrade to work, the account also needs the sufficient write permissions to access the Deadline client binary folder(
<Installation Directory>/Resources). See the macOS Daemon documentation below for more information.
After configuring the Client and Launcher settings, press Next to continue with the installation.
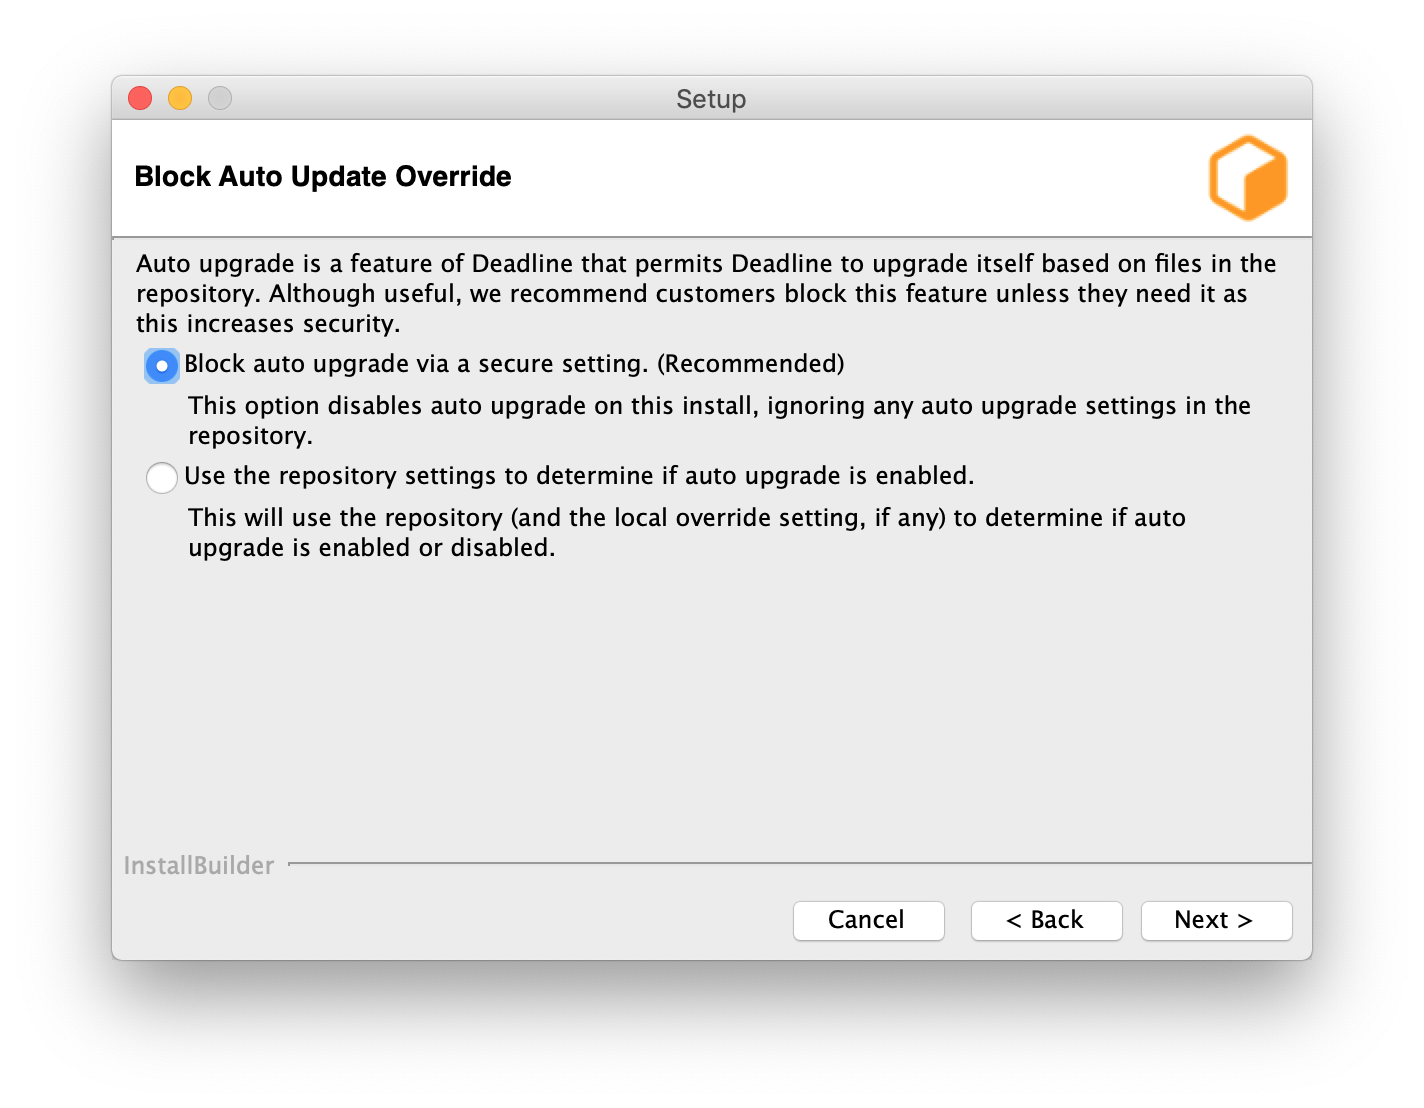
From 10.1.16, it is recommended to block auto-upgrade on Deadline client machines to improve the security. When it is blocked, AutoUpdateOverride setting will be ignored. No auto-upgrade will be performed on this machine even if auto-upgrade is enabled via Monitor Repository Options.
Installing Web Service
The Web Service application is a command line application for the Deadline render farm management system. It allows you to get query information from Deadline over an Internet connection with a custom Web Service Scripts to display this information in a manner of your choice, such as a web page.
You can choose to set up the current machine to act as Web Service on the installation type selection screen.

If you have selected the option to configure the current machine as a Web Service, you will be prompted with configuration screens for the Web Service.
Note
These configuration screens only come up once the regular configuration screens have been filled out. They do not appear immediately after the installation type selection screen.

User/Group running the Web Service: OS user or group who will be running the Web Service.
This dialog allows you to select if TLS is required.

This dialog allows you to select whether to generate new or use an existing TLS certificates.

The final dialog allows you to specify a location to store the new certificate and optionally protect it with a password.
Installing Remote Connection Server
The Remote Connection Server (RCS) is an application that allows other Deadline components (such as the Deadline Worker, Deadline Monitor, etc.) to communicate with a Deadline Repository. RCS installation must be explicitly selected at the installation type selection screen.
If you have selected the option to configure the current machine as a Remote Connection Server, you will be prompted with configuration screens for the Remote Connection Server.
Note
These configuration screens only come up once the regular configuration screens have been filled out. They do not appear immediately after the Component Selection screen.
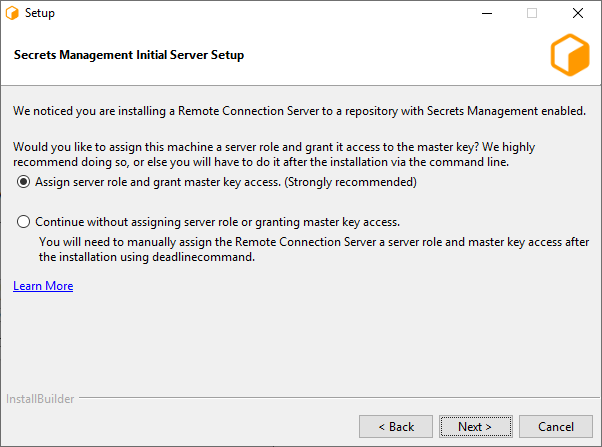
If Secrets Management is enabled in the database you will be presented with the option to assign a server role and grant master key access to the machine that is running the installer. (Windows and Linux only)
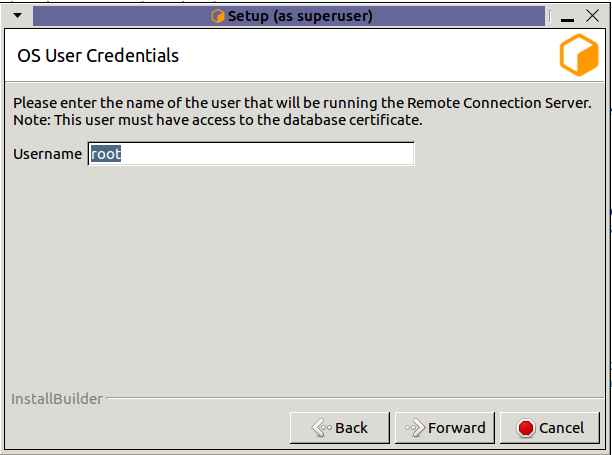
Username: Name of the OS user who will be running the Remote Connection Server. Secrets Management Identities are created for a specific OS User and machine. This field specifies which OS User to create the server identity for. (Linux only, on windows the OS user who is running the installer will be used.)
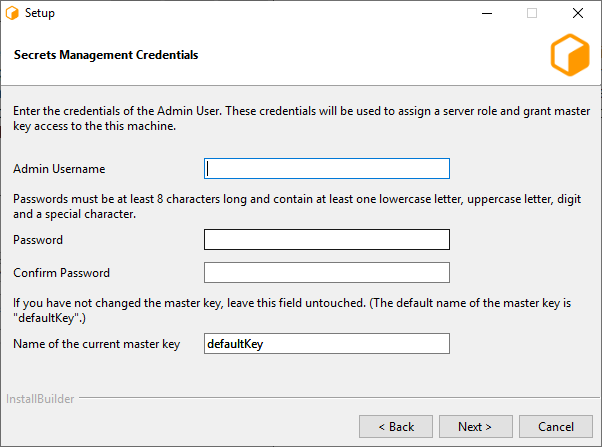
Admin Username: The username of the Secrets Management Administrator that you entered during the repository installation.
Password: The password of the Secrets Management Administrator that you entered during the repository installation.
Name of the current master key: Name of the Secrets Management master key. The default master key name is “defaultKey”. Use the default name, unless you have manually changed it using GenerateNewMasterKey.
Note
In order for the Secrets Management configuration to be succesful, you must enable TLS in the next section.
Note
If you are installing on macOS and wish to configure Secrets Management, run the ConfigureServerMachine after the installation.
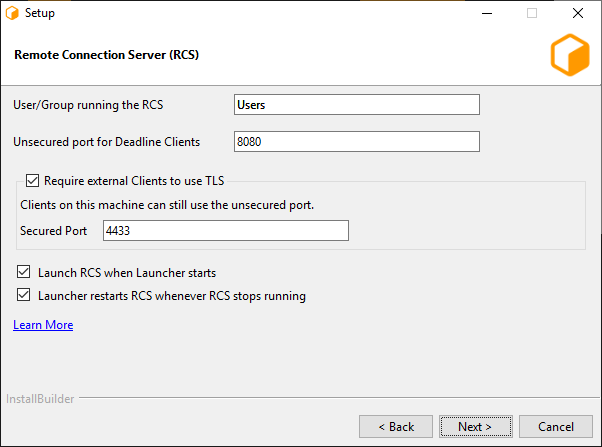
The first page consists of a few different settings:
User/Group running the RCS: This is the user (or user group) that will be expected to run the Connection Server process. This value will dictate the initial permissions on files needed by the Connection Server, and the user listed on the HTTP.SYS URL Reservation (Windows only).
Unsecured port for Deadline Clients: This is the port on which the Server will listen for incoming HTTP requests. On Windows, this will also be the port listed on the HTTP.SYS URL Reservation created by the installer.
- Require external Clients to use TLS: If enabled, the Remote Connection Server will serve remote clients exclusively over an encrypted connection. It will require clients to provide a valid x509 certificate when connecting.
Secured Port: If TLS is enabled, remote clients will need to connect to this TLS port (and not the unsecured HTTP port).
Launch RCS when Launcher starts
Launcher restarts RCS whenever RCS stops running, for example when it crashes or you close it. The restart will only happen if Launcher is running.
Warning
HTTP-only configurations should only be used internally within a closed network, and should not be exposed to the internet.
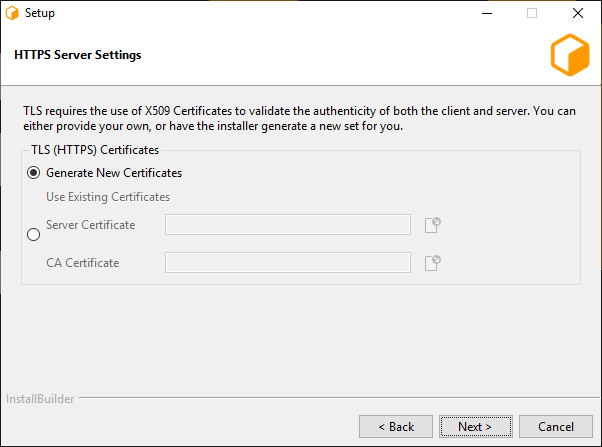
If TLS was enabled, this next page allows for configuration of the x509 certificates that the Connection Server will use to serve clients over TLS.
Generate New Certificates: Select this option if you do not have a set of certificates to use.
- Use Existing Certificates: Select this option if you’ve already generated a set of certificates to use (either externally or previously through the installer).
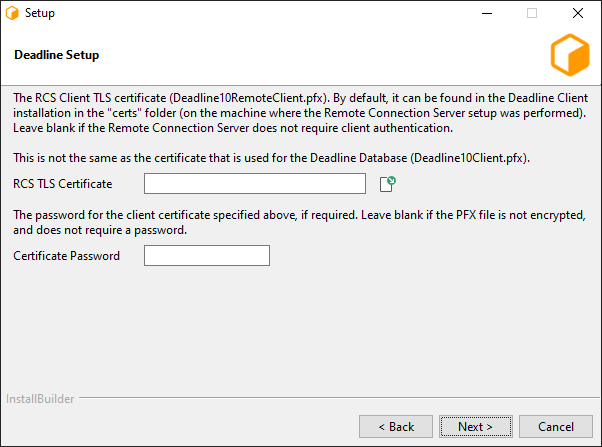
Server Certificate: The path to a Server x509 certificate, in PKCS#12 (*.pfx, *.p12) format. This must include the private key alongside the certificate.
CA Certificate: The path to a trusted root CA that should be used to validate incoming client certificates.
This page is the final page for configuring the Connection Server, and only appears if ‘Generate New Certificates’ was selected in the previous step. It contains settings related to generating the CA, server, and client certificates.
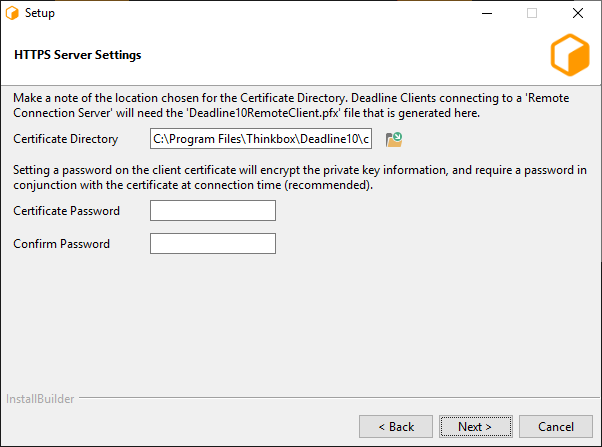
Output Directory: This is the directory in which the set of generated certificates will be placed.
Client Certificate Password: You may specify a password that will be used to encrypt the Client certificate and key. If specified, it will need to be provided by clients connecting using this certificate. If you do not wish to set a password, leave this field blank.
Note
Once the certificates have been generated, the ‘Deadline10RemoteClient.pfx’ file should be securely moved to client machines that are expected to connect to this Connection Server; it will be needed at connection time. In addition, the user(s) running the client processes will need to be granted Read access to the file (the installer creates the file with restrictive permissions).
Warning
It is important to be aware of who might have access to the file throughout the process of distributing it to the client machines – the operating system might change the access level of the file to be overly broad on a copy, for example. We recommend always maintaining each certificate with the minimal subset of permissions for the users that need to connect to the Deadline Repository.
Change Connection type / Repository
If you wish to change the Connection type / Repository after the installation, you can refer to Change Repository.
Web Service
As part of the Client Installation, you can also choose to configure the current machine as a Deadline Web Service server, please go to Standalone Python API for more details.
Command Line or Silent Installation
The Client installer can be run in command line mode or unattended mode on each operating system. Note that on macOS, you must run the installbuilder.sh script that can be found in the Contents/MacOS folder,
which is inside the Mac Client Installer package.
To run in command line mode, pass the “–mode text” command line option to the installer. For example, on Linux:
./DeadlineClient-X.X.X.X-linux-x64-installer.run --mode text
To run in silent mode, pass the “–mode unattended” command line option to the installer. For example, on Windows:
DeadlineClient-X.X.X.X-windows-installer.exe --mode unattended
To get a list of all available command line options, pass the “–help” command line option to the installer. For example, on macOS:
/DeadlineClient-X.X.X.X-osx-installer.app/Contents/MacOS/installbuilder.sh --help
Note that there are quite a few Client installer options that are only available from the command line, which you can view when running the “–help” command. These options include:
--help: Display the list of valid options.--version: Display product information.--unattendedmodeui <unattendedmodeui>: Unattended Mode UI. Default:none. Allowed:none minimal minimalWithDialogs.--optionfile <optionfile>: Installation option file. Default:"".--debuglevel <debuglevel>: Debug information level of verbosity. Default:2. Allowed:0 1 2 3 4.--mode <mode>: Installation mode. Default:win32(Windows),gtk(Linux) orosx(macOS). Allowed:win32 unattended(Windows),gtk xwindow text unattended(Linux), orosx text unattended(macOS).--debugtrace <debugtrace>: Debug filename. Default:"".--enable-components <enable-components>: Comma-separated list of components. Default:generalclientfiles. Allowed:proxyconfig webservice_config.--disable-components <disable-components>: Comma-separated list of components. Default:proxyconfig webservice_config. Allowed:proxyconfig webservice_config.--installer-language <installer-language>: Language selection. Default:en. Allowed:en.--prefix <prefix>: The path to install the Client software to. Default:C:\Program Files\Thinkbox\Deadline<VERSION>(Windows),/opt/Thinkbox/Deadline<VERSION>(Linux) or/Applications/Thinkbox/Deadline<VERSION>(macOS), where<VERSION>is:10.--connectiontype <connectiontype>: Connection Type, please specify one of the options:Direct Remote. Default:Direct--repositorydir <repositorydir>: The path to the Deadline Repository. Default:"".--proxyrootdir <proxyrootdir>: The default ProxyRoot used by the Client. Default:127.0.0.1:8080.--dbsslcertificate <dbsslcertificate>: The default SSL certificate used by the Client when connecting to the Database. Default:"".--dbsslpassword <dbsslpassword>: The password for the Database SSL certificate. Submitting a value with the prefix ‘env:’ will instruct the installer to pull the password from an environment variable. The name of the environment variable is the value after ‘env:’ (e.g. env:MY_VARIABLE). Default:"".--proxycertificate <proxycertificate>: The default SSL certificate used by the Client. Default:"".--proxycertificatepassword <proxycertificatepassword>: Certificate Password. Submitting a value with the prefix ‘env:’ will instruct the installer to pull the password from an environment variable. The name of the environment variable is the value after ‘env:’ (e.g. env:MY_VARIABLE). Default:"".--configport <configport>: The port that the Client uses for Auto Configuration. Default:17001.--slavestartupport <slavestartupport>: The port that the Workers use to ensure that only one Worker is initializing at a time. Default:17003.--slavedatadir <slavedatadir>: The local path where the Worker temporarily stores plugin and job data from the Repository during rendering (if not specified, the default location is used). Default:"".--noguimode <noguimode>: If enabled, the Launcher, Worker, and Pulse will run without a user interface on this machine. Default:false.--killprocesses <killprocesses>: If enabled, the installer will kill any running Deadline processes before proceeding with the installation (Windows only). Default:false.--region <region>: The region that this machine is in. Default:"".--nobinaries <nobinaries>: If enabled, the installer will not install any binaries. The installation directory should be pointed to a directory that already contains a Deadline client installation. Default:false.--binariesonly <binariesonly>: If enabled, the installer will only install files to the installation directory. The installer will not perform any additional configuration to run Deadline on this machine. Default:false.--licensemode <licensemode>: (DEPRECATED) Starting with Deadline 10.1.23, Deadline and its components do not require a license. For older versions, this is the License Mode. Please specify one of the options:Floating UsageBased LicenseFree. Default:Floating.--licenseserver <licenseserver>: (DEPRECATED) Starting with Deadline 10.1.23, Deadline and its components do not require a license. For older versions, this is the license server to use. Default:"". Example:27008@hostname.domain.--launcherport <launcherport>: The Launcher uses this port for Remote Administration, and it should be the same on all Client machines. Default:17000.--launcherstartup <launcherstartup>: If enabled, the Launcher will automatically launch when the system logs in (non-service mode on Windows only). Default:true.--restartstalled <restartstalled>: If enabled, the Launcher will try to restart the Worker application on this machine if it stalls. Default:false.--slavestartup <slavestartup>: If enabled, the Worker will automatically start when the Launcher starts. Default:false.--serviceuser <serviceuser>: The user name for the Launcher service (Windows only). Required when--launcherserviceis enabled.--servicepassword <servicepassword>: The password for the Launcher service (Windows only). Submitting a value with the prefix ‘env:’ will instruct the installer to pull the password from an environment variable. The name of the environment variable is the value after ‘env:’ (e.g. env:MY_VARIABLE). Default:"".--launcherservice <launcherservice>: If enabled, the Launcher will be installed as a service, and requires an account with network access (Windows only). Default:false.--daemonuser <daemonuser>: The user to run the Launcher daemon as. (Linux and macOS only). Required when--launcherdaemonis enabled.--launcherdaemon <launcherdaemon>: If enabled, the Launcher will be installed as a daemon (Linux and macOS only). Default:false.--launcherservicedelay <launcherservicedelay>: If the Launcher is running as a service or daemon, this is the amount of seconds it waits after starting up before launching other Deadline applications. Default:60.--blockautoupdateoverride <blockautoupdateoverride>: Auto upgrade is a feature of Deadline that permits Deadline to upgrade itself based on files in the repository. Although useful, we recommend customers block this feature unless they need it and this increases security. Default:Blocked. Allowed:Blocked NotBlocked.--autoupdateoverride <autoupdateoverride>: Overrides the Auto Update setting for this client installation (leave blank to use the value specified in the Repository Options). Default:"".--connserveruser <connserveruser>: The OS user for which the connection server will be configured. Only used if the ‘proxyconfig’ component is enabled. Default:Users.--httpport <httpport>: The port on which the connection server will serve HTTP connections. Only used if the ‘proxyconfig’ component is enabled. Default:8080.--tlsport <tlsport>: TLS Port. Default:4433.--enabletls <enabletls>: If true, the connection server will require remote clients to connect and authenticate via TLS. Only used if the ‘proxyconfig’ component is enabled. Default:true.--servercert <servercert>: Server Certificate. Default:"".--cacert <cacert>: CA Certificate. Default:"".--tlscertificates <tlscertificates>: Specify the source of the certificates that will be used for TLS communication and authentication. Only used if the ‘proxyconfig’ component is enabled and TLS is enabled. Default:"". Allowed:generate existing.--generatedcertdir <generatedcertdir>: Specifies the output directory for TLS certificates generated by the installer. Only used if the ‘proxyconfig’ component is enabled, TLS is enabled, and new certificates are being generated. Default:"".--clientcert_pass <clientcert_pass>: If specified, will set a password on the generated client certificate. Only used if the ‘proxyconfig’ component is enabled, TLS is enabled, and new certificates are being generated. Submitting a value with the prefix ‘env:’ will instruct the installer to pull the password from an environment variable. The name of the environment variable is the value after ‘env:’ (e.g. env:MY_VARIABLE). Default:"".--InitializeSecretsManagementServer <InitializeSecretsManagementServer>: This will assign a server role and grant master key access to the Remote Connection Server you are installing. Default:true. Allowed:true false.--osUsername <osUsername>: Name of the user that will be running the Remote Connection Server. Default <user who is running the installer> (Linux only).--secretsAdminName <secretsAdminName>: Secrets Management Admin username.--secretsAdminPassword <secretsAdminPassword>: Secrets Management Admin password.--masterKeyName <masterKeyName>: Name of the master key. Default:defaultKey--webserviceuser <webserviceuser>: The OS user for which the webservice server will be configured. Only used if the ‘webservice_config’ component is enabled. Default:Users.--webservice_httpport <webservice_httpport>: The port on which the webservice server will serve HTTP connections. Only used if the ‘webservice_config’ component is enabled. Default:8081.--webservice_tlsport <webservice_tlsport>: Web Service Secured Port. Default:4434.--webservice_enabletls <webservice_enabletls>: If true, the webservice server will require remote clients to connect and authenticate via TLS. Only used if the ‘webservice_config’ component is enabled. Default:true.--webservice_servercert <webservice_servercert>: Web Service Server Certificate. Default:"".--webservice_cacert <webservice_cacert>: Web Service CA Certificate. Default:"".--webservice_tlscertificates <webservice_tlscertificates>: Specify the source of the certificates that will be used for TLS communication and authentication. Only used if the ‘webservice_config’ component is enabled and TLS is enabled. Default:webservice_generate. Allowed:webservice_generate webservice_existing.--webservice_generatedcertdir <webservice_generatedcertdir>: Specifies the output directory for TLS certificates generated by the installer. Only used if the ‘webservice_config’ component is enabled, TLS is enabled, and new certificates are being generated. Default:"".--webservice_cert_pass <webservice_cert_pass>: If specified, will set a password on the generated client certificate. Only used if the ‘webservice_config’ component is enabled, TLS is enabled, and new certificates are being generated. Default:"".--remotecontrol <remotecontrol>: Remote Control is a Deadline feature that allows remote users to administer a machine that is running the Launcher. This includes running arbitrary commands. We recommend that you block this feature on workstations, servers, and other machines that are not dedicated render nodes. Default:Blocked. Allowed:Blocked NotBlocked.
Note, where applicable (path contains spaces), it is recommended to encapsulate options in quotation marks, such as:
--prefix "C:\Program Files\Thinkbox\Deadline<VERSION>" --repositorydir "\\network path\with spaces\in it"
where <VERSION> is the Deadline major version such as: 10.
Note
Please ensure any directory paths do NOT have any trailing slashes
Installation Logging
Our client installer creates an installation log in the system’s temporary directory. On Linux and macOS, this typically means the /tmp directory. On Windows, the log will be created in the user’s local temp directory, usually C:\Documents and Settings\%USERNAME%\Local Settings\Temp. The default name of the generated log file is installbuilder_installer.log, but if the file already exists from a previous installation, the installer will try to create an unique filename trying installbuilder_installer_[pid].log and installbuilder_installer_[pid]_[uid].log where [pid] is the PID of the process and [uid] is an unique identifier. On Linux, if the /tmp directory is not writable, it will attempt to use /var/tmp, /usr/tmp and ~/tmp instead. Deadline installers from versions before Deadline 10.2.1.0 will create files named bitrock_installer_[pid].log and bitrock_installer_[pid]_[uid].log.
Microsoft SCCM Installation for Windows
Microsoft System Center Configuration Manager (SCCM) allows you to manage software distribution to selected target systems through a remote process. For more information about this topic, go to Microsoft TechNet and search for “System Center Configuration Manager”. Deadline Client software on Windows can be installed and later uninstalled if necessary, by following these steps to create an SCCM Application Package and deploy it in your company.
Installing as a Service
On Windows and Linux, you can choose to install the Launcher as a service or daemon during installation. There are a few things to keep in mind when running Deadline in this mode.
Windows Service
When running as a service on Windows, the Launcher will run without displaying its system tray icon. If the Worker or Pulse application is started through the Launcher while it is in this mode, they will also run without a user interface. Finally, the Launcher can still perform an auto-upgrade, but only when launching the Worker and Pulse applications (launching the Monitor, for example, will not invoke an upgrade).
Note that when running the Launcher as a service, the Worker or Pulse application will also run in a service context. Since services run in a different environment, and potentially under a different user profile than the one currently logged in, certain considerations need to be made.
First, the default user for a service has no access to network resources, so while Launcher service will run without any issues, neither the Worker nor Pulse applications will be able to access the Repository. To avoid network access issues, you must configure the service to run as a user with network privileges. Typical desktop users have this permission, but check with your system administrator to find which account is best for this application.
Another issue presented by the service context is that there is no access to the default set of mapped drives. Applications will either need to map drives for themselves, or make use of UNC paths. While Deadline supports Automatic Drive Mapping, the SMB protocol does not allow sharing a resource between two users on the same machine. This means that mapping of drives or accessing a resource with different credentials may fail when running as a service on a machine which already requires access to the Repository.
There is also an issue with hardware-based renderers. Starting with Windows Vista, services now run in a virtualized environment which prevents them from accessing hardware resources. Because the renderer will run in the context of a service, hardware-based renderers will typically fail to work.
To ensure Deadline’s Automatic Upgrade/Downgrade system works correctly; make sure the service account used to run Deadline Launcher has the ability to start and stop the service. This permission can be added to the service account by an Administrator user as follows:
setacl.exe \\computername\deadline<VERSION>launcherservice /service /grant <serviceaccount> /start_stop
Note
<VERSION> is the Deadline major version, such as: 10.
Linux Daemon
When installing the daemon, the Client installer creates the appropriate deadlinelauncherservice script in /etc/systemd/system.
When running as a daemon on Linux, the Launcher will run without displaying its system tray icon. If the Worker or Pulse application is started through the Launcher while it is in this mode, they will also run without a user interface. This is useful when running Deadline on a Linux machine that doesn’t have a Desktop environment.
Linux Resource Limits
UNIX-based operating systems impose a limit on the number of resources a process can use, and these limits can affect the number of open files used by a process. Each open network connection is tracked as an open file by UNIX-based operating systems, so the open file limit restricts the number of network connections that a process can have. For Linux processes, default limit is 1024. Deadline Launcher daemon’s limits for the number of open files will be increased to 200000.
You can adjust this limit by editing the LimitNOFILE value in /etc/systemd/system/deadline10launcher.service. Run systemctl daemon-reload and restart the service using systemctl restart deadline1-launcher for your changes to take effect.
macOS Daemon
When installing the daemon, the Client installer creates the appropriate com.thinkboxsoftware.deadlinelauncher.plist file in /Library/LaunchDaemons.
When running as a daemon on macOS, the Launcher will run without displaying its system tray icon. If the Worker or Pulse application is started through the Launcher while it is in this mode, they will also run without a user interface.
Client License Configuration (DEPRECATED)
Note
Starting with Deadline 10.1.23, Deadline and its components do not require a license. This section is left for operators of older versions of Deadline.
Before you can configure the license for the Client, the license server must be running. See the Licensing documentation for more information.
If you didn’t configure the license for the Client during installation (see above), there are a couple of ways to set the license for the Client. The quickest way is to use the right-click menu in the Launcher or the File menu in the Worker application to change the license server.

The other option is to set up Auto Configuration so that the Client automatically pulls the license server information.
Uninstallation
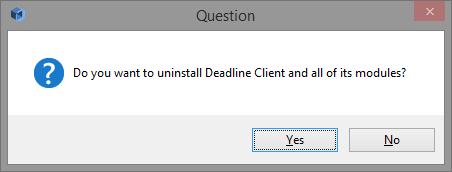
The Client installer creates an uninstaller in the folder that you installed the Client to. To uninstall the Client, simply run the uninstaller and confirm that you want to proceed with the uninstallation.
Command Line or Silent Uninstallation
The Client uninstaller can be run in command line mode or unattended mode on each operating system.
To run in command line mode, pass the “–mode text” command line option to the installer. For example, on Linux:
./uninstall --mode text
To run in silent mode, pass the “–mode unattended” command line option to the installer. For example, on Windows:
uninstall.exe --mode unattended
To get a list of all available command line options as a pop-up dialog, pass the “–help” command line option to the installer. For example, on Windows:
uninstall.exe --help
To get a list of all available command line options in the terminal, pass the “–help” command line option to the installer and an additional option when on macOS:
./uninstall osx-intel --help
Note that there are a few Client uninstall options that are only available from the command line, which you can view when running the “–help” command. These options include:
--help: Display the list of valid options.--version: Display product information.--debuglevel <debuglevel>: Debug information level of verbosity. Default:2. Allowed:0 1 2 3 4.--mode <mode>: Installation mode. Default:win32(Windows),gtk(Linux) orosx(macOS). Allowed:win32 unattended(Windows),gtk xwindow text unattended(Linux), orosx text unattended(macOS).--debugtrace <debugtrace>: Debug filename. Default:"".--installer-language <installer-language>: Language selection. Default:en. Allowed:en.
Uninstall Logging
Our Client uninstall process creates an uninstall log in the system’s temporary directory with the same behaviour as the Client Installation log.
