Geometry To Voxel Grid Using Frost And Krakatoa PRT Volume
- Introduction
- Setting up the Base Scene
- Creating Frost Geometry from the PRT Volume
- Animating The Grid Resolution
- Animating the Source Object
- Assigning LEGO Materials
- Consistent Materials with Animated Source Mesh
- Tweaking the Color Pattern
- Animating The Growth From The Center
- Animating The Growth From The Bottom
- Mapping The Color Distribution
- Finalizing The LEGO Look
- CONCLUSION:
Introduction
In the previous tutorial, we saw how the PRT Volume object could be used to convert a FROST mesh back to a point cloud to render as particles in Krakatoa.
The following tutorial demonstrates yet another useful application of FROST in conjunction with the Krakatoa PRT Volume - converting geometry objects to a regular grid of boxes or other shapes to produce a result similar to a LEGO model.
You can download the latest Krakatoa build from here.
Setting up the Base Scene
In this example we will use the Stanford Bunny mesh which is commonly employed to demonstrate various computer graphics solutions.
You can either download the sample scene (3ds Max 2010 format) or use any other geometry object, for example a teapot primitive.
- Load the sample scene.

- Select the Bunny mesh.
- In the Krakatoa menu, select the Create PRT Volume object(s) from selected Object(s)… option.
RESULT: A new PRT Volume object will be created at the same location as the bunny mesh. The bunny mesh will be assigned as the source of the PRT Volume. The voxel size in the viewport will be set to slightly over 3 units based on the size of the mesh’s bounding box. Depending on your Krakatoa preferences, the source mesh might be switched to display as Bounding Box (but it is not the default option).

To switch the bunny mesh to Bounding Box display, either select it and check the Display As Box option in the Display tab of 3ds Max, or click the [>] button to the right of the source object button in the PRT Volume and select Display Source Object as Bounding Box from the menu.
Now let’s tweak the PRT Volume’s settings to produce a regular grid:
- Select the PRT Volume object.
- Uncheck the Jitter Position option.
- Enter 3.0 in the Spacing field in the Source rollout of the PRT Volume.
- Uncheck the checkbox in front of the Viewp. Spacing spinner.
RESULT: The particles are now distributed in a regular grid aligned to the local object space of the bunny mesh.

In this mode, the PRT Volume creates a voxel grid out of the source mesh and places one particle in the center of each voxel. The value 3.0 defines the width, lenght and height of each voxel.
Since we are not going to be able to see inside the volume of the voxelized bunny, it makes no sense to create all particles - we could use the Shell option of the PRT Volume to localize the particles only to a narrow band close to the surface of the mesh.
- Check the Seed In Surface Shell option in the Miscellaneous rollout of the PRT Volume.
- Enter 6.0 in the Thickness field.
RESULT: The particles will be created only within 6 units from the surface - this is up to two voxels deep. Any other voxels in the core of the bunny’s body will be skipped, reducing the particle count to about 1/3.

Creating Frost Geometry from the PRT Volume
Let’s turn the PRT Volume’s particle cloud to a FROST geometry mesh.
- With the PRT Volume selected, click the FROST icon in the toolbar (or alternatively create a FROST object from the Create tab manually and pick the PRT Volume as a Particle Object).
- Check the option Viewport Update > When Particles Change in the Frost rollout.
- Switch the Meshing mode to Geometry.
- Enter 1.45 as the particle Radius.
- Switch the Particle Geometry mode to Box.
RESULT: The shape of the bunny’s mesh is now represented as a grid of boxes with size slightly less than 2.9 units, leaving little gaps between them to make the result look more natural.

Animating The Grid Resolution
The PRT Volume’s Spacing value can be keyframed, and the same is true for the Radius value of the FROST object. Let’s animate the two values to change the grid spacing over time:
- Save the 3ds Max scene to disk to be able to return to this point later.
- Open Material Editor, assign a Standard Material to the FROST object, set diffuse color to R:150, G:150, B:255.
- Create an Omni light to illuminate the particles independently from the view’s position.
- Select the PRT Volume.
- Change the Spacing value to 10.0 units.
- Uncheck the Seed in Surface Shell option.
- Move the time slider to frame 100.
- Enable AutoKey and change the Spacing to 3.0 units.
- Select the FROST object.
- On frame 0, enter a Radius value of 5.0
- On frame 100, enter a Radius value of 1.5
- Disable AutoKey mode.
RESULT: Playing back the animation or moving the time slider will produce a low-res to high-res animation of the voxel grid:
Animating the Source Object
Now let’s see how the combination of a PRT Volume and FROST mesher reacts to an animated source mesh.
- Save the current scene to a new file on disk.
- Load the scene saved in the previous step - this will remove the grid spacing animation.
- Select the Bounding Box representing the bunny mesh.
- Add a Bend modifier to its modifier stack.
- Enable the AutoKey mode.
- Move the time slider to frame 20 and enter Angle -30.0
- Move the time slider to frame 70 and enter Angle of 45.0 and Direction of 90.0
- Move the time slider to frame 100 and enter Angle 0.0 and Direction 0.0.
- Disable the AutoKey mode.
RESULT: Playing back the animation or moving the time sldier will cause the bunny mesh to bend, thus producing a different PRT Volume point cloud and a different FROST mesh following the changing shape:
Assigning LEGO Materials
Now we will assign a Multi/Sub-Object Material to the FROST object to produce a more LEGO-like look.
- Open the (Compact) Material Editor.
- Change the Standard Material to Multi/Sub-Object
- Set the first sub-material’s color to Blue, instance it into the second sub-material’s slot.
- Set the third sub-material’s color to Red, instance it to the fourth sub-material.
- Set the fifth sub-material’s color to Yellow, instance it into the sixth sub-material.
- Set the seventh sub-material’s color to White, instance it into the eight sub-material.
- Click the Set Number button and enter 8 to remove slots 9 and 10.

RESULT: The FROST particles have 6 Material IDs assigned like the regular 3ds Max Box primitive, so each side of each box shows a different sub-material.
The PRT Volume supports the Krakatoa Channels Modifier directly, so we can easily provide a valid MtlIndex channel to assign a different sub-material to each particle.
- Select the PRT Volume object and add a Magma Modifier to its modifier stack.
- Click the Open Magma Editor.
- Press [CTRL]+[O] to create an Output node.
- Change the Output node’s Channel to MtlIndex.
- Press [I] for Input, [C] for Channel, then select the Index channel from the list.
- Close the Magma Editor.
- Select the FROST object, expand the Materials rollout and switch to ID from MtlIndex Channel mode.

RESULT: The sub-materials will be assigned to individual particles according to their Index (creation order). Since the PRT Volume creates particles in rows from bottom to top, having two consecutive materials with the same color produces the impression of longer “LEGO pieces” along the local X axis.

Unfortunately, this approach does not produce consistent materials when the source mesh is animated - each frame will have a different pattern, resulting in severe flickering:
Consistent Materials with Animated Source Mesh
As shown above, the material assignment we introduced in the previous step does not work that well when the PRT Volume is changing its particles either because the source mesh is deforming or the voxel Spacing is animating. The Index of the particle is based on the order of creation, and any change in the shape produces a shift in the indexing and thus flickering materials.
To solve this, we could make the color of each particle dependent on its position in space regardless of its creation order.
- Select the PRT Volume object.
- Open the Magma Editor again.
- Select the Input node and change from Index to Position channel.
- With the Input node selected, press [V] and then [M] to insert a Vector > Magnitude operator.
- With the Magnitude operator selected, press [C] and then [I] to insert a Convert > ToInteger operator.
- Select the Magnitude operator again and press the [*] key on the Numeric keypad to insert a Multiply operator.
- With the Multiply operator selected, press [CTRL]+[1] to create a new Float input with value of 1.0. We will modify this value later on to produce different color variations…

RESULT: The distribution of the colors is now based on the Position of each particle, or more precisely, on the distance from the particle to the local space origin. Playing back the animation or moving the time slider will cause new particles to be added and some to be removed, but those that stay between two frames will preserve a constant color.

Tweaking the Color Pattern
Because our PRT Volume Spacing is 3.0 units, the particles are changing their distance from the object’s local origin relatively fast, producing a relatively varied pattern, but there are certain “waves” of color visible in the image above.
Increasing the multiplier in the KCM can randomize the pattern even more, while reducing it can emphasize the waves of colors within common distance “bands”.
Below is the result of a multiplier of 20.0 vs. a multiplier of 0.25:


Here is the animation with multiplier of 0.25, illustrating the fact that while particles come and go, color indormation is locked in object space:
Animating The Growth From The Center
Using the fact that the Shell Start value of the PRT Volume can also be keyframed, we could easily produce an animation of the object growing from the inside.
- Save the scene to a new file to be able to revert to it later…
- Select the bunny mesh and disable the Bend modifier.
- Select the PRT Volume, set the Shell Start to 40.0.
- Enable AutoKey, move to frame 100 and set the Shell Start to 0.0.
- Disable AutoKey.
RESULT: Playing back the animation will result in a growth from the center out:
Delete the animation keys of the Shell Start track to remove the animation and try something else…
Animating The Growth From The Bottom
We already know that the particle Index is incremented from the bottom left corner of the local object bounding box and growing along the X, Y and Z axes in that order. We could use this knowledge to animate the growth of the model from bottom to top:
- Select the PRT Volume object.
- Add a new Magma Modifier.
- Click the Open Magma Editor button.
- Press [CTRL]+[O] to create a new Output node.
- Set the Output node and change it to Selection channel.
- With the Output node still selected, create an Input > Channel > Index channel node.
- With the Input node selected, press [L] then [O] to create a Logic > GreaterOrEqual node.
- With the GreaterOrEqual node selected, press [I] and then [S] to create a Script Input node.
- Enter the code 100*CurrentTime.frame as integer in the Expression field.
- Select the GreaterOrEqual node and press [C] then [I] to add a Convert > ToInteger node.
- Close the Magma Editor.
- Add a Krakatoa Delete modifier to the modifier stack on top of the Magma modifier.

RESULT: As the time advanced, particles with Index higher than 100 times the current frame will be selected and deleted, resulting in an animated reveal effect:
You can achieve a similar effect (at least along the Z axis) by adding a Vol.Select modifier before the Krakatoa Delete modifier, setting it to Vertex mode and animating its gizmo to move up and gradually deselect particles. In fact, you can use any gizmo (except for Mesh) and any animation.
As an added bonus, you can enable Soft-Selection and switch the Krakatoa Delete modifier to Soft-Selection + ID Channel mode (the Index channel will be used instead of ID channel).
This will cause the particles to be deleted in a random pattern, like in the following video example:
Reload the previously saved scene to discard the new animation and continue playing with the material assignments…
Mapping The Color Distribution
Going back to the Material assignment controls, we could go a step further and use the colors of a 3D Texture Map (which is also evaluated in local object space) to determine which particles will get which material. Of course, we could assign the color of the map to a single material directly, but if we wanted each particle to have different surface properties (e.g. specularity, diffuse color, opacity etc.), the following approach would be a lot more flexible:

- Select the PRT Volume object.
- Open the MagmaFlow Editor.
- Select the Position Channel Input node and switch its type to TextureMap.
- Switch the Texture Map Output Type to Mono (Float).
- Click the Get Texture Map button and select a Cellular Map.
- Open the (Compact) Material Editor, select an empty slot and click the Put To MEdit button.
- Set the Cellular map Size to 40.0, the Cell Color to White and the two Division colors to Black.
- Select the Magnitude node and press the [Backspace] key to remove it while preserving the existing connection.
- Select the Float input node and change the Multiplier to 8.0.

RESULT: The Cellular map will produce a Float value between 0 and 1 which will be scaled by 8 and converted to Integer as the MtlIndex value. Thus, cells with white color will produce particles with white material, cells with black color will produce blue particles, and grayscale values will produce red and yellow particles depending on their intensity.
Finalizing The LEGO Look
At this point, you could go the extra mile to make your particles look like actual LEGO bricks.
- Create a cubic Box primitive with dimensions 100.0 units
- Switch to Top viewport.
- Create a Cylinder with Radius 15.0 and Height 20.0 in the one corner of the Box.
- Set the Height Segments to 1 and the Segments to 6.
- Convert the Cylinder to Editable Mesh and delete the bottom capping faces.
- Using the Align tool, move the Cylinder’s Z Mininum to the Box’ Z Maximum.
- Clone the Cylinder 3 times to the other 3 corners.
- Select the Box and in the Hierarchy tab, press Center To Object to place the Pivot at the center of the box.
- In the Utilities tab, press Reset XForm and then Reset Selected.

- Convert the Box to Editable Mesh.
- Attach the 4 Cylinder meshes to the Box.
- Right-click the Scale tool in the Main Toolbar of 3ds Max and enter 1.0 in the Offset:World field to scale down 100 times.
- Reset XForm and Collapse to Editable Mesh again to bake the scaling into the mesh.
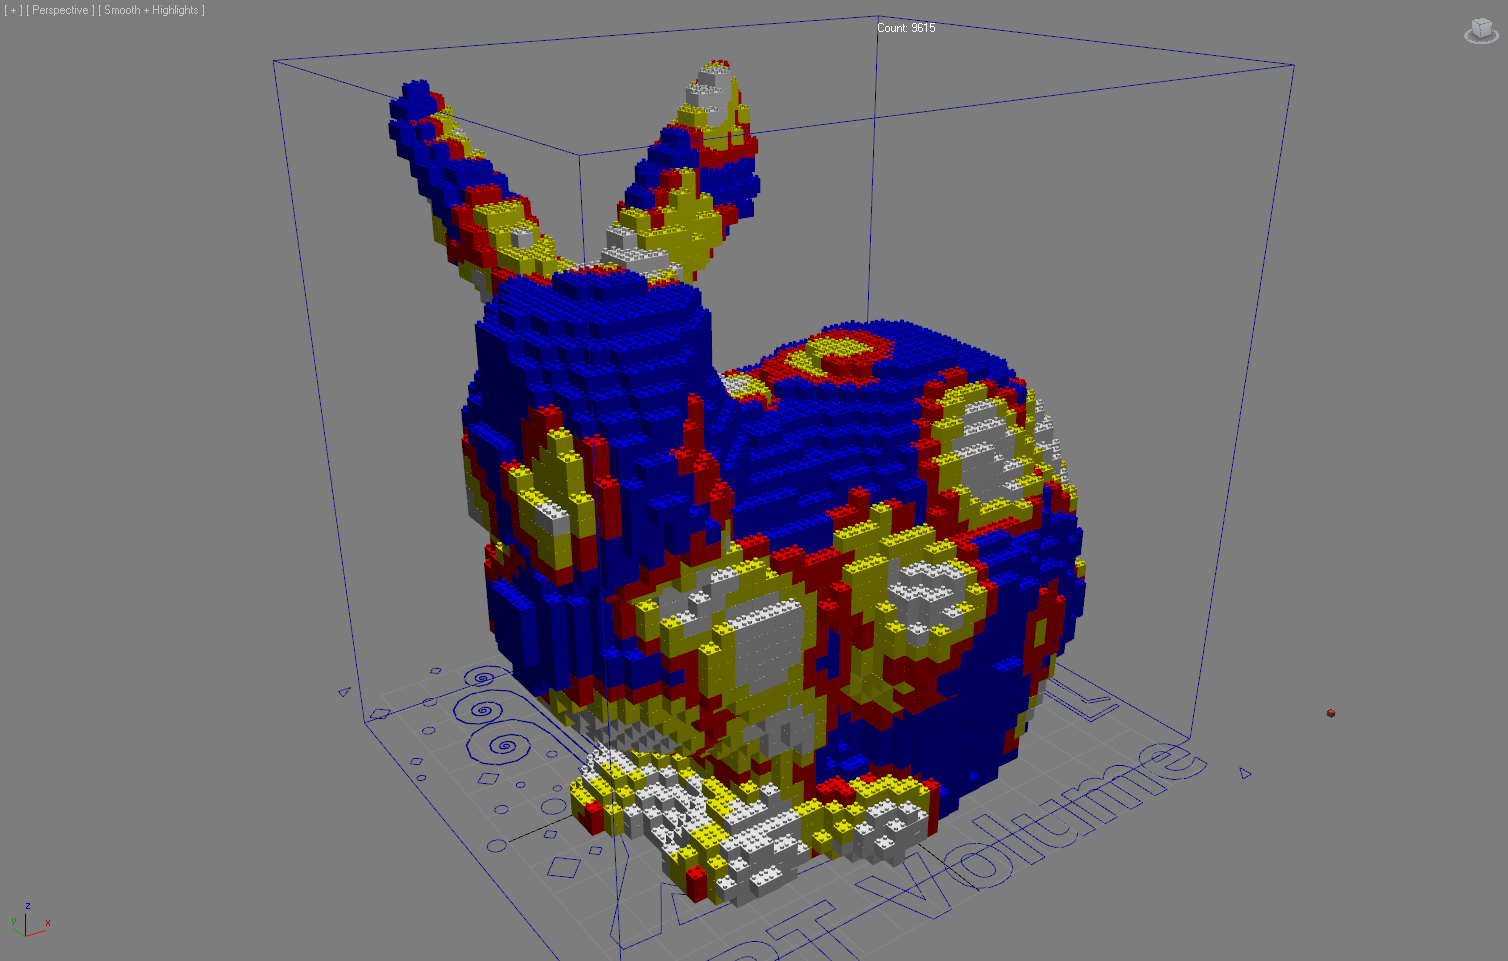
- Select the FROST object, change the Radius to 3.0, switch from Box to Custom Geometry and pick the LEGO piece created above.

RESULT: The FROST mesh now looks like a model built using LEGO bricks!
CONCLUSION:
In this tutorial, we used the ability of the Krakatoa PRT Volume to voxelize arbitrary geometry to create a regular grid of box particles and produce a LEGO-like model which can be animated and colored freely.
Once again, the combination of the FROST meshing capabilities and Krakatoa’s particle channel data flexibility let you achieve a large number of effects in a very short time.
