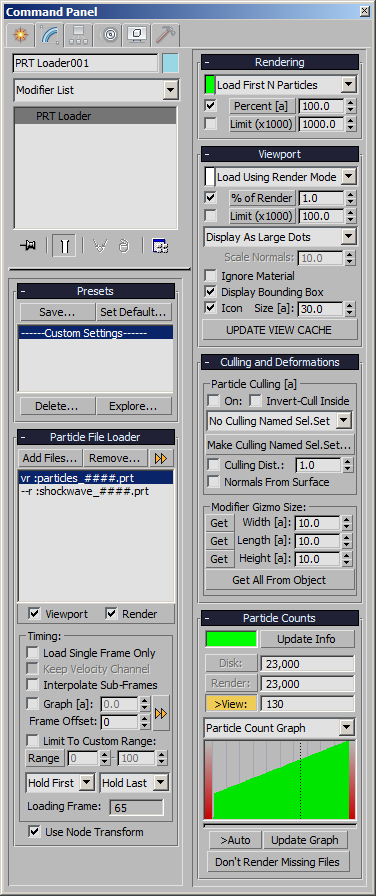
PRT Loader Object
Available in Krakatoa v1.0.0 and higher
- Particle Loaders
- Creating Particle Loaders
- Particle File Sequence Controls
- Add Files… button
- Remove… button
- File Sequence Manager (Edit…)
- Viewport and Render Controls
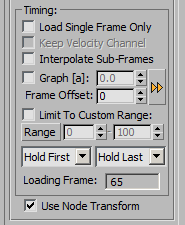
- Timing group of controls
- Load Single Frame Only checkbox
- Keep Single Frame Velocity checkbox
- Interpolate Sub-Frames checkbox
- Graph checkbox and spinner
- Frame Offset
- Graph context menu
- Limit To Custom Range checkbox
- Range spinners
- Range button
- First and Last Range Behavior drop-down listst
- Loading Frame field
- Use Node Transforms checkbox
- Rendering Rollout
- Viewport Rollout
- Culling and Deformations Rollout
- Particle Count Display
- Presets Rollout
- SEE ALSO
Particle Loaders
- Krakatoa manages the loading of particle files and sequences via so-called Krakatoa PRT Loader scene objects.
- Krakatoa PRT Loaders are geometry class stand-in objects which are not renderable in renderers other than Krakatoa.
- Supported input file formats include:
- Thinkbox .PRT files
- Next Limit’s RealFlow Particle .BIN and .RPC files
- Comma-Separated Values ASCII .CSV files
- LiDAR .LAS files.
Creating Particle Loaders
- A PRT Loader can be created using several methods:
Command Panel
- To create a PRT Loader manually,
- Switch the Command Panel to Create Tab
- Click the Geometry icon
- Select the Krakatoa category from the drop-down list
- Click the PRT Loader button and click in the viewport to define the location of the pivot point.
- Right-click to exit creation mode, or click again to create another PRT Loader.
Krakatoa Explorers > Particle Loaders
- From the Krakatoa Explorers > Particle Loaders rollout by pressing the Create New Loader… button.
- By using the provided PRT Loader MacroScript in the “Krakatoa” category of the Customize User Interface dialog of 3ds Max.
- Clicking the MacroScript icon will enter creation mode automatically.
- Clicking while holding the SHIFT key will create a PRT Loader directly at the world origin.
Toolbar > PRT Icon
- If you have customized a toolbar with the Krakatoa MacroScript icons as described here,
- Click the PRT icon to enter creation mode or
- Hold SHIFT and click the PRT icon to create a PRT Loader at the world origin.
Note that depending on your Preferences settings for PRT Loader creation, additional steps could be automated like the opening of the File Open dialog for selecting one or more sequences to be loaded and the navigation to a default path to locate particle sequences.
Particle File Sequence Controls
- This section of the PRT Loader contains the list of files to be added and related controls for adding and removing file sequences.
Add Files… button
This button opens a file picker dialog. The path the dialog will display depends on the Preferences settings for PRT File Loading or the selection in the PRT Loader’s file list:
- If the file list contains no entries (freshly created PRT Loader), the dialog will show, depending on the Preferences,
- The path currently specified in the Save Particles area of the Main Controls rollout.
- The default path specified in the Preferences rollout.
- The current path
- If the file list contains sequences and one sequence has been selected, the file dialog will show the path of the selected sequence. This is useful when adding more partitions to an existing partition. Note that since the list is a multi-selection box, you can deselect all sequences by holding Ctrl and clicking the selected sequence. If nothing is selected, the behavior specified by the Preferences will be used.
- If a valid Default Path has been specified in the Preferences rollout, holding down the CTRL key while clicking “Add Files…” will open the dialog at the Default Path regardless of the above rules.
- If the file list contains no entries (freshly created PRT Loader), the dialog will show, depending on the Preferences,
The user can select either a single file or a file which is part of a sequence or of a Partition Sequence.
- If the file is not a part of the sequence, it could be used together with the “Load Single Frame Only” discussed later on this page to display a static particle cloud on all frames.
- If the file is a part of a numbered sequence, the sequence will display the frame corresponding to the current scene time. If there is no file for that frame, Krakatoa will fail to load the file and will not render/display anything. See Particle Counts rollout for indication of missing frames.
- If the file is a part of a numbered sequence but the “Load Single Frame Only” is checked in the Timing controls, the frame picked during the adding process will be displayed on all frames. Thus, it makes sense to select a representative frame from the sequence when picking a sequence of frames.
- The PRT Loader will NOT allow the SAME frame of a sequence to be added twice to the list, but different frames from the same sequence (for example particles_0000.prt, particles_0010.prt, particles_0042.prt) CAN be added to the same PRT Loader so it is possible to show them all at the same time when “Load Single Frame Only” is on. When it is off, the same sequence will be loaded 3 times, thus increasing the density of the cloud and the loading time.
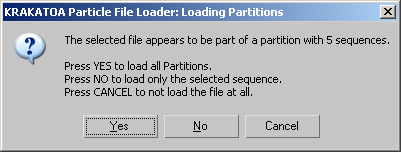
If the file is a part of a Partition, a Prompt dialog will appear asking about loading partitions, the current partition only, or none at all.
- Since v1.5.1, answering with YES will open the PRT Loader’s Select Partitions dialog allowing you to select any partitions in the range specified in the selected file name. In previous versions, answering with YES would have loaded all partitions.
- Answering with NO will load only the selected partition.
- Answering with CANCEL will not add any sequence at all.
The selected files will be shown in a listbox where they can be selected individually or as a group.
Double-clicking the file name on the list will open a Windows Explorer at its path (if still existing).
Remove… button
- Pressing the Remove… button will remove all sequences highlighted in the list box.
- A prompt will ask for confirmation of this operation.
- The Remove operation is undoable.
File Sequence Manager (Edit…)
- See details in File Sequence Manager topic…
Viewport and Render Controls
Available in Krakatoa v1.1.0 and higher
- Every sequence on the list is prefixed by two letters representing the Viewport and Render status of the files. “v” denotes the Viewport display and “r” means the sequence will render.
- When the sequence is not going to be displayed or rendered, the letter will be replaced by “–”.
- You can select any number of sequences on the list and toggle their Viewport and Rendering state using the checkboxes “Viewport” and “Render” underneath the file list. When the selection contains sequences that have either states, the checkbox will be in an indeterminate display mode (grayed out background and checked).
- The File Sequence Manager provides a wide range of operations to mass-control the states of the Viewport and Render flags.
Timing group of controls
- The Timing controls can be used to alter the playback of the PRT sequences.
- By default, particle sequences are loaded according to the scene time.
- For example, if a file is called parts_0000.prt, on frame 1 a PRT Loader would attempt to load the file called parts_0001.prt, on frame 42 it would attempt to load part_0042.prt and so on.
- If the file is missing, nothing will be displayed and if rendered, the rendering will fail unless “Ignore Missing Particles” is checked in the Main Controls rollout.
Load Single Frame Only checkbox
- If the file parts_0000.prt specified in the file sequence list should be used on all frames, checking this option will take the file name as it was specified and use it without attempting to replace the frame number suffix.
- This can be used to place static particle clouds into the scene.
Keep Single Frame Velocity checkbox
Available in Krakatoa v1.6.0 and higher
- When the “Load Single Frame Only” option is checked, the same explicitly specified file will be loaded on all frames, which means that there can be no motion and thus the Velocity channel will be reset to zero at loading time to disallow any motion blur.
- In cases where a single frame is being loaded but the Velocity channel is required, for example by a KCM on top of the stack, the “Keep Single Frame Velocity” option can be checked.
- To reset the Velocity after the KCM has used it, you can add another KCM and set the Velocity Channel to a 0,0,0 Vector.
Interpolate Sub-Frames checkbox
Available in Krakatoa MX v2.0.0 and higher
- This option is useful when changing the playback speed of the particle sequence using the Playback Graph control.
- When the “Interpolate Sub-Frames” option is unchecked, the position of a particle will be interplated linearly based on the closest PRT file’s Position and Velocity channel values. This is fast, but can produce a discontinuity in the particle trajectory half-way between the two PRT files if the particle is moving on a curved path.
- When the “Interpolate Sub-Frames” option is checked, the position of the particle will be calculated using the two surrounding PRT files and cubic interpolation of their positions and velocities. This is signigicantly slower, but the particle’s trajectory will be smooth.
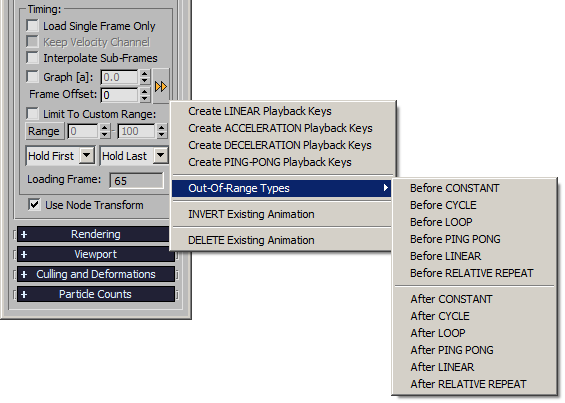
Graph checkbox and spinner
- The Graph checkbox switches the loader to a special mode in which the current scene time is ignored and does not flow anymore.
- The Graph spinner’s value can be keyframed to define the PRT Loader’s frame to be displayed on any given scene frame.
- When the Playback Graph spinner is set to a static value, for example 5.0, the frame 0005 will be loaded on every frame.
- The VALUE of the controller at any given time will define the frame to be loaded on that frame.
For example, a straight line from frame 0 with value 0 to frame 100 with a value of 100 would match the normal playback of the PRT loader with Playback Graph disabled.
- This mode can be used to loop back and forth, change speed, play backwards, play back random frames and so on by specifying matching values in keyframed or procedural controllers.
For example, setting a key on frame 0 with a value of 10.0, a key on frame 40 with a value of 30.0 and a key on frame 100 with a value of 0.0 will play back frames 10 to 30 in the interval from 0 to 40 and then backwards from frame 30 to 0 in the interval from 40 to 100.
- Using bezier controllers, the interpolation of the curve can be used to speed up and slow down playback gradually.
- The PRT Loader will interpolate particle positions requested at sub-frame steps based on the closest saved particle file sample and the saved velocity (if available).
- NOTES:
- This feature is very similar to the Playback Graph found in the Point Cache modifier in 3ds Max 9 and higher.
- The Frame Offset is still taken into account, so if you keyframed a custom animation in the Playback Graph but wanted to shift it by 10 frames, you don’t have to move the keys up in TrackView (although you could), but can just change Frame Offset from 0 to 10.
- The actual frame being played back will be displayed in the “Loading Frame:” field at the bottom of the Timing group of controls.
Frame Offset
- This spinner can be used to offset the frame counter so instead of loading frames 1 to 10 on frames 1 to 10, entering 5 would load frames 6 to 15 on frames 1 to 10.
- The spinner is disabled when Load Single Frame Only is checked because in that case the exact name specified on the list will be used without frame number modifications.
Limit To Custom Range checkbox
- This checkbox limits the frame numbers to avoid attempting to load non-existent frames.
Range spinners
- The Range spinners can be used to specify the first and last existing frames of a consecutive sequence of frames without gaps.
- Any attempts to load a lower or higher frame number (because of the current time, Frame Offset, extreme Playback Graph values etc.) will be prevented by either clamping the frame number to the lower or higher limit, or outputting no particles, depending on the First and Last drop-down lists (see further below).
Range button
- This button can be used to determine the optimal Limit Range based on the actual availability of frames.
- It will query the frame numbers of all sequences and attempt to find the intersection of all ranges that would display and render without any missing frames.
- In some cases, such range cannot be determined - if this is the case, a warning message will pop up.
First and Last Range Behavior drop-down listst
- These two lists define the behavior when Limit To Custom Range is enabled and a frame is requested that is outside of the defined range:
- When the list is set to Hold (Firts or Last), the frame defined by the range spinner as the first or last frame will be output if a frame is requested outside of the range.
- When the list is set to Blank, no particles will be output when a frame outside of the range is requested.
- This is very useful if the first or last frame contains a few particles but you want the sequence to start or end with no particles at all without the need to save empty frames in the sequence itself.
Loading Frame field
- The Loading Frame field represents the actual frame number being loaded at the current time, taking into account all factors including Graph, Offset and Custom Range. When “Load Single Frame Only” is checked, the field will show “File” instead.
Use Node Transforms checkbox
- Controls the transformation of particles by the PRT Loader’s node transforms.
- When unchecked, the particles will appear at the absolute position they were saved at, regardless of the location of the PRT Loader.
- When checked (default), the transformations of the PRT Loader node will be applied to the particles from the file, thus allowing you to position, rotate and scale the particle system in world space.
- If the Position and Rotation are zero and Scale is 100%, the particles will appear where they were saved from, equivalent to unchecking this option.
- Transformations will affect the particle velocities, resulting in correct motion blur of both static and moving particles.
Rendering Rollout
- The Rendering Rollout allows the user to customize the count and display of particles in the final rendering.
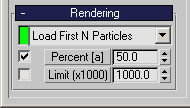
Load Mode drop-down list
- This list provides the following options:
- Load Every Nth Particle - balances loading through the files skipping particles to reach the final count. If the particles are ordered (for example saved from geometry primitives, or emitted over time), this mode will display a lower particle count that would still represent the overall shape of the particle cloud correctly. On the negative side, this mode requires each PRT file on the current frame to be opened and read from start to end, making this mode the slower one.
- Load First N Particles (default) - loads from the beginning of the PRT file until the desired count is reached. If the particles are ordered (for example saved from geometry primitives, or emitted over time), this mode will show only a small region that is unrepresentative of the overall shape of the particle cloud, but since loading just a portion of the file is much faster than reading the whole file, it was made the default setting. If the particles in the cloud are completely random (unordered), the result of this mode will look like the result of Load Every Nth Particle but without the speed hit.
Note: When loading a CSV file, particles will always be loaded in Load Every Nth Particle mode. This is because the CSV file does not contain any header information about the total number of particles stored inside, and figuring this out on the fly would defeat the purpose of the Load First N Particles mode which is used mostly for improving speed. If you need to load particles in the order they were saved to achieve a special effect like building up an object by animating the Render Percentage, you should convert your CSV files to PRT files by loading in a PRT Loader and saving from Krakatoa to PRT, then use the PRTs in the PRT Loader to achieve the effect.
- Load Every Nth by ID - this mode was added to Krakatoa v1.5.0 and balances loading through the files skipping particles based on their ID channel (if present) to reach the final count. If every particle has a unique ID, the same particles will be loaded even if other particles are born or die, resulting in a stable flicker-free particle cloud over time. This method has the same speed drawback as Load Every Nth Particle. If the ID Channel is not found, this method will work like Load Every Nth Particle.
Percent spinner, button and checkbox
- The spinner defines the percentage of particles (either first N or every Nth) to be rendered as fraction of the total particle count on disk.
- The Percent spinner is ANIMATABLE (denoted by [a] next to its name), allowing for animated reveals and dissolves of particles over time by changing the percentage of particles loaded from the PRT file.
- The checkbox in front of the Percent spinner controls whether the particles will be rendered at all. When this checkbox is unchecked, the PRT Loader will not be considered by the renderer at all - as if it was hidden or non-existent.
Note: You can uncheck this checkbox if you are saving particles to PRT files and the output PRT path is loaded in your existing PRT Loader. Otherwise an error would be reported about attempting to recursively save into a file that is already used for input.
- The button with the text “Percent [a]” provides typical Preset values and can be customized using the Krakatoa Value Presets system.
Limit (x1000) spinner, button and checkbox
- The spinner defines an optional maximum number of particles to load.
- Its value is taken as a multiple of 1000.
- By default it is disabled (checkbox in front is unchecked) and is set to 1000, resulting in a limit of 1 million particles.
- This can be used if your PRT files contain a lot more particles than you can render and you want to cap the number to a value you know your system can handle safely.
- The button implements the Krakatoa Value Presets system for this spinner, letting you select typical values and add and remove your own.
Viewport Rollout
- The following controls affect the display of particles in the 3ds Max viewports.
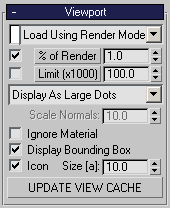
Load Mode drop-down list
- The list provides the same controls as the Render Controls list plus one additional
- Load Using Render Mode - uses whatever mode is set in the corresponding Render Controls drop-down list.
- The % of Render spinner defines a Percentage of the Percent in Render Controls. Thus, if the Render Percent is set to 50 % and Viewport % of Render is set to 10%, only 10% of 50% will be drawn in the viewport, in other word only 5%. this also allows you to animate the Render Percent and have the Viewport show the same animation, but with a reduced count.
- The checkbox in front of the % of Render spinner controls the drawing of particles in the viewport. When it is unchecked, no particles will be drawn. When it is checked (default), particles will be drawn. This option is completely independent from the one in the Render Controls area - particles can be set to render and display, not render but display, render but not display and not render and not display.
Limit (x1000) spinner, button and checkbox
- The spinner is similar to the one in the Render Controls, but caps the number of particles to be drawn in the viewport if the checkbox in front of the spinner is checked.
- The value is set to 100000 particles and is disabled by default.
- The button implements the Krakatoa Value Presets system for this spinner, letting you load, add and delete custom values.
Display Mode drop-down list
- This list is unique to the Viewport Controls - it defines the shape of the individual particles drawn in the viewport. The options are:
- Display As Small Dots - draws small dots. The size is dependent on the graphics driver - in Software Z-Buffer, the dots will have a size of exactly one pixel, in DirectX they are usually 2x2 pixels. This is the same mode used by PFlow Dots display. NOTE: In this mode, z-buffering will not function correctly and the particles will not be sorted correctly with regard to each-other and geometry objects in the scene.
- Display As Large Dots - draws large dots. The size depends on the graphics driver, but is generally much larger than the previous mode. In contrast to Small Dots, Large Dots respect Z-buffering correctly and will sort / intersect with scene geometry as expected. This mode is recommended when working with the Culling option as it would show the correct intersection between geometry and particles in the viewport.
- Display Velocities - draws lines with size based on the velocity stored in the PRT file. The display is also dependent on the graphics driver - in Software Z-Buffer, velocity of 0 is displayed as a single dot. In DirectX, near zero and 0 velocities make the lines completely disappear. Thus, this mode should only be used when the particle file contains moving particles. This mode is similar to the Lines display of Particle Flow, but is implemented differently:
- Krakatoa displays lines 30 times faster than the Line display of Particle Flow and about as fast as the Dot display in both Particle Flow and the PRT Loader itself.
- Particle Flow tests against zero velocity in Line mode and displays such particles as Dots instead of Lines. Krakatoa does not do this as it would require a test for each particle and would potentially slow the display down, especially with millions of particles. If your particles are static, simply do not switch to Velocity Display.
- If the Particle Loader has been limited to show only one frame, for example via “Load Single Frame Only” checkbox, Playback Graph with no animation or “Limit to Custom Range” with the same start and end frames, NO VELOCITIES will be displayed since the particle cloud is considered static.
- Display Normals - draws the normal vectors found in the Normal channel of the particles as lines. Similar to the Velocity Display, but the lines will point in the direction of the particle normal (if any). The Scale Normal spinner can be used to make the lines appear longer in the viewport. The default scale is 10.0.
- Display Tangents - draws the tangent vectors as lines. Similar to the Normal Display, but the lines will point in the direction of the particle tangent (if any). The Scale Normal spinner can be used to make the lines appear longer in the viewport. The default scale is 10.0.
Note that the Tangent channel is currently not used by the Renderer, but can be saved from most particle systems as the Y axis of the particle transformation matrix and could be useful to calculate the Z axis as the cross product of the Normal and the Tangent in MagmaFlows. It was originally used by Beta builds of v1.5.0 to perform Anisotropic shading, but that feature was dropped from the final version.
Ignore Material checkbox
- This checkbox was added in Krakatoa v1.5.0 to allow the display of pre-material assigned channels in the viewports without the need to remove the material to see them.
- If a material is assigned to the PRT Loader, its color (if provided - the Scattering color can be disabled in a Krakatoa Material!) will override any color channels provided by the PRT files or Krakatoa Channels Modifiers setting the color channel on the object’s stack.
- When this checkbox is checked, the colors provided by the PRT files or the KCMs will be used in the viewport, ignoring the colors of the Material assigned to the PRT Loader.
- When unchecked (default), the Material colors will be shown in the viewport.
Display Bounding Box checkbox
- The checkbox is on by default and causes a bounding box to be drawn around the displayed particles.
- Note that when using Particle Culling, the original bounding box before culling will be displayed to show where the particles would have been if they were not culled.
Icon checkbox
- This checkbox lets the user turn on and off the Krakatoa Icon display in the viewport.
Size[a] spinner
- The spinner next to the Icon checkbox is used to adjust the size of the PRT Loader’s icon.
- The icon shows the Krakatoa Logo and can be used as a stand-in for selecting the loader when no particles are being displayed in the viewport.
- The Icon does not render so it is ok to be left visible most of the time.
- The Size is animatable to provide varying icon sizes throughout animation for better visibility.
UPDATE VIEW CACHE
- Pressing the button will invalidate the viewport cache.
- It is equivalent to moving the time slider or selecting a new viewport or rendering option that would require recaching the viewport particles.
- It can be used, for example, after changing a material property like the diffuse color to refresh the viewport color display without having to reselect the color mode from the drop-down list.
- The same button will also cause a refresh of the culling volumes, so if you added a new culling volume to the currently selected named selection set, you can press the button to update the particles display instead of reselecting the named selection set from the list.
Culling and Deformations Rollout
Particle Culling
- Please see the topic Particle Culling and Normals Acquisition for details and examples.
Modifier Gizmo Size
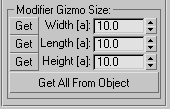
- Deformation gizmos in 3ds Max are resized to fit the object’s bounding box.
- Since the particle bounding box is constantly changing and might not even have the correct size when using Load First N Particles mode, the Particle Loader provides its own explicit and animatable modifier context size to any modifiers.
- The Width, Length and Height values specify an explicit modifier context for any object space modifiers added to the Particle Loader. All values are animatable.
- The Get buttons in front of the values can be used to get the corresponding value from the particle bounding box on the current frame. If the 3ds Max Auto Key option is enabled, the values will be keyframed.
- The Get All From Object will set all three values at once. It can be used instead of pressing the 3 Get buttons one by one.
- Please see the topic Particle Deformations for details and examples.
Particle Count Display
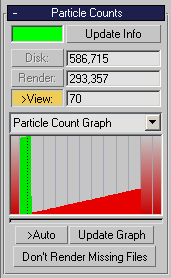
- The Particle Count Display group of controls provides information about the status of the loader, the number of particles in the particle files, the particles scheduled for rendering and the count actually displayed in the viewport.
- The Status Indicator in the upper left corner of the rollout can show 4 different colors depending on the status of the particle files on the current frame:
- Gray- no particle files have been specified, nothing to show or render.
- Green - all particle files were found and valid. Particles would render correctly.
- Red - some particle files could not be loaded. This would fail the rendering.
- Clicking on the Status Indicator while it is red will display the last error message that caused the warning.
- Checking the >View option will display the Viewport count in the viewport next to the one corner of the bounding box. In v1.0.x, the Disk and Render values could also be displayed in the viewport. To streamline the code and improve the display speed, these options were disabled in v1.1.0.
- The View count value in the UI will show the requested viewport count while the value in the viewport will show the actual number of particles drawn, taking into account culling etc.
- The text fields cannot be written into, but the values can be copied and pasted to/from the clipboard.
- The Update Info button can be used to force a refresh of the info. It will also display the error message showing the last missing frame encountered if the status indicator is red.
- The Graph area can be used to display information about the particle counts and missing frames similar to the ones displayed by the PRT Loader Analyzer Utility.
- The Status Indicator in the upper left corner of the rollout can show 4 different colors depending on the status of the particle files on the current frame:
File Availability Graph
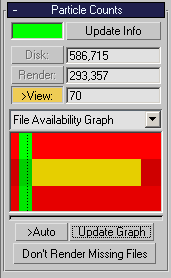
- This mode collects data only about the existence of the files, not about their content. Thus it is much faster to process and display the data.
- By default, the graph will be empty, only displaying a vertical dotted line representing the current frame.
- Press the Update Graph button to collect data from the particle files in the loader.
- The result is a set of horizontal stripes, one more than the number of file sequences in the PRT Loader.
- The top stripe represents the total accumulated particle cloud.
- Green represents frames that are available in all sequences.
- Red represents frames where at least one sequence is missing a frame. Attempting to render that frame would cause an missing file error.
- The following N stripes represent in color the file availability of each file sequence.
- Green means that the frame is available AND all other sequences have that frame available.
- Yellow means that the frame is available BUT at least one other sequence is missing the frame.
- Red means that the frame is missing from that sequences.
- Gray means that the Render flag of that sequence has been disabled and the sequence will not participate in the rendering (sort of “silent green”)
Particle Count Graph
- This mode collects the actual particle counts from the PRT files on the list and shows them as a detailed graph.
- By default, the graph will be empty, only displaying a vertical dotted line representing the current frame.
- Press the Update Graph button to collect data from the particle files in the loader. NOTE that this can take a long time depending on the amount of files, frames and the location (network vs. local).
- If the files are few and local, you can also check the >Auto option to refresh the graph display while changing timing and percentage values. WARNING: Use this at your own risk and only when the update time is short enough for interactive updates!
- Note that the update time of the Graph in milliseconds will be reported in the status bar of 3ds Max.
- The graph colors have the following meaning:
- Green - all particle files were found and valid. Particles would render correctly. If displayed as a gradient, the count cannot be determined (CSV file sequences cannot report their count).
- Red - If displayed as a red gradient, no particle files could be loaded and the renderer would fail. If displayed as solid red bar, some particles could be loaded but at least one file was missing, and it would fail the renderer.
- A blue progress bar underneath the graph will represent the process of reading particle counts from all loaded sequences.
Don’t Render Missing Files
- This button performs a File Availability check and disables the Render Flag of all sequences that are missing at least one frame within the current scene range.
Presets Rollout
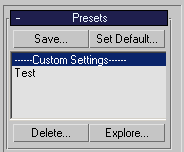
- Any combination of custom settings can be stored to Preset Files for fast switching between typical modes.
Save… button
- To create a new Preset,
- Set up your PRT Loader using all its settings (some settings are not saved though - like the file list and r/v flags)
- Press the Save… button.
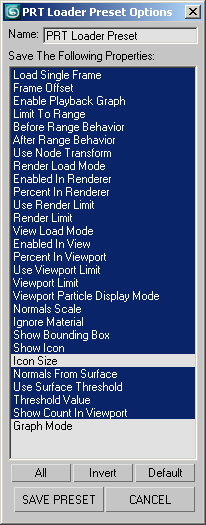
- A modal PRT Loader Preset Options dialog will open.
- Using Ctrl+Left Click, select/deselect the properties you want to be saved.
- You can also use the All, Invert and Default buttons to select all, invert the current selection or set the default selection.
- Enter a name for the preset in the Name field on top of the dialog.
- Press SAVE PRESET to save or CANCEL to exit.
- To load a saved preset, simply single-click on its name in the Presets listbox.
Set Default… button
- Any saved preset can be made the default preset to be applied when a new PRT Loader is created in the scene.
- For example, if you like working with a specific percentage of particles, specific point size or display mode etc., instead of changing the settings after each PRT Loader creation, you can save your own defaults and whole libraries of favorite settings.
- To make a preset the Default,
- Either select the preset in the Presets list of the PRT Loader and press the Set Default… button or
- Open the Krakatoa GUI>Preferences rollout, select the Preset to be applied from the list and check the >Apply Preset to New PRT Loaders option.
- To disable the loading of Presets on new PRT Loader creation, either select the “Custom Settings” entry in the Presets list and press the Set Default… button, or disable the >Apply Preset to New PRT Loaders option in the Preferences rollout.
- The name of the preset to be loaded and the enabled state of the preset loading on PRT Loader creation are stored LOCALLY for each 3ds Max installation, while the presets are stored in the SAME Presets folder for all installations. This lets all 3ds Max installations share the same presets but use a different default one when creating PRT Loaders.
Delete… button
- To delete a preset, select it on the list, then press the Delete… button.
- Alternatively, use the Explore… button described below and delete the file manually.
Explore… button
- All presets are stored in the Presets folder in the Local User settings folders. To explore, copy, archive, delete manually etc. preset files, press the Explore… button - it will open a Windows Explorer at that folder’s location.