PRT Volume Object
Available in Krakatoa MX v1.5.0 and higher User Interface updated in Krakatoa MX v1.6.0
Introduction
- The Krakatoa PRT Volume object is designed to fill the volume of any more or less closed mesh with particles.
- It generates particles in the viewport and in the renderer and can be modified interactively using Magma Modifiers, 3ds Max Deformation modifiers and regular node transformations.
- It accepts both Krakatoa and Standard Materials as the sources of most shading-related channels.
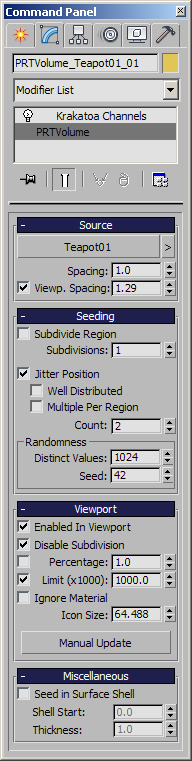
Source Rollout
Volume Object pickbutton and Options [>] button
- This button can be used to pick the volume source object to be filled with particles.
- You can either click in the viewport to select the object or hit H to open the Select By Name dialog and select from the list.
- Right-clicking the pickbutton or clicking the [>] Options button will open a context menu with various useful functions - see here for more.
Spacing spinner
- This value controls the spacing between the particles at render time (and in the viewport if Viewport Display>Spacing is unchecked).
- Krakatoa takes the local bounding box of the geometry object and generates particles in a voxel grid aligned to the object’s axes.
- Min. value is 0.0001
- Default value is 1.0
Viewport Spacing checkbox and spinner
- When the checkbox is checked (default), the spinner will be used as an alternative Spacing value for the Viewport generation of particles, typically to create less particles than at render time.
- When unchecked, the global Spacing parameter will be used for both Rendering and Viewport particle generation.
- In v1.5.1 and higher, when using the VOL MacroScript icon provided in the Krakatoa category of the Customize User Interface dialog, the Viewport Spacing value will be set automatically to 1/50 of the largest world space bounding box of the source geometry volume. This ensures that the viewport count will not be dependent on the size of the source geometry object (as a larger object would have enclosed more voxels in v1.5.0).
- For example, A Geosphere with radius of 10.0 will produce a PRT Volume with Viewport Spacing of 0.4 (2*10.0/50) and create 63264 particles. A Geosphere with radius of 100.0 will produce a PRT Volume with Viewport Spacing of 4.0 and will create 63266 particles. The particle count in the viewport will remain close to 63K regardless of the radius value of the Geosphere.
Seeding Rollout
- The Seeding controls affect the distribution of particles within the voxels calculated by the Level Set including grid or random placement, voxel sub-division and multiple particles per sub-divided region.
- When all checkboxes are unchecked, a single particle will be created in the center of each voxel as long as the particle is inside the source mesh’s volume. This was the default behavior of the PRT Volume in v1.5.x.
- In Krakatoa v1.6.0, the Jitter Position checkbox is checked by default, thus the default distribution of particles is one per voxel, but randomly placed inside the voxel.
- This is to remove visible moire patterns when rendering a regular grid as points.
- When rendering as voxels, it is advisable to turn off the Jitter Position and create a regular grid to produce a smooth distribution.
Subdivide Region checkbox and Subdivisions spinner
- When unchecked (default), each voxel will be taken as a Region and filled with particles according to the settings below.
- When checked, each voxel will be sub-divided uniformly according to the Subdivisions spinner - a value of 1 means the voxel will be subdivided once along X, Y and Z, producing 8 sub-regions.
- Each of these resulting regions will be filled with one or more particles as specified by the settings below.
- It is important to note that the Subdivisions value causes CUBIC subdivision, producing exponentially more particles! For example a value of 3 means each voxel will be turned into 4x4x4 = 64 Regions!
Jitter Position checkbox
- When unchecked, each particle will be placed exactly in the middle of each Region (either Level Set Voxel or Voxel sub-division)
- When checked (default), the position of the particle inside the region will be randomized by seeding a given number of distinct random positions according to the Randomness setting (see further below) and picking from the random positions.
- The Random positions ensure that each region will always produce the same random distribution pattern and will never flicker between renders.
Well Distributed checkbox
- This option is only used when the Jitter Position checkbox is checked. Otherwise it will not be grayed out, but will be ignored.
- When unchecked (default), the random positions will be generated without taking into account the distance between already seeded samples and will thus not ensure uniform distribution, but this results in higher performance.
- When checked, the random positions will be seeded so that the distances between samples would be uniform and avoid accidental clumping of particles, at cost of performance.
Multiple Per Region checkbox and Count spinner
- This option is only used when the Jitter Position checkbox is checked. Otherwise it will not be grayed out, but will be ignored.
- When unchecked (default), exactly one particle will be created in each Region.
- When checked, the number of particles specified by the Count spinner will be created in every Region.
- Note that this is the absolute number of particles per region, so entering 32 will create exactly 32 particles in every region.
- If the Subdivide Region option is checked and each Voxel is thus sub-divided into multiple sub-regions, each of these sub-regions will generate the number of particles specified by the Count spinner, e.g. if Subdivisions is set to 2, this will create 3x3x3 = 27 sub-regions and if Count is 2, 54 particles will be created in each Voxel.
Randomness Group Of Controls
- The following controls affect only the Jitter Position behaviour and do not apply to Regular Grid without Jitter or Random In Cube.
Distinct Values
- This value controls the total number of distinct points to generate within a voxel for the particle to select a Jittered Position.
- Default is 128.
Viewport Rollout
Enabled In Viewport checkbox
- When checked (default), the PRT Volume will calculate and display particles in the viewports.
- When unchecked, no calculations will be performed and no particles will be shown in the viewports.
- This does not affect the generation of particles at render time - to disable a PRT Volume from rendering, either disable its Renderable Object Property or hide it.
Disable Subdivisions checkbox
- When checked, the Viewport particle generation will ignore any sub-division values that could produce unmanageable particle amounts.
- When unchecked, the sub-division settings (Subdivisions spinner, Multiple Per Region > Count spinner) will be respected in the viewport.
Percentage checkbox and spinner
- The checkbox enables a Viewport percentage value which controls the amount of particles to be drawn as a fraction if the particle count to be rendered, defined either by the global or the Viewport Spacing parameter.
- This option is unchecked by default.
- The spinner defines a percentage in the range from 0.0 to 100.0%
Limit (x1000) checkbox and spinner
- The checkbox enables a Viewport count limit value which controls the max. number of particles (in thousands) to be drawn.
- The spinner defines the limit value, min. is 0 (no particles drawn).
Ignore Material checkbox
- When checked, the viewport display will show the color data available in the particle stream before the material is applied.
- This enables the color channel acquired by the PRT Volume (for example from the Vertex Color Channel of the source geometry) or KCM_Color modifiers to be displayed in the viewport even if a material would override them at render time.
Icon Size spinner
- This value controls the size of the PRT Volume’s Icon.
- When using the MacroScript to create PRT Volumes from objects, the size of the Icon will be set automatically to the maximum value of the X and Y dimensions of the source.
- The icon can also be set manually based on the source size using the [>] button’s menu.
Manual Update button
- When pressed, the PRT Volume object will recalculate the Level Set and regenerate the particles, thus also capturing any changes to Materials, Maps and KCMs.
Miscellaneous Rollout
Seed In Surface Shell checkbox
- When the checkbox is unchecked, all particles inside the volume will be created.
- When the checkbox is checked, only particles found in voxels that are within the range defined by the two spinners will be created.
Shell Start and Thickness spinners
- The two spinners control the start and thickness of the band to be filled with particles.
- Start of 0 means at the surface of the object, positive Start values are measured as an offset from the surface inwards.
- The Thickness controls how thick the shell will be, starting at the Start offset and ending at Start+Thickness measured inwards.
- Both values are in world units.
- Both values are animatable!
Surface Data Acquisition
- The PRT Volume will acquire surface properties and store them into the corresponding Particle Channels on demand.
- The Position channel will be set based on the voxel grid and shell settings
- Normals will be acquired throughout the volume and stored in the Normals channel.
- Any existing Texture Coordinates will be stored in the respective particle channels including Vertex Color to Color, UVW Channel 1 to TextureCoord and Mapping Channels 2 to 99 to particle channels Mapping2 to Mapping99.
- A special SignedDistance channel will be populated with the distance of the particle to the closest point on the surface.
- All values will be with a negative sign since inside the volume.
- This value could be used to calculate a Shell or a falloff gradient relatively to the surface in a Krakatoa Channels Modifier.
Options Menu
Available in Krakatoa v1.6.0 and higher
- The Options menu is accessible via the [>] button next to the Volume Object Pickbutton or by right-clicking the Volume Object Pickbutton itself.
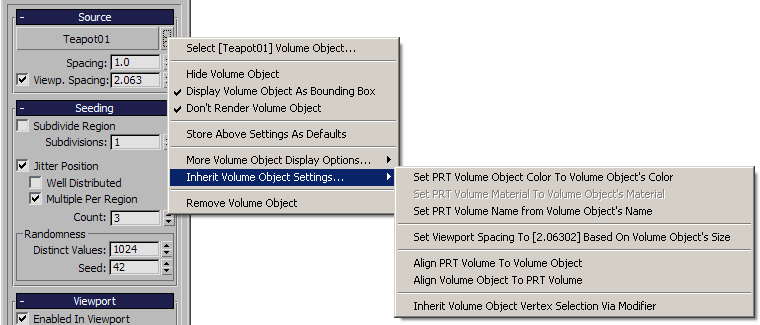
- It provides the following options:
Select Volume Object [<VolumeObjectName>]
- Picking this menu item will select the Volume Object assigned to the PRT Volume.
- If the Volume Object is hidden, it will still be selected and its controls will show in the Modify Panel.
- This menu option can also be used to see the full name of the Volume Object in case it is too long to fit on the Pickbutton.
Hide Volume Object
- This option controls whether the Volume Object is hidden or visible.
- When the Volume Object is hidden, a checkmark will appear in front of the menu item.
- Selecting the menu item will toggle the hidden state of the Volume Object without the need to select it and use the Object Properties or 3ds Max hide/unhide controls.
Display Volume Object As Bounding Box
- This option controls whether the Volume Object is displayed as Bounding Box or as Geometry.
- When the Volume Object is displayed as Bounding Box, a checkmark will appear in front of the menu item.
- Selecting the menu item will toggle the Bounding Box display of the Volume Object.
Don’t Render Volume Object
- This option controls whether the Volume Object will be rendered if Geometry Vertices are enabled as a particle source via the Renderable Object Property.
- When the Volume Object is Not Renderable, a checkmark will appear in front of the menu item.
- Selecting the menu item will toggle the Renderable property of the Volume Object.
Store Above Settings As Defaults
- This options can be used to record the current settings for Hidden/Visible, Bounding Box/Geometry and Renderable/Non-Renderable Volume Object to be used when using the PRT Volume MacroScript in the Krakatoa Menu or Toolbar.
More Volume Object Display Options >
See-Thru Volume Object
- This option controls whether the Volume Object will be displayed as See-Thru or as solid geometry (when not hidden or set to bounding box)
- When the Volume Object is set to See-Thru display, a checkmark will appear in front of the menu item.
- Selecting the menu item will toggle the See-Thru display of the Volume Object on and off.
Freeze Volume Object
- This option controls whether the Volume Object will be frozen or selectable
- When the Volume Object is set to Frozen state, a checkmark will appear in front of the menu item.
- Selecting the menu item will toggle the Frozen state of the Volume Object on and off.
Volume Object Show Frozen As Gray
- This option controls whether the Volume Object will be displayed as Gray or using its color/material when it is Frozen.
- When the Volume Object is set to Frozen and Show Frozen As Gray, a checkmark will appear in front of the menu item.
- Selecting the menu item will toggle the Show Frozen As Gray option of the Volume Object on and off.
Inherit Volume Object Settings >
Set PRT Volume Object Color To Source Object’s Color
- When selected, this menu item will assign the Object (Wireframe) Color of the picked Volume Object as the PRT Volume’s object.
Set PRT Volume Material To Source Object’s Material
- When selected, this menu item will assign the Volume Object’s Material to the PRT Volume’s.
- If the Source Object has no material assigned, the option will be grayed out.
Set PRT Volume Name To [PRTVolume_ObjectName_NN]
- When selected, this menu item will assign the unique name “PRTVolume_<ObjectName>_NN” to the PRT Volume, where <ObjectName> is the name of the Source Object and NN is a unique number.
- The menu item will show a preview of the name to be assigned.
Set Icon Size from Source Object’s Bounding Box
- When selected, the Icon Size will be set to the greater of the X and Y world-space dimensions of the Source Object’s bounding box using the same code applied when creating a PRT Volume via the MacroScripts (toolbar or Krakatoa menu).
Set Viewport Spacing To [X.X] Based On Source Object’s Size
- When selected, this menu item will set the Viewport Spacing to the value calculated based on the diagonal of the Source Object’s Bounding Box.
- The value to be assigned will be shown as preview in the menu item.
Align PRT Volume To Volume Object
- Selecting this menu item will align the PRT Volume’s transformation to the one of the Source Object.
Align Source Object To PRT Volume
- Selecting this menu item will align the Volume Object’s transformation to the one of the PRT Volume object.
Inherit Source Object Vertex Selection Via Modifier
- When selected, a TurnToMesh modifier will be added to the stack of the Source Object and will be set to pass through the Vertex Selection Channel.
- If the PRT Volume has KCMs or Modifiers that depend on the particle Selection channel, the Selection channel of the Source Object will be propagated within the PRT Volume - see here for details.
Remove Volume Object
- Selecting this menu item will remove the current Volume Object and reset the Pickbutton, thus also disabling the particle generation in the PRT Volume.
Additional Information
The PRT Volume uses the object space of the source geometry object - any object-space transformations or world-space modifiers and Space Warps will NOT be reflected.
The PRT Volume will take into account any object space deformations and modifiers applied to the source geometry, for example modifiers changing the UVW coordinates or painting into the Vertex Color channel will affect the particle data.
The PRT Volume scene object can be transformed independently from the geometry source, so you can have multiple PRT Volume objects (or instances of the same PRT Volume object) placed or animated freely in the scene while using a static or animated geometry object without being affected by its location or PRS animation.
When creating a PRT Volume using the MacroScript found in the Krakatoa menu or toolbar, the material and wireframe colors of the source geometry will be assigned to the corresponding PRT Volume object, and its name will be set to PRTVolume_<SourceObjectName>_XX where XX is a new unique number.
For example, if Box01 is selected and the MacroScript is executed, a PRT Volume with the name “PRTVolume_Box01_01” will be created.