Assigning Particle Shape Using PRT Cloner Modifier
Applicable to Krakatoa MX v2.0.0 and higher.
- Note Before reading further, be sure to check out the Using PRT Cloner Modifier topic first.
Introduction
- Krakatoa has always rendered particles as single points, and since v1.5.0 also as voxels, but the general shape of the particle count never be truly controlled. Naturally, the ability to specify the actual shape of a particle has been on the wishlist since the very beginning.
- The PRT Cloner Modifier lets you replace the point shaped particle in one particle stream with any number of particles from another particle stream. To a certain extent, it allows you to actually define the shape of particles by using object-shaped clouds of particles. Properties like Position, Orientation, Scale, Color and Density of the Cloned particles can be controlled via particle channels coming from the original simulation, or generated on the fly using Magma.
- In the following tutorial, we will look at the basic workflows by replacing each particle in a very low-count simulation with thousands of custom-shaped particles via the PRT Cloner modifier.
The Base System
- For this example, we will use a Particle Flow system with only 100 main particles which will spawn up to 50 particles at random to represent something similar to Fireworks.
- Your system could be set up differently, but here are some guidelines:
- Create a Standard Flow, set it to 100% in Viewport, Frame Integration Step for both Viewport and Render.
- Delete the Shape operator.
- Set the Birth operator to 100 particles over 100 frames.
- Switch the Speed operator to Reverse and Speed 500.0, Variation 200.0, Divergence 30.0
- Add a Delete operator and set to by Age 100
- Set the Display Operator to orange-yellow color, Line display.
- Add a Force operator to the Global PF_Source_001 Event.
- Create a Gravity force, set it to Strength 0.1
- Create a Drag force, leave at defaults
- Add both Gravity and Drag to the Force operator.
- Move the Rotation operator from Event001 to the Global Event and set to Speed Follow.
- Add a Spawn Test after the Speed operator and set to By Travel Distance, Step Size 200.0, Spawnable 30.0%, Offspring # 50, Variation 50.0, Speed Inherited:50.0, Variation: 20%, Divergence 180.0.
- Drag a new Delete operator into a new Event, set to By Age 20+/-10
- Set the new Display color to Blue, Line display.
- Wire the Spawn Test to the new Event.
- Clone the Spawn Test as Copy twice inside the Event001.
- Change the Random Seeds of both copies, change the Step Sizes to 150 and 250 respectively.
- Clone the Event 002 two times
- Change the Display colors to Red and Green, wire to the new Spawn tests.

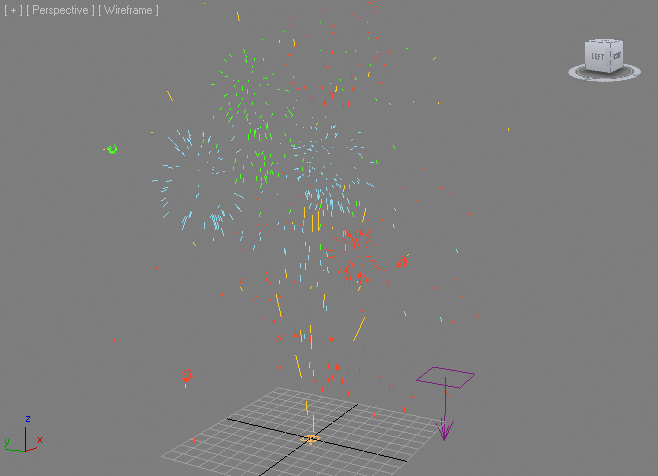
- The resulting system should have yellow rockets shooting up and bursting into blue, red and green clouds:
Creating A PRT File Sequence
- In order to use the PRT Cloner Modifier, we will need a PRT file sequence which we will load in a PRT Loader.
- Open Krakatoa UI.
- Set Krakatoa to Save Particles To File Sequence
- Specify a save path
- In the Channels To Save, make sure you include the following channels:
- Position
- Velocity
- ID
- Age
- LifeSpan
- Orientation
- Color
- Right-click the SAVE PARTICLES button and select “Active Segment [0-100]”
- Press the SAVE PARTICLES button to generate the PRT files.
- Once done, disable the Particle Flow
Creating the PRT Loader
- Now that we have baked the Particle Flow to a file sequence, we can reload it using a PRT Loader and set up the PRT Cloner:
- Hold SHIFT and click the PRT icon or select the “Create a PRT Loader…” option from the Krakatoa menu.
- Add the saved sequence to the PRT Loader’s file list.
- Click the “% of Render” button in the Viewport rollout and select 100.0 to show all particles.
- Select “Display Velocities” from the list instead of “Display As Large Dots”.
- Create a GeoSphere with Radius 5 and 8 Segments.
- Press the VOL icon or select the “Create PRT Volume object(s)…” option from the Krakatoa menu to turn the GeoSphere to a particle cloud.
- Set the Viewport spacing to 2.0, leave Spacing to 1.0 and make sure Jitter is on.
- Check “Multiple Per Region” and enter 10 in the Count value spinner.
- Set the Wireframe color of the PRT Volume to white!
- Add a PRT Cloner Modifier to the modifier stack of the PRT Loader.
- Click the Add button and pick the PRT Volume made from the GeoSphere.
- Change the Viewport > Percentage to 100.0 to show all viewport particles.
- Uncheck the “Compenstate Density > Enabled” option.
- We now have each particle from the PRT sequence representing the Particle Flow system replaced with the GeoSphere-shaped particle cloud of the PRT Volume:

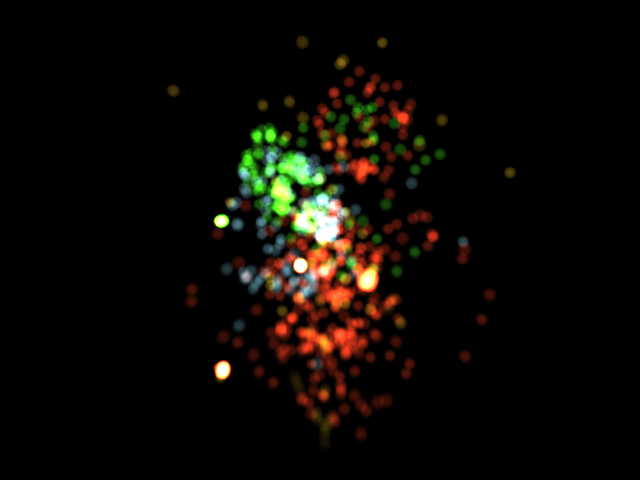
- Here is frame 50 rendered at 640x480 with Force Additive on, Final Pass Density 5.0/-2, Jittered Motion Blur on with 4 Segments and 360 degrees Shutter - the particle count was 4.91 Million, rendered in 3.818 seconds:
- You can render all 100 frames to take a look at the whole animation:
Setting the Scale Channel By Inter-Particle Spacing
- In the above example, the Scale of the particles was assumed to be [1,1,1] and the PRT Volume was assigned to the particles without changes.
- The PRT Cloner provides an option to scale each particle’s Clone based on the distance to the closest neighbor particle - this produces small Clones in dense regions and large clones in lower particle density regions.
- Check the “Enabled” checkbox in the “Set ‘Scale’ Channel” group of controls.
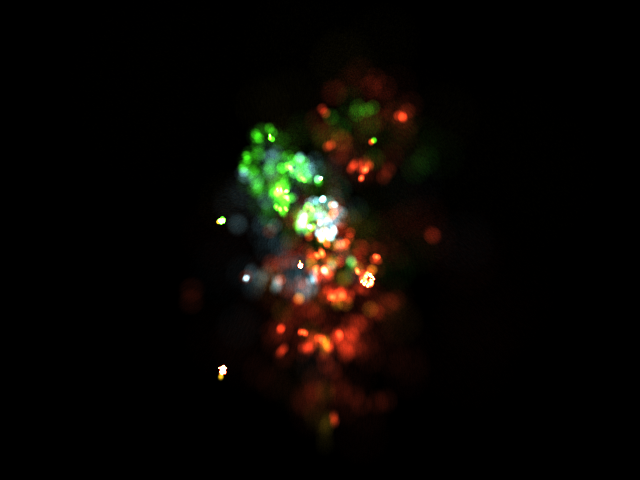
- Render the animation using Krakatoa to a new image sequence:
Fading Off The Density
- As you can see from the above videos, when the particles die, they pop out of existence.
- This is less pronounced in the second video because most particles are drifting apart and scaling up, thus losing some spatial density.
- But since we have the Age and LifeSpan stored in the original PRT file sequence, we can control the Density channel using Magma:
- Select the PRT Loader and add a new Magma modifier below the PRT Cloner Modifier.
- Open the MagmaFlow Editor
- Press CTRL+O to create a new Output node, set it to Density channel
- Deselect the Output node.
- Press SHIFT+A to create an Age Channel input.
- Press SHIFT+L to create a LifeSpan Channel input.
- Note that both will be selected, so you can hit [/] to add a Delete operator.
- Since both channels are integers, we have to convert both to Floats.
- Select the Age Channel Input and press [C][F] to insert a ToFloat operator.
- Select the LifeSpan Channel Input and press [C][F] to invert another ToFloat operator.
- NOTE The above two steps are not required in Krakatoa MX 2.2 and higher when the Age and LifeSpan are stored as Float Seconds instead of Integer Ticks.
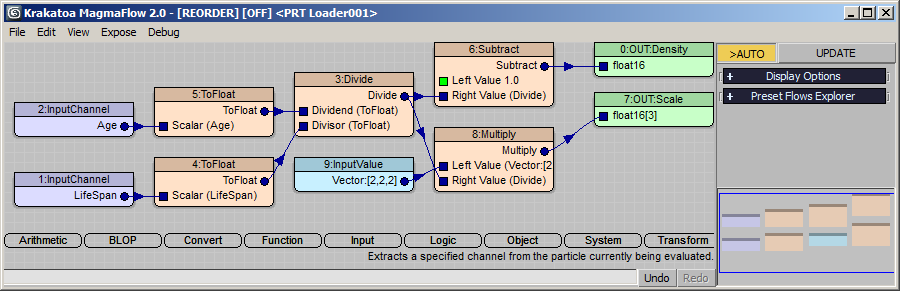
- Select the Divide operator and press [-] to add a Subtract operator.
- With the Subtract selected, press CTRL+W to swap the two inputs - now we have one minus the result of the division.
- Wire the output of the Subtract into the Output node.
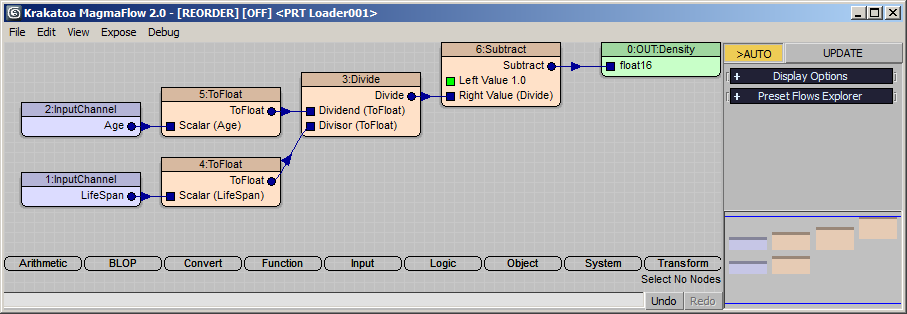
- The result is the Density fading off linearly from 1.0 at Birth to 0.0 at death:
Using Custom Scale
- Instead of using the Nearest Particle distance to control the scaling, we can extend the MagmaFlow fading off the Density and set the Scale channel to an Age-based value ourselves:
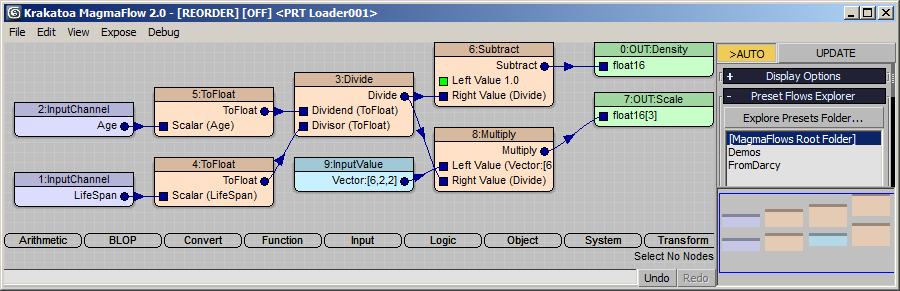
- In the MagmaFlow Editor, press CTRL+O to create a second Output Node, set its channel to Scale.
- Connect the output of the Divide operator (NOT the Subtract operator!) to the new Output.
- Since the Scale channel expects a Vector, we have to convert the Float in the range from 0 to 1 to a Vector - select the wire between the Divide and the OUT:Scale and press [*] to insert a Multiply operator.
- Press CTRL+W to swap the two input sockets, then press SHIFT+7 to connect a new Vector with a value of [1,1,1] into the first socket.
- Render the animation to a new sequence - the particles will start as small dense dots and expand over time to a scale of [1,1,1] before disappearing completely:
Non-Uniform Scaling
- Using the same flow, we can now easily stretch the sperical particle shapes into ellipsoids.
- Enter [6,2,2] in the InputValue controlling the Scale - since we have the Orientation stored in the original Particle Flow PRT files, and the Rotation > Speed Follow orients the X axis of the particle along the Velocity, we have to scale the X to stretch along the motion vector. The other values 2,2 will scale the particle along Y and Z twice as much as in the previous example.
- Render to a new animation sequence:
Modifying the Particle Shape
- Now let’s try to modify the shape of the particles to look more like an elongated moving fireball.
- Create a Box with Size 10x10x10
- Create a PRT Volume from the Box, set Spacing to 1.0, Jitter Position, Multiple Per Region 10.
- Set the Wirecolor (Object Color) of the PRT Volume to white - otherwise the final particles will be tinted by the PRT Volume’s color since the Color channels of the Distribution stream and the Cloner streams will be multiplied.
- Delete the GeoSphere PRT Volume from the PRT Cloner’s list and add the Box’ PRT Volume instead.
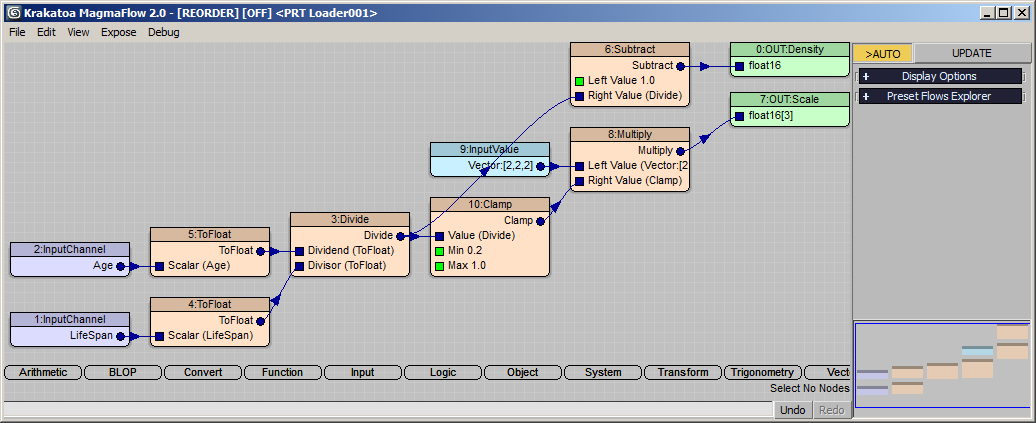
- In the MagmaEditor, select the wire between the Divide and the Multiply operators and press [F][C] to insert a Function > Clamp operator.
- Set the Min. value of the Clamp to 0.2, leave the Max. to 1.0 - this will ensure that all particles are never smaller than 0.2 times the Vector Input.
- Change the InputValue Vector to 2,2,2 to produce cube shapes.
- Render a new image sequence
Assigning Multiple Shapes Using ShapeIndex Channel
- The dedicated ShapeIndex channel already used by the FROST particle mesher to determine which shape to be assigned to which particle is also supported by the PRT Cloner modifier.
- Since Particle Flow does not use an indexed shape channel but stores the actual TriMesh in its Shape channel, we cannot use that directly. Instead, we will have to work around this by assigning a value to some other channel and employ a Magma modifier to convert it to a ShapeIndex.
- A possible approach would be to use the U component of any of the 99 Mapping channels.
- Open Particle View
- Add a Mapping operator to the Event 001, leave the U: component as 0.0, leave Map Channel to 1.
- Add another Mapping operator to Event 002, set U: to 1.0
- Add two more Mapping operators to Events 003 and 004 and set their U: values to 2.0 and 3.0 respectively.
- Enable the PF Source 001 system.
- In the Krakatoa UI, switch to Save Particles To File Sequence mode
- In the Save Particles rollout, add TextureCoord channel to the list of Channels to save.
- Change the PRT sequence’s File name.
- Resave as a new PRT sequence.
- Disable the PF Source 001 system.
- Replace the PRT sequence in the PRT Loader.

- At this point, we have a PRT sequence that contains the information about which Clone to use encoded in the TextureCoord channel.
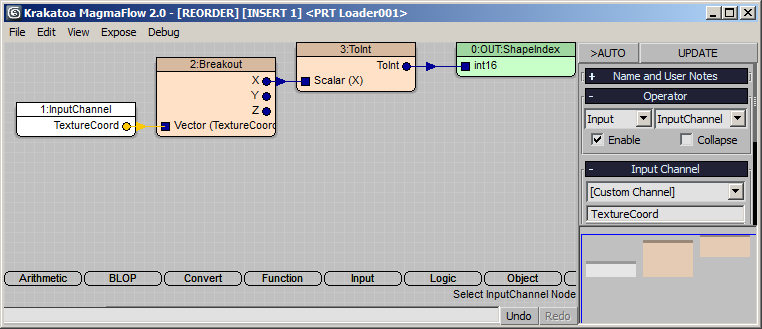
- All we need is a simple MagmaFlow that copies the first component of the TextureCoord channel into the ShapeIndex channel:
- Press Crtl+O to add an Ouput node, set it to ShapeIndex
- Press [I] and [C] to create an Input Channel node and set to TextureCoord channel.
- Press [C] and [B] to insert a Convert > Breakout operator.
- Press [C] and [I] to insert a Convert > ToInt operator to turn the floating point value to an Integer.
- Select the PRT Loader and change the PRT Cloner modifier to Using the ‘ShapeIndex’ channeloption in the Clone Choice group of controls.
- Use the Add button to pick the GeoSphere’s PRT Volume 3 times after the Box’s PRT Volume cloud. This will cause the fireworks particles shooting up to use the Box shape while all three explosions will use the GeoSphere as clone.
- If you want, create new unique shapes for the Red, Green and Blue explosions and assign them as second, third and fourth Clone to the list.
Conclusion
- Using the PRT Cloner Modifier and only less than 1500 particles from a Particle Flow system plus some simple PRT Volume shapes, we could render between 5 and 10 million particles and control Orientation, Scale, Color, Density and the actual Shape of each particle.
- This is of course just the beginning, the PRT Cloner allows even more advanced controls and effects that will be discussed in future tutorials.