Ambient PME Rollout
- The Ambient PME controls provide a color extinction feature which simulates the color loss over distance as light passes through an ambient medium like air or water. For more info on the usage of this feature, please see Ambient Participating Medium Extinction
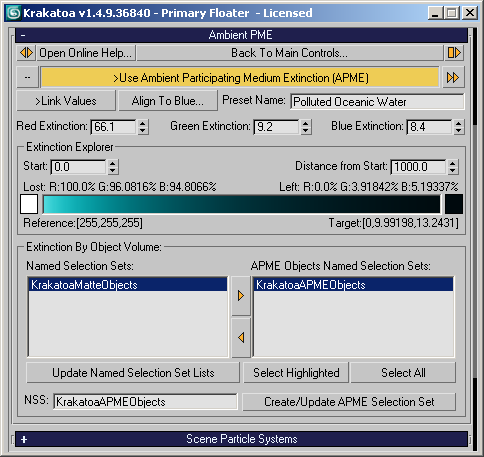
- When checked, this option will enable the ambient medium extinction feature.
- If the Red, Geeen and Blue Extinction values are 0.0, no extinction will be calculated.
- If no valid PME Object Named Selection Set is specified (see below), Krakatoa will assume that both Camera and particles share the same volume and will use the total distance between Camera and particle to calculate the extinction.
- Use the [>>] button to load and manage PME presets.
- Several PME Presets are built into Krakatoa and are read-only. They can be loaded but not saved.
- Changing the Extinction values, entering a new Preset Name and pressing the button will add a menu item “Add ‘PresetName’” on top of the context menu. Select it to create a new preset. No Add option will be displayed if the name matches a read-only system preset.
- If the name is the same as a saved preset, the option “Delete ‘PresetName’” will be displayed at the bottom of the context menu. No Remove option will be displayed if the name matches a read-only system preset.
- If the name is the same as a saved preset, the option “Update ‘PresetName’” will be displayed on top of the context menu instead of the Add option. Selecting the option will update the preset with the current values. No Update option will be displayed if the name matches a read-only system preset.
- The >Link Values checkbutton can be used to link the Red, Green and Blue Extinction values in a relative fashion. Changing any of them would change all three, keeping the value ratio constant. This option will be disabled if any of the three values is 0.0 to avoid division by zero.
- The Align Values… button will align the Red and Green values to match the Blue value. This is useful if you want to work with identical extinction for all 3 channels.
- The Red, Green and Blue Extinction spinners provide controls over the exponential function calculating the color loss over distance. The values displayed are unitless but have been calibrated so that a value of 50.0 causes an extinction of 50% at a distance of 1 meter. (Since the influence of the values is not linear, a value of 30.0 does NOT result in an extinction of 30% at a distance of 1 meter though - see the actual percentage displayed in the Extinction Explorer described below to see the real result).
- The Extinction Explorer is a sophisticated GUI system designed to provide feedback for the artist when adjusting the Extinction values or to allow the artist to find the necessary settings to achieve a specific look at a given distance.
- The Start spinner value defines the distance displayed at the left of the Explorer’s Gradient field. By default, the gradient displays the color values starting at a distance of 0.0.
- The Distance from Start spinner controls the distance represented by the gradient. It is always a distance relative to the Start value, so if the Start is set to 100m and the Distance… is set to 25m, the gradient will represent the color loss when light travels between 100 and 125 meters in the medium.
- The Lost: readout will display the color loss for the Red, Green and Blue channel after light has traveled through a medium with thickness of Start+Distance.
- The Left: readout will display the inverse info - how much color is left in each channel after that distance.
- The Reference color swatch on the left of the Explorer Gradient defines the color to apply the extinction to. By default the color is pure white. If your particle color is white, the gradient will show what would happen to a self-illuminated particle’s color at a given distance when light is passing through the given amount of ambient medium. If your particles have a non-white color, you can copy and paste that color as the reference into the color swatch to see what color you would see at the given distance. NOTE: When >Use Lights is turned on, the light also travels through the medium from the light source to the particle and then from the particle to the camera, so the effect of the Extinction is much stronger. The Explorer does NOT take direct lighting into accounting, it assumes the particles already emit the Reference color.
- The Reference readout below the color swatch will show the color at the Start distance through the medium. If Start value is 0.0, the value will be identical to the color stored in the Reference color.
- The Extinction Explorer Gradient represents visually the effect of the Extinction values on the Reference color starting at the given Start distance and until the given Distance from the Start.
- The Target color on the right of the Gradient shows the final color at the given distance, but its main function is to specify a desired target color to be calculated from the Source color by reverse-calculating the needed Extinction values for the Red, Green and Blue channels. Note that the color swatch will only allow you to specify colors that can be calculated from the given source color using physically-based positive extinction values (in other words, you cannot request a higher target channel value than the source color provides since extinction generally removes color).
- Instead of assuming the whole distance from the camera to the particle as a medium, Krakatoa can use arbitrary mesh volumes as media and only calculate color extinction inside these volumes.
- This is useful for example when simulating the color extinction effect on objects under water when the camera is above the water.
- The controls are similar to the ones found in the Matte Objects Rollout.