Krakatoa Preferences Floater
Available in Krakatoa v1.6.0 and higher. Previously part of the Krakatoa GUI.
- The Preferences floater can be opened using one of the following access points:
- Preferences button at the bottom of the Main Controls rollout of the Krakatoa GUI
- Preferences button at the bottom right of the Krakatoa VFB Extensions in 3ds Max 2009 and higher (if enabled)
- Open the Krakatoa Preferences dialog menu items in the Krakatoa Menu in the 3ds Max Main Menu.
- Preferences MacroScript icon in the Krakatoa toolbar (if customized manually)
- The Preferences floater contains three rollouts dealing with distinct aspects of the Krakatoa experience:
System Preferences Rollout
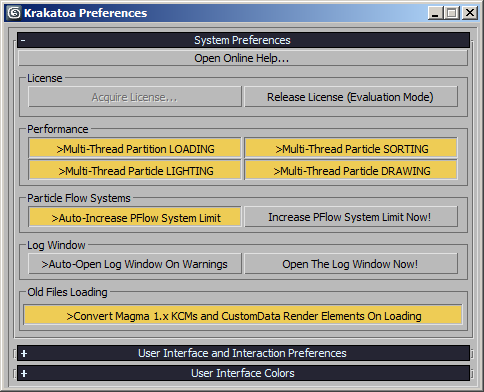
Overview
The System Preferences rollout provides controls over Multi-Threading Performance, Particle Flow System Limit Auto-Increase, the Krakatoa Log Window’s Auto-Open on Output, and Old Files Loading features.
User Interface
Performance
- >Multi-Thread Partition LOADING - When checked, multiple threads will be created for loading of multiple particle file sequences within the same PRT Loader. This can speed up loading significantlu, particularly from fast SSD and Fusion-io drives. It is NOT RECOMMENDED when loading from network locations.
- >Multi-Thread Particle SORTING - The sorting algorithm is used to order the particles from back to front relatively to light sources and cameras before drawing the particles in the attenuation buffer and the render buffer. The sorting algorithm supports multi-threading and can thus employ all available CPUs and cores to deliver maximum performance when this option is checked. When unchecked, only one thread will be used for sorting.
- >Multi-Threaded Particle LIGHTING - When checked, the calculation of the lighting attenuation will be split into multiple regions based on the number of available threads. When unchecked, all particles will be processed in a single thread.
- >Multi-Threaded Particle DRAWING - When checked, the particles will be splitinto multiple regions and will be drawn into multiple image buffers which will be composited together in the end. When unchecked, only one image buffer will be used. The latter option is useful when rendering very large images, since on machines with many cores the multiple image buffers alone could use up all available memory.
Particle Flow Systems
- This group of controls provides allows the user to let Krakatoa change the system limit of PFlow Emitters automatically or manually.
- >Auto-Increase PFlow System Limit - Particle Flow Systems are limited artificially to 100,000 particles on creation time. In 3ds Max versions prior to 2008, the value spinner in the System Management rollout allows values up to 10,000,000 to be entered, mostly because the default Birth operator cannot create more than 10 million particles and because until Krakatoa nobody seriously expected a particle system to contain 10 million particles. But this is a User-Interface-level limit, not a technical limit - a Particle Flow system can contain more than 10 million particles. This option allows Krakatoa to increase the limit in all Particle Flow systems to 100 million unless the limit is already set to an even higher value.
- Increase PFlow System Limit Now! - pressing this button will search the scene for PF Source objects and increase their system limit to 100,000,000 immediately.
Log Window
This group of controls allows you to open the Krakatoa Log Window and control its behavior on log output.
- >Auto-Open Log Window On Warnings - when checked, the Log Window will pop up open whenever Krakatoa is writing to it.
- In v1.6.0 and higher, default is checked.
- Open the Log Window Now! - this button will open the Log Window.
- Both options are also exposed as MacroScripts and are available in the Krakatoa Menu and can be used to customize a toolbar, QuadMenus or keyboard shortcuts.
Old Files Loading
- This group of controls contains a single checkbutton controlling the conversion of old Magma flows into the new Magma 2 format on scene loading.
- >Convert Magma 1.x KCMs and CustomData Render Elements On Loading - when checked, scenes containing old Magma 1.x flows in Krakatoa Channels modifiers or CustomData Render Elements will be converted automatically to their Magma 2 counterparts. When unchecked, the old flows will be retained (useful for example when sharing scene files with Krakatoa 1.x users). Note that this checkbox is NOT STICKY and it will revert to checked after restarting the 3ds Max session. In other words, it can be unchecked only temporarily during the current session.
Preferences
- The User Interface and Interaction Preferences rollout allows users of different skill levels to customize certain aspects of the Krakatoa GUI to match their preferred workflow.
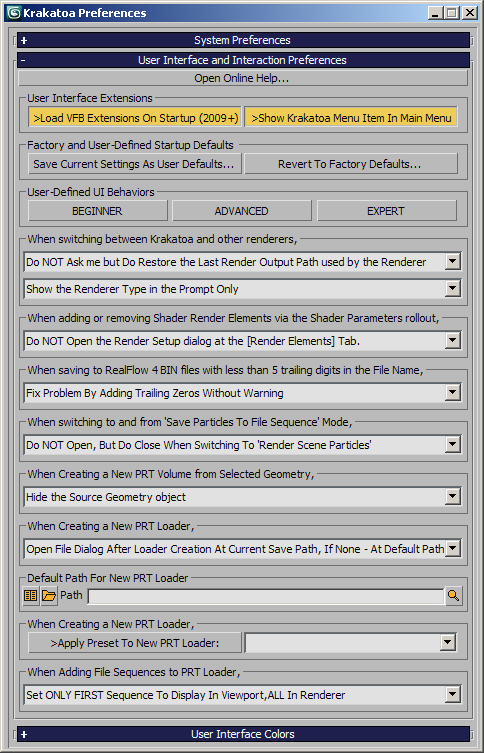
User Interface Extensions
Load VFB Extensions On Startup (2009+)
- When checked, and if Krakatoa is running inside 3ds Max 2009 or higher, the VFB Extensions scripts will be loaded.
- When unchecked, the VFB Extensions will not be loaded even if 3ds Max 2009 or higher is detected.
- Changing the setting will require a restart of 3ds Max.
Factory and User-Defined Startup Defaults
- This group of controls provides the following options:
Save Current Settings As Defaults
- Pressing this button will create an INI file containing all relevant Krakatoa settings (from the data stored inside the renderer, NOT from the GUI like Presets/History do).
- When Krakatoa is assigned as the current renderer and initializes its properties, the data from the INI file will be used as custom defaults in place of the factory defaults hard-coded in the KrakatoaGUI script.
Revert To Factory Defaults
- Pressing this button will remove any existing KrakatoaDefaults.INI file (by renaming it to .BAK) and thus ensure that new instances of the Krakatoa renderer would initialize using the Factory Defauls.
- Note that if another KrakatoaDefaults.BAK file already exists, it will be overwritten.
- You can undo this change by manually renaming the .BAK file to .INI.
User-Defined UI Behaviors
- This group of controls allows the user to configure certain behaviors of the Krakatoa GUI according to his or hers skill level and preferred way of working.
Skill Levels
- The [BEGINNER] button will preset the options listed below to the ones marked with (B).
- The [ADVANCED] button will preset the options listed below to the ones marked with (A).
- The [EXPERT] button will preset the options listed below to the ones marked with (E).
When switching between Krakatoa and other renderers
Available in Krakatoa v1.6.0 and higher
Output Path Handling
- Ask me about Restoring the Last Render Output Path used by the Renderer (B) - when switching between Krakatoa and another renderer like Scanline or VRay, this option will prompt the user that the output path last used in either renderer is different and propose to restore it. This is necessary because 3ds Max Render Presets do not store the output path, only the renderer settings.
- Do NOT Ask me but Do Restore the Last Render Output Path used by the Renderer (A) - when switching between Krakatoa and another renderer like Scanline or VRay, this option will automatically swap the output path for the last used in that renderer. Especially when rendering shadows, this can be very useful as it automatically makes sure the Scanline output won’t overwrite the Krakatoa output and vice-versa.
- Do NOT Ask me and Do NOT Restore the Last Render Output Path used by the Renderer (E) - when switching between Krakatoa and another renderer like Scanline or VRay, this option will not interfere and do nothing. It will be the user’s responsibility to modify the output path manually after each renderer change.
Message Window Behavior
- Show a Message Window with the Renderer Type (B) - after switching to a new renderer via the Krakatoa MacroScripts, a popup window will appear, listing the type of the newly assigned renderer. This is the old behavior prior to v1.6.0.
- Show the Renderer Type in the Prompt Only (A) - after switching to a new renderer via the Krakatoa MacroScripts, the new renderer’s type will be displayed in the prompt area at the bottom of the 3ds Max UI. This behavior is a lot less intrusive and allows for faster turnaround, especially if the user is aware of what two renderers he is switching between.
- Do NOT SHow the Renderer Type (E) - after switching to a new renderer via the Krakatoa MacroScripts, there will be no notification whatsoever.
When adding or removing Shader Render Elements via the Shader Parameters rollout
Available in Krakatoa v1.6.0 and higher
- Open the Render Setup dialog at the [Render Elements] Tab (B) - when a button to add a Render Element for a Shader channel is pressed inside the Shader Parameters rollout, this option will cause the Render Setup Dialog to appear if not open yet and switch to the Render Elements tab to show the result of the operation and allow user tweaking.
- Do NOT Open the Render Setup dialog at the [Render Elements] Tab (A)(E) - when a button to add a Render Element for a Shader channel is pressed inside the Shader Parameters rollout, this option will do nothing to show the outcome of the operation. Krakatoa Shader Render Elements are generally set up correctly and do not require any manual tweaking to produce their output.
When saving to RealFlow 4 BIN files with less than 5 trailing digits in the File Name
- Warn Me About The Problem And Siggest To Fix Automatically (B) - when a BIN file name is specified and it has less than 5 trailing digits, a warning will be issued about the problem, proposing an automatic fix.
- Fix Problem By Adding Trailing Zeros Without Warning (A) - when a BIN file name is specified and it has less than 5 trailing digits, Krakatoa will set the trailing digits to 00000 automatically without asking any questions.
- Do Not Do Anything (E) - even if the BIN file is specified incorrectly, no changes will be made to it, assuming the Expert user knows what he is doing.
RealFlow BIN files MUST end with 5 trailing digits for RealFlow to be able to read them correctly.
When switching to and from ‘Save Particles To File Sequence’ Mode
- Open and Close the ‘Particle Partitioning’ Rollout (B) - this (rather intrusive) option will open and close the Partitioning rollout whenever the user enables and disables the saving of particle sequences. It was meant to remind the user that when saving a lot of particles, using Partitions is probably what he should use.
- Do NOT Open, but do Close when switching to ‘Render Scene Particles’ (A) - when this option is selected, the Partitioning rollout will not open when Save Particles To File Sequence is selected, but if the user opened the Partitioning rollout manually and then switched Krakatoa back to Render Scene Particles mode, the rollout will be closed automatically because it is of no use when rendering.
- Open, but do NOT Close when switching to ‘Render Scene Particles’ - this is a variation of the first option where the rollout will never be closed. Added just for completeness.
- Do NOT change ‘Particle Partitioning’ Rollout Open/Close state at all. (E) - this option disables any help with opening or closing the Particle Partitioning rollout. It is up to you to open and close it as you need.
When Creating a New PRT Volume from Selected Geometry
Available in Krakatoa v1.6.0 and higher
- Turn OFF the Source Geometry’s Renderable property (B) - when creating a PRT Volume from geometry, it might be a good idea to turn off the renderable property to avoid the rendering of the object’s vertices in the final output.
- Switch the Display of the Source Geometry to Bounding BOX - when creating a PRT Volume from geometry, it could be useful to switch the source object to bounding box display in order to see the particles inside and still be able to select the source for tweaking its parameters.
- Turn OFF the Renderable property AND Switch Source Geometry to Bounding BOX (A) - this mode combines the benefits of the two approaches above by making the particles visible while keeping a bounding box version of the source around for easier selecting and tweaking.
- Hide the Source Geometry object - this mode gets rid of the source geometry by hiding it. Note that you can still access it via the right-click menu of the PRT Volume for quick tweaks without it being visible in the viewport at all.
- Do NOT Change the Source Geometry object (E) - in this mode, the source geometry of a PRT Volume will not be changed in any way.
Note that these settings can be modified directly from the right-click menu of the PRT Volume using the “Store Above Settings As Defaults” option.
When creating a New PRT Loader
- Open File Dialog after Loader Creation at Current Save Path, if none - at Default Path (B)(A) - when this option is selected and a new PRT Loader is created from the Particle Loaders rollout of the Krakatoa GUI, the Add Files… button will be pressed and the Open File dialog will be opened automatically, assuming that if you created a loader, you want to load something. If there is a valid save path in the Save Particles rollout, Krakatoa will assume that you want to load the particles that you saved using that path. If there is no valid save path specified, Krakatoa will use the Default Path specified in the Preferences rollout just below this option. If there is no Default Path specified, the dialog will open at the current path from the last file operation.
- Open File Dialog after Loader Creation at Default Path - when this option is selected and a new PRT Loader is created from the Particle Loaders rollout of the Krakatoa GUI, the Add Files… button will be pressed and the Open File dialog will be opened automatically at the location specified in the Default Path field underneath the option in the Preferences rollout (see below).
- Do NOT Open File Dialog after Loader Creation (E) - when this option is selected, the PRT Loader will be created without automatically presenting the user with the Open File dialog.
Default Path For New PRT Loader
- The Path field can be used to specify the Default Path to be used when creating a new PRT Loader as specified in the first option above.
- Paste a path into the text field or enter a path manually. If it does not exist, you will be prompted about creating it. If it cannot be created, the field will revert to the last known value.
- Press the [H] button to search for already used save paths in the History records.
- Press the […] button to pick an existing path
- Press the [E] button to reveal the current Default Path location in Windows Explorer.
- Of course, you can set all options to ANY combination of settings to match your preferred workflow.
- The settings will be stored in a local INI file and will persist between 3ds Max sessions.
Apply Presets When Creating a New PRT Loader
- >Apply Preset to new PRT Loaders: - when this option is checked, a custom preset will be loaded each time a new PRT Loader is created. The drop-down list to the right contains all currently available PRT Loader settings. To create a new PRT Loader Preset, follow the instructions on the PRT Loader page.
When adding File Sequiences to a PRT Loader,
Available in Krakatoa v1.1.0 and higher
- Set ALL Sequences To Display In BOTH Viewport and Renderer (B) - this option is the default behavior of Krakatoa v1.0.1 - any sequence loaded will be active in both the viewport and the renderer.
- Set NO Sequence To Display In Viewport, ALL To Display In Renderer (A) - this option loads new sequences to render but does not show them in the viewport. This is useful when loading sequences with a lot of particles and you don’t want to waste time drawing them in the viewports but want to render them all.
- Set ONLY FIRST Sequence To Display In Viewport, ALL In Renderer - this option is very useful when loading partitions with a lot of particles but you want to represent them by just a single partition in the viewport, while still rendering them all.
- Set ALL To Display NEITHER In Viewport NOR In Renderer (E) – this option adds sequences to the list but does not display or render them until the user specifies explicitly via the PRT Loader’s UI or the File Sequence Manager which ones should be displayed and which will be rendered.
User Interface Colors Rollout

Overview
- The User Interface Colors rollout controls the optional coloring of Krakatoa UI icons and checkbuttons. The main purpose of this system is to adjust Krakatoa’s UI to work with various 3ds Max color schemes (light, dark etc.) and to be easier to navigate for new users by color-coding different rollouts in different shades.
User Interface Controls
Custom Checkbutton Colors
Available in Krakatoa v1.1.0 and higher
- This feature allows the customization of the highlight colors shown when a checkbox option is activated. This way, the user can easily distinguish the rollouts of the Krakatoa GUI by “feeling” them based on the common color.
- This group of controls contains the following options:
- >Use Custom Checkbutton Colors - when checked, the custom colors defined in this section will be enabled and used by the Krakatoa GUI. When unchecked, the default UI color for active checkboxes will be used (orange in light 3ds Max color scheme and blue in dark color scheme).
- Update Colors Now (Restart GUI)… - pressing this button will close the Krakatoa GUI and open it again. If the Custom Checkbutton Colors were enabled, the changes will become visible.
- Rollout Drop-Down List - the drop-down list shows all rollouts that can be customized. To change a rollout’s color, select its name from the list and use the Checkbutton Highlight Color swatch to specify the custom color.
- Checkbutton Highlight Color - this color swatch shows the custom color for the rollout selected in the drop-down list and can be used to customize the color.
- Save Checkbutton Colors As Preset… - this button can be used to save a file containing the current custom color settings to disk as a .KCP (Krakatoa Colors Preset) file. The current color settings will be stored in the KrakatoaPreferences.ini file, but the KCP files could be used to create libraries of color schemes, share with other users, transfer the colors to other computers and so on.
- Load Checkbutton Colors From Preset… - this button can be used to load an existing .KCP file from disk.
Icon Color Correction
Available in Krakatoa v1.5.0 and higher
- This feature allows the customization of the icon colors used for value Presets buttons, Rollout Float/Dock buttons and Rollout Preset buttons as well as left/right arrows between lists.
- The default color of the icons is light blue with slightly darker outline.
- This group of controls contains the following options:
- Color Correction Mode - This drop-down list provides two color correction modes:
- Relative Offset - the colors of the original icons will be shifted by the values entered in the Hue, Saturation and Value spinners.
- Absolute Value - the colors of the original icons will be replaced with the color definition comprised of the Hue, Saturation and Value spinners.
- Hue, Saturation and Value
- These three spinners can be used to modify the colors of the original icons based on the Color Correction Mode drop-down list settings.
- Every pixel that is not white (background) will either be shifted by or replaced by the HSV values of the spinners.
- The changes will be performed interactively as you change the spinner values.
- Load/Save Custom Icon Colors Preset
- The text field and the [>>] icon next to it can be used to load, save, edit and delete icon color presets.
- Krakatoa ships with several built-in presets including the default icons, darker blue icons, orange icons with dark outline, bright yellow with no border, red with no border and white border without filler.
- You can enter a new name in the text field and use the [>>] button to add a new preset to the list - the current Mode, H,S and V values will be stored in the Local Settings folders of the current user and will be visible to all other Krakatoa installations in other versions of 3ds max.
- If you have loaded a user preset, its name will appear on the list. You can modify the values and Update the same preset or save under a different name. You can also Delete the current preset as long as the name in the field matches an entry from the list and the entry is not a shipping factory preset.
NOTE: While the Presets will be stored in the User’s Local Settings folder, the last Icon Color Correction settings applied will be stored in the current 3ds Max’ PLUGCFGKrakatoa folder and will be local to the current version. This is to allow various versions of Krakatoa to apply different color settings on the same machine, while sharing preset files.