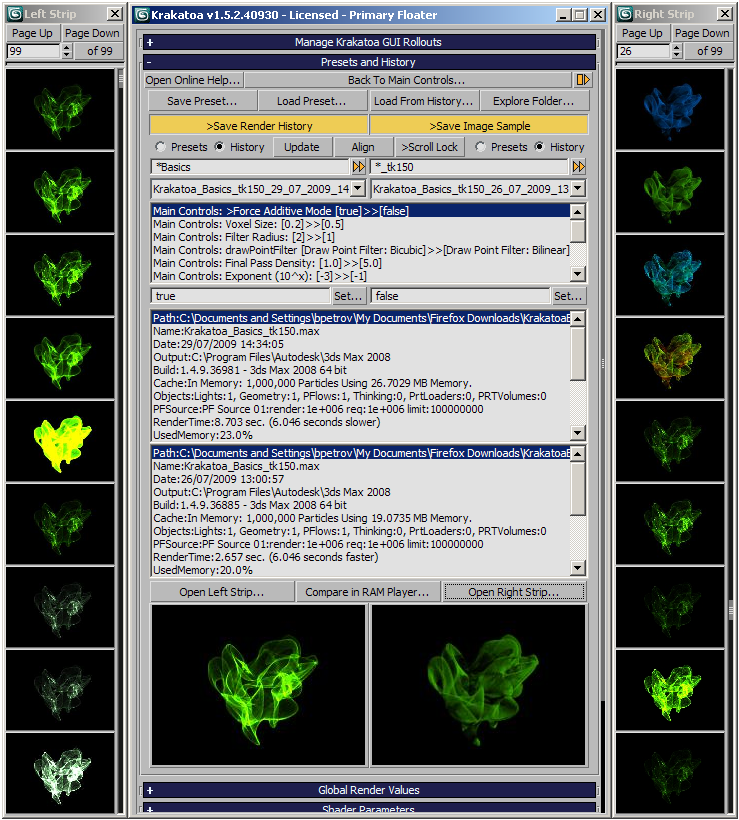
Presets and History Rollout
Available in: Krakatoa v1.0.0 and higher.
Introduction
- Getting the particles to look right in the final rendered image can take a lot of tweaking of various parameters.
- Krakatoa provides a highly sophisticated Presets and Render History sub-system to make sure you can save and load renderer settings and restore settings used to do test renderings at any time in the future.
Presets
- Presets are used to manually store either the full set or a sub-set of rendering settings from the Krakatoa GUI to an INI file on disk.
- The Preset files are written to a sub-directory of the User’s Local Settings: C:Documents and SettingsYourUserNameLocal SettingsApplication DataPrime FocusKrakatoaPresets and have the extension .KrakatoaPreset.
- Other than the Render Presets implemented by 3ds Max for all renderers which provide granularity at Render Tab level, the Krakatoa Render Presets allow the user to specify exactly what to be saved or loaded with the highest precision possible - every single control or rollout can be included or excluded from saving or loading if desired.
Note: The standard 3ds Max Render Presets are fully supported by Krakatoa and are even used by the Krakatoa GUI and Switch Back From Krakatoa scripts to keep full records of a renderer’s settings when switching between Krakatoa and other renderers. Also note that 3ds Max render presets are a form of a .MAX file which stores the parameters of the renderer itself, while the Krakatoa Presets store the User Interface level settings.
Saving Presets
- To save a Preset,
- Expand the “Krakatoa:Presets and History” rollout
- Press the “Save Preset…” button - a dialog showing a tree view of all supported rollouts and their controls will appear.
- If you want to disable the saving of the controls belonging to a specific rollouts, uncheck the checkbox in front of the rollout.
- If you want to disable the saving of specific controls, uncheck their corresponding checkboxes.
- Enter a descriptive name in the text field at the bottom of the dialog.
- Press the SAVE button to save the preset or Cancel to exit the dialog without saving.
Loading Presets
- To load a Preset,
- Expand the “Krakatoa:Presets and History” rollout
- Press the “Load Preset…” button - a dialog showing a tree view of all saved rollouts and their controls of the currently selected preset will appear.
- Select the desired preset name from the drop-down list at the bottom of the dialog.
- If you want certain rollouts’ controls or just specific controls to be excluded from loading, uncheck their corresponding checkboxes.
- Press the LOAD button to load the preset or Cancel to exit the dialog without loading.
Support for Future Versions
- When loading Preset or History files, only values currently supported by Krakatoa will be considered.
- Preset files saved in the current version of Krakatoa should remain usable in future versions as long as the control names have not changed.
- Preset files saved in the current version of Krakatoa will also work in older versions, as long as the relevant controls exist in both.
Render History
- Krakatoa provides an automatic Render History feature which is enabled by default.
- It can be disabled temporarily, but since the size of Preset and History files is only about 3KB, we believe it is a good idea to keep the Render History enabled all the time.
- The Render History feature will save a preset file with the current settings of the Krakatoa GUI before each rendering.
- The settings will be stored in the same format as the Preset files, but in a different sub-directory C:Documents and SettingsYourUserNameLocal SettingsApplication DataPrime FocusKrakatoaHistory and with the extension .RenderSettings.
- The Render History file will be named automatically using the current 3ds Max Scene Name and the current date and time.
- When saving multiple Partitions using the Krakatoa Particle Partitioning rollout, no history will be saved.
- When the “Save Render History” option in the “Presets and History” rollout is unchecked, no render history will be saved.
- In addition to the text file containing the settings and some scene info, an OpenEXR file containing the last rendered image will also be saved to disk into a Samples subfolder.
- This image file will be shown as a smaller thumbnail in the UI as a visual reference for the corresponding preset and will produce a .JPG cache image for faster browsing.
- The original OpenEXR image can be opened at any time for closer inspection by clicking on the thumbnail.
- When the “Save Image Sample” option in the “Presets and History” rollout is unchecked, no sample image will be stored.
Exploring the Presets and History Folders
- Press the Explore Folder… button in the upper right corner of the rollout to open a Windows Explorer with the path C:Documents and SettingsYourUserNameLocal SettingsApplication DataPrime FocusKrakatoa.
- You can manually delete, copy, move, edit or just browse the settings files found in the sub-folders Presets and History. Any .KrakatoaPreset or .KrakatoaSettings files not placed in the respective sub-folders will remain “invisible” to the Presets/History system.
- If you want to remove some older history files without deleting them, simply move them to a sub-folder of their default location.
- You can also copy history and preset files between computers to share settings with co-workers. Since the file names are based on the scene name and a time stamp, the history names will be unique with a very high probability.
Loading From History
- You can load all or some of the settings used to create a specific rendering by pressing the “Load From History…” button and following the same steps described above for “Loading Presets”.
- The drop-down list in the Load Presets dialog will be automatically positioned at the History name selected in the LEFT drop-down list of the Compare Settings group of controls.
Comparing Settings
- Krakatoa provides means to compare the content of any Preset or History file to the Current Settings or any other Preset or History file.
- It also allows you to copy specific settings from either one of the compared files to the Current Settings in the GUI.
- This will let you restore settings from previous successful renders or saved Presets in order to produce similar output with your current scene.
Using the Compare Settings options
- The “Compare Settings” group of controls in the “Krakatoa:Presets and History” rollout has two drop-down lists placed side-by-side.
- Each one can contain either Presets or History files found on disk, depending on the states of two sets of Radio Buttons labeled “Presets” and “History”.
- In addition, the right set of files will display a special entry called [Current] on top of the list which represents the current settings in the Scripted GUI.
- The two lists supports custom filtering and can be populated with sub-sets of all files based on wildcard patterns.
- When two valid Preset or History files have been selected in both lists, the comparison list box will show all controls and values which are different in the two files.
- Each line will represent a different pair of settings, listing the Rollout Name, the control name, the value found in the left file and the value found in the right file (or the [Current] state of the GUI).
- When the two files are identical, the list will remain empty.
- When a line from the comparison list is selected, the current values from both files will be displayed in two text boxes with corresponding Set… buttons.
- You can press these buttons to take the value from the corresponding file and load it into the GUI (thus making it the current value of the control).
- If the right file is set to [Current], pressing the left “Set…” button will cause the right side to match the left side value - the currently selected difference line will disappear from the comparison list.
- Alternatively, you can double-click the difference line in the comparison list - the value from the left list will be make current automatically.
NOTE: While using the “Compare Settings” feature allows you to move values from a file to the Current GUI settings one by one interactively, if all you want is to load ALL settings from a History or Preset file, consider using the “Load From History…” resp. “Load Preset” buttons described above for faster loading.
- As mentioned already, current and older Preset and History files will be supported by future versions of Krakatoa.
- If a key stored in a Preset file does not exist in the Current settings anymore, or if an existing control is not present in an older Preset file, the comparison window will report it’s value at the corresponding side as [no such key].
Updating The Settings
- The Update button in the Compare Settings group of controls will force a refresh of the currently displayed history/preset files, but in general the update will be performed automatically when
- the Presets/History radio buttons are changed,
- new Preset or History files are generated manually or automatically
- the Compare Settings drop-down lists are being changed or
- the Set… buttons are being used.
Align and Scroll Lock
- The Align button can be used to align the right drop-down list to the left drop-down list with one item offset.
- Typically, when you perform consecutive test renders, the History files will be created in the order of the renders.
- Since the History feature also orders the files in creation order, having the two lists aligned with an offset of one means that you can easily compare two consecutive attempts to render the same scene with slightly different settings.
- Engaging the >Scroll Lock button will link the two lists permanently using the current offset, so scrolling either one of the lists will automatically reposition the other list, keeping the existing offset.
- This way, you can advance either of the lists by one History record and have the other list show the previous or following History record, thus showing the effect of the different settings on your scene.
Search Fields
- Each drop-down list provides a text field for entering a search pattern, like “Skydome” or “*Cheese?”.
- When the field is empty, the corresponding list will show all available entries.
- When the field is not empty, only records whose name matches the entered search pattern will be displayed.
- Since the date and time of the record are also part of its name, you can filter history records by date, for example entering *3_6_2007 will show all records saved on that March 6th 2007. Note that Krakatoa will assume implicitly a * symbol at the end of the pattern. The search is Case-INsensitive.
- SKY will search for any records STARTING with “SKY”, like “SkyDome”, but not “BlueSky”
- *SKY will search for any records containing SKY anywhere in the name, so both “SkyDome”, “TheSkyIsTheLimit” and “BlueSky” will be listed.
- *3_?_2007 will search for any records containing a March 2007 date, where the day can be any character.
- *3_??_2007 will search for March 10th to 31st.
- NOTE that depending on your country specific Windows settings, the date might be in a different format, for example day first, then month and then year.
Scene Info
- In the middle of the rollout, two list boxes display additional scene information about the two compared files which is stored automatically when a History record is saved.
- This information is useful to determine when and from where the Preset or History file was saved, what the render output path of the scene was set to, how many lights, geometry and Particle Flow objects it contained and what the User Notes were at the moment of saving.
- The following information will be saved:
Path:
- This scene info record contains the path to the 3ds Max scene file that was loaded when the rendering or saving was performed.
- Double-clicking this path will open a Windows Explorer at that location.
Name:
- This scene info record contains the 3ds Max scene file name that was loaded when the rendering or saving was performed.
- Double-clicking this entry will print it to the MAXScript Listener.
Date:
- This is the local date and time the record was saved on.
- Double-clicking this entry will print it to the MAXScript Listener.
Output:
- This is the Render Output path and image file name that was active at the time of rendering (even if the rendering was performed in Iterative mode without saving).
- Double-clicking this entry will print the full path and file name to the MAXScript Listener AND open a Windows Explorer at the output path if it is valid.
Build:
- This entry contains the Krakatoa version number and the 3ds Max version and build (e.g. 2010 64 bit) as a reference esp. when testing performance differences between versions of Krakatoa or loading settings from older or newer versions.
- Double-clicking this entry will print it to the MAXScript Listener.
Objects:
- This entry contains a list of Objects found in the scene, including Lights, Geometry, Particle Flows, Thinking Particles, PRT Loaders and PRT Volumes
- Double-clicking this entry will print it to the MAXScript Listener.
PFSource:
- This entry contains info about the Particle Flow sources found in the scene and their render particle count and limits.
- Double-clicking this entry will print it to the MAXScript Listener.
RenderTime:/SaveTime
- This entry contains the frame render time or frame save time which is stopped using pre-frame and post-frame callbacks registered by Krakatoa (the time reported by Krakatoa itself in the Log might be slightly different, but should be close).
- If two History records of the same type (both rendering or both saving) are selected, in addition to the time of the respective record, the difference to the other record’s time will be displayed in both absolute units (seconds) and as a speed-up/slow-down factor (e.g 2.34x) to simplify the performance comparison when changing render settings.
Frame:
- This entry contains the floating point frame number that was active when the History file was saved.
- Double-clicking this entry will set the Time Slider in the current scene to the given time (assuming the Scene Start and End interval values allow it).
- This is useful when you want to recreate the same rendering of the same scene but do not remember what frame you rendered last time.
Camera:
- This entry contains the name of the Camera (if any) that was set in the active view when the frame was rendered.
- Double-clicking this entry will search for a camera of the same name in the current scene and if found, it will set the active viewport to that camera, this allowing you to quickly switch to the same view as the one used in the Render History record.
ViewType:
- This entry contains the view type of the active viewport at the time of rendering when the view was NOT a Camera view.
- Double-clicking this entry will switch the active viewport to the given type to recreate the conditions at the time of Render History record saving - see next item for more!
ViewTM:
- This entry contains the view transformation matrix of the active viewport at the time of rendering.
- Double-clicking this entry will switch the active viewport to Perspective Mode and set the view’s transformation matrix, thus producing exactly the same viewpoint placement and orientation as in the Render History record.
Threads:
- This entry contains the number of threads specified in the Krakatoa System Preferences dialog at the time of rendering/saving.
- Double-clicking this entry will print it to the MAXScript Listener.
UsedMemory:
- This entry contains the memory usage as percentage of available memory at the time of the Render History record saving.
- Double-clicking this entry will print it to the MAXScript Listener.
Additional Memory Usage Details
- A number of memory usage stats acquired via MAXScript will also be stored in the History record to give an idea of the memory consumption at the time of rendering/saving.
- Double-clicking these entries will print them to the MAXScript Listener.
Sample Images
- When the Save Image Sample checkbox is checked (default), a copy of the image rendered using the settings stored in the preset will also be saved to disk in the sub-directory C:Documents and SettingsYourUserNameLocal SettingsApplication DataPrime FocusKrakatoaSamples
- The image will be saved as .EXR file using the current OpenEXR settings.
- When selecting a History file from either of the two lists, if the corresponding EXR file can be located, it will be displayed as a thumbnail at the bottom of the screen.
- If an image was saved but cannot be found anymore, the thumbnail will be displayed as gray with a red cross.
- If no image was saved (in the case of manually saved Presets or a History file written in Save Particles mode), the thumbnail will be displayed as brighter gray with a red cross.
- To open the full version of the image, click the corresponding thumbnail - the image is always saved in the original resolution.
- The sample image would be saved even if no output was specified in the Render Scene dialog, which allows you to tweak settings and hit QUICK RENDER as often as you want, saving a copy of the resulting image and all settings that led to its creation automatically.
- If you set both lists to History, select the latest History file in the left list and the previous file in the right list, when you render again, both lists will keep their relative positions but will show the NEW last and previous samples, allowing you to easily compare the result of the new settings to the previous ones after each preview render.
NOTES:
- Presets and the [Current] settings entry do NOT include a Sample Image, only History files do.
- History and Sample Images are only saved if the Scripted GUI is open and the corresponding options are checked.
- You can delete the content of the Samplesfolder anytime if you want to free up disk space. The thumbnails will become gray, but the History files and comparison features will still work as before.
Comparing Images in RAM Player
- The thumbnails shown in the Presets and History rollout are scaled down versions of the actual output image.
- While you can open either one by clicking on the thumbnail, the RAM Player provides a way to compare the images of two History records with an A|B wipe.
- To do so, select two History records you want to compare and press the “Compare in RAM Player”’ button to open both images.
- If either one is empty, the RAM Player will load only the existing image.
- If both thumbnails are empty, no RAM Player will be opened.
Left and Right Thumbnail Strips
Available in Krakatoa v1.6.0 and higher
- The Left and Right Strips are extensions to the “Presets and History” rollout that provide a faster way to browse through Render History records by their thumbnails.
- To open the Left or Right Strip, press the “Open Left Strip…” or “Open Right Strip” buttons located above the thumbnail buttons.
- Alternatively, you can right-click the left or right thumbnail in the “Presets and History” rollout.
- The Strips will be docked to the left or right side of the Krakatoa GUI Floater (and if the Secondary Floater is active, the Right Strip will be docked to the right side of the Secondary Floater).
- The Strips provide several thumbnails in a column - the actual count depends on the current height of the Primary Floater which determines the initial height of the Strips.
- If a History record does not have a thumbnail (either because it was created when saving particle file sequences to disk or because the thumbnail was deleted), a gray stand-in image with a red cross will be shown instead.
User Interface Controls
- The Strips contain the following Controls:
Page Up/Page Down buttons
- These two buttons can be used to scroll up or down based on the current thumbnail count per strip.
- Left-clicking the buttons will scroll a full page up or down.
- Right-clicking the buttons will scroll by a half page up or down.
Current Thumbnail spinner
- The spinner shows the current thumbnail displayed on top of the strip.
- You can enter a value or use the arrows to scroll the strip and navigate to a given thumbnail.
- Right-clicking the arrows will reset the spinner to 1 and jump to the first record.
of XXXX button
- The button next to the spinner displays the total count of records (which depends on the current content of the corresponding History drop-down list which is affected by eventual filtering)
- Left-clicking the button will jump to the most recent (last) record.
- Right-clicking the button will jump to the oldest record (equivalent to right-clicking the spinner’s arrows).
Progress bar
- A red progress bar will show the process of thumbnail loading which can be slower or faster depending on whether a thumbnail has been shown before or not:
- The first time a thumbnail has to be loaded, a JPG proxy will be created by resizing the original OpenEXR image saved with the Preset - this will be slower than just loading the proxy from disk the second time around.
- When the proxy already exists, the strip will use it and the update will be much faster.
Scrollbar
- To the right of the thumbnails, a scrollbar provides an alternative control for scrolling the thumbnails strip up and down.
- Dragging the slider will scroll the thumbnails with it.
- Clicking on the black area next to the slider will jump directly to that place and reposition the thumbnails list to the corresponding location without scrolling.
Loading a Record into the Presets and History Rollout
- The main purpose of the Left and Right Strips next to browsing History records by thumbnails is the loading of a History record in the left or right slot of the Presets and History Rollout.
- Left-clicking the thumbnail in the Left or Right Strip will load the corresponding History record in the left or right slot.
- Right-clicking the thumbnail will open the original OpenEXR image corresponding to that record (equivalent to loading the preset first and then clicking the larger thumbnain in the “Presets and History” rollout.