Krakatoa Rendered Frame Window Extension
Available in Krakatoa v1.5.0 and higher
- Overview
- Top Left Panel
- Render Mode Button
- Voxel Spinners
- Phase Function Mode Button
- Shader Parameters Dialog…
- No Lights Checkbutton
- Reflections Checkbutton
- Additive Checkbutton
- Self-Shadow Filter Button
- Lighting Pass Density Spinners
- Use Checkbutton
- Draw Point Filter Button
- Final Pass Density Spinners
- Emission Strength Spinners
- Color Override Checkbutton, Color, Slider and Mapbutton
- Emission Override Checkbutton, Color, Slider and Mapbutton
- Absorption Override Checkbutton, Color, Slider and Mapbutton
- Top Right Panel
- M Checkbutton
- J Checkbutton
- G Checkbutton
- Motion Blur Segements Spinner
- Motion Blur Shutter Spinner
- Use Checkbutton and Matte Segments Spinner
- Matte Motion Blur Bias Spinner
- Depth Of Field Checkbutton
- DOF Sample Rate Spinner
- Use Particles From Checkbuttons
- Percent… Button and Spinner
- LCache Checkbutton
- PCache Checkbutton
- Iterative/InterActive Checkbutton
- Bottom Panel - Left Side
- Bottom Panel - Right Side
- Save History Checkbutton
- Save Images Checkbutton
- Global Values and Main Controls Button
- Memory Channels & Saving Button
- Krakatoa Explorers >> Button
- Use Matte Checkbutton
- Save Layers Checkbutton
- Depth Files Checkbutton
- Save Atten. Checkbutton
- Use Ambient PME Checkbutton
- Preferences Rollout Button
- Log Window Button
- Preferences/Log Window >> Button
Overview
- 3ds Max 2009 and 3ds Max 2009 Design introduced the ability to extend the Rendered Frame Window (also known as Virtual Frame Buffer or VFB for short) with additional rollouts and controls.
- These additional controls are enabled/disabled based on the class of the current renderer and are completely implemented in MAXScript.
- In Krakatoa versions prior to 2.0, the VFB Extensions were turned OFF by default and had to be enabled explicitly using the option in the Krakatoa Preferences rollout. This also required a restart of 3ds Max for the VFB Extensions to get loaded. In Krakatoa MX 2 and higher, the VFB Extensions are on by default.
- Krakatoa provides its own set of VFB Extension rollouts which implement almost all Main Controls and also give some additional info about the rendering process as well as fast access to some of the other Krakatoa GUI rollouts and their most important features.
- In addition, the extended VFB allows for fast preview rendering using a new InterActive option of the Iterative rendering control.
- The VFB extensions are implemented as a set of three borderless rollouts - two on top of the image and one docked at the bottom.
- When the window is resized, the two top rollouts will stick to the left and right borders of the window and a gap will be introduced between them, while the bottom panel will always align to the left border of the window and will never resize.
- To save space, most drop-down lists in the Krakatoa VFB have been exposed as buttons with context menus.
- The button will display the current value, and clicking or right-clicking the button will open a menu with the possible options. See for example the Draw Filter buttons.
- For checkbuttons, the menu will open via right-clicking, while clicking will toggle the option on and off. See for example the Final Pass Density Mode checkbutton.
NOTE: To save space, the Checkbuttons in the VFB do NOT have the > prefix as in the rest of the Krakatoa GUI. Instead of drop-down lists, regular buttons with text in [] brackets and popup menus are used.
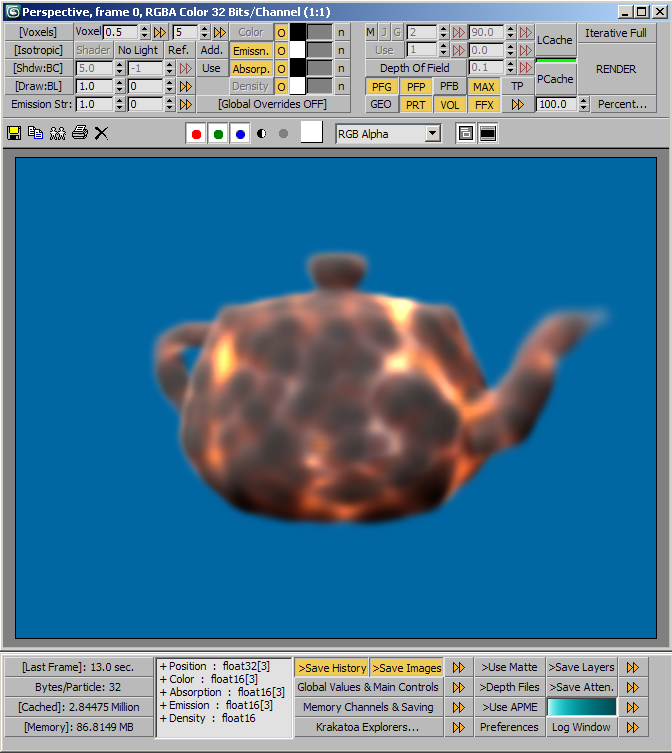
Top Left Panel
The top left rollout of the extended VFB duplicates the Particle Color Controls and Lighting Pass / Final Pass Density groups of controls found in the Main Controls rollout of the Krakatoa GUI, as well as the color overrides from the Global Render Values rollout.
Render Mode Button
- Corresponds to the Render Mode drop-down list in the Main Controls rollout.
- Click or Right-Click the button to open the context menu with the render mode options:
- Particles
- Voxels
- InterActive Mode: Supported.
Voxel Spinners
- Correspond to the Voxel Size and Filter Radius spinners in the Main Controls rollout.
- Enabled only when the Render Mode is set to Voxels.
- The first spinner sets the size of the voxel.
- The second spinner sets the number of neighbor voxels to filter over when shading a single voxel.
- InterActive Mode: Supported.
Phase Function Mode Button
- Corresponds to the Phase Function Mode drop-down list in the Main Controls rollout.
- Click or Right-Click the button to open the context menu with the render mode options:
- Isotropic
- Phong Surface
- Henyey-Greenstein (H-G)
- Schlick
- Kajiya-Kai
- Marschner
- Depending on the mode, various other controls will appear/disappear in the area to the right of the button - Specular Power and Level for Phong and Phase Eccentricity for H-G and Schlick.
- InterActive Mode: Supported.
Shader Parameters Dialog…
- This button will only be enabled when the Phase Function is not set to Isotropic.
- When pressed, the Shader Parameters rollout will be floated and displayed regardless of whether the Krakatoa GUI is open or closed.
No Lights Checkbutton
- Corresponds to the >Ignore Scene Lights checkbutton in the Main Controls rollout.
- When checked, the scene lights will be considered turned off. Use Emission channel, for example Emission Channel Override, to produce particle illumination. This can also be useful when loading a saved Lighting channel into the Emission channel to reproduce the original lighting.
- InterActive Mode: Supported.
Reflections Checkbutton
- Corresponds to the >Use Environment Reflections checkbutton in the Main Controls rollout.
- When checked, particles will look up texels from the 3ds Max Environment Map (if any) along their Normals (if any) and use the color of the map as additional lighting.
- InterActive Mode: Supported.
Additive Checkbutton
- Corresponds to the >Force Additive Mode checkbutton in the Main Controls rollout.
- When checked, the Color, Emission and Absorption channels will be modified internally to produce additive rendering. The Color channel will be copied into the Emission channel, while the Emission and Absorption channels will be set to black.
- When unchecked, the regular volumetric rendering will be performed with the ability to produce additive rendering if the above three channels are set by overrides or KCMs as described.
- InterActive Mode: Supported.
Self-Shadow Filter Button
- Corresponds to the Self-Shadow Filter drop-down list in the Main Controls rollout.
- Enabled only when lighting is enabled and the Use checkbutton is pressed (see below) .
- Click or Right-click for a context menu with the Self-Shadow Filter options:
- Self-Shadow Filter: Nearest Neighbor (S:NN)
- Self-Shadow Filter: Bilinear (S:BL)
- Self-Shadow Filter: Bicubic (S:BC)
- InterActive Mode: Supported.
Lighting Pass Density Spinners
- The two spinners to the right of the Self-Shadow Filter button correspond to the Lighting Density Per Particle and Density Exponent spinners in the Main Controls rollout.
- The >> presets button mirrors exactly the behavior of the Lighting Pass Density Presets >> button in the Main Controls rollout - it manages both spinners as one value.
- InterActive Mode: Supported, except when setting the values via the >> preset button.
Use Checkbutton
- Corresponds to the >Use Lighting Pass Density Settings checkbutton found in the Main Controls rollout.
- When checked, the Lighting Pass Density spinners will be enabled (as long as lights are not disabled).
Draw Point Filter Button
- Corresponds to the Draw Point Filter drop-down list in the Main Controls rollout.
- Click or Right-click for a context menu with the Self-Shadow Filter options:
- Self-Shadow Filter: Nearest Neighbor (S:NN)
- Self-Shadow Filter: Bilinear (S:BL)
- Self-Shadow Filter: Bicubic (S:BC)
- InterActive Mode: Supported.
Final Pass Density Spinners
- The two spinners to the right of the Draw Point Filter button correspond to the Density Per Particle and Density Exponent spinners in the Main Controls rollout.
- The >> presets button mirrors exactly the behavior of the Final Pass Density Presets >> button in the Main Controls rollout - it manages both spinners as one value.
- InterActive Mode: Supported, except when setting the values via the >> preset button.
Emission Strength Spinners
- The two spinners below the Final Pass Density ones correspond to the Emission Strength and Emission Strength Exponent spinners in the Main Controls rollout.
- The >> presets button mirrors exactly the behavior of the Emission Strength Presets >> button in the Main Controls rollout - it manages both spinners as one value.
- InterActive Mode: Supported, except when setting the values via the >> preset button.
Color Override Checkbutton, Color, Slider and Mapbutton
- These controls represent the checkbutton, color picker, spinner and Mapbutton found in the Global Render Values rollout.
- They provide a quick way to replace the Color channel of all loaded particles with a single color, a color map or a blend of the two.
- The Color button is disabled and currently not used - it is only a label at this point.
- The O checkbutton corresponds to the >Override Color checkbox in the Global Render Values rollout.
- The color picker defines the override color used when the O checkbutton is checked.
- The slider defines the blend amount of the map. When set to 100% and a map is defined, only the map will be used. When less than 100%, the map will be mixed with the color.
- The map button defines the override map used as described above.
- Left-clicking the button will open the Material/Map Browser to select a new or existing Map.
- Right-clicking the button will show the context menu for copying, getting, setting and clearing the Map.
Emission Override Checkbutton, Color, Slider and Mapbutton
- These controls represent the checkbutton, color picker, spinner and Mapbutton found in the Global Render Values rollout.
- They provide a quick way to replace the Emission channel of all loaded particles with a single color, a color map or a blend of the two.
- The Emiss. checkbutton corresponds to the >Use Emission button found in the Main Controls rollout. When checked, the Emission channel will be allocated and used by the renderer.
- The O checkbutton corresponds to the >Override Emission checkbox in the Global Render Values rollout.
- The color picker defines the override color used when the O checkbutton is checked.
- The slider defines the blend amount of the map. When set to 100% and a map is defined, only the map will be used. When less than 100%, the map will be mixed with the color.
- The map button defines the override map used as described above.
- Left-clicking the button will open the Material/Map Browser to select a new or existing Map.
- Right-clicking the button will show the context menu for copying, getting, setting and clearing the Map.
Absorption Override Checkbutton, Color, Slider and Mapbutton
- These controls represent the checkbutton, color picker, spinner and Mapbutton found in the Global Render Values rollout.
- They provide a quick way to replace the Absorption channel of all loaded particles with a single color, a color map or a blend of the two.
- The Abs. checkbutton corresponds to the >Use Absorption button found in the Main Controls rollout. When checked, the Absorption channel will be allocated and used by the renderer.
- The O checkbutton corresponds to the >Override Absorption checkbox in the Global Render Values rollout.
- The color picker defines the override color used when the O checkbutton is checked.
- The slider defines the blend amount of the map. When set to 100% and a map is defined, only the map will be used. When less than 100%, the map will be mixed with the color.
- The map button defines the override map used as described above.
- Left-clicking the button will open the Material/Map Browser to select a new or existing Map.
- Right-clicking the button will show the context menu for copying, getting, setting and clearing the Map.
Top Right Panel
- The top right panel of the extended VFB provides the rest of the options found in the Main Controls rollout.
M Checkbutton
- Corresponds to the >Enable Motion Blur checkbutton in the Main Controls rollout.
- InterActive Mode: Supported.
Note that if no Velocity channel has been loaded previously, turning this option on in InterActive mode will cause a reloading of all particles, result in a relatively long loading time which will possibly prevent further InterActive updates until the RENDER button is pressed manually again.
J Checkbutton
- Corresponds to the >Jittered Motion Blur checkbutton in the Main Controls rollout.
- When checked, Particle Positions will be jittered along the Velocity vector on the sub-frame samples to produce a more diffuse look of the motion blur.
- When unchecked, each sub-sample will be placed according to its timing, resulting in visible image sample overlaid on top of each other.
- InterActive Mode: Supported.
G Checkbutton
- Corresponds to the >Sub-Sample Geometry checkbutton in the Main Controls rollout.
- When checked, Matte Objects deforming at vertex level will be reevaluated on each sub-sample, producing correct mattes.
- When unchecked, only Position, Rotation and Scale animation of Matte Objects will be taken into account.
- InterActive Mode: Supported.
Motion Blur Segements Spinner
- The spinner to the right of the M, J and D checkbuttons corresponds to the Motion Blur Segments spinner in the Main Controls rollout.
- The >> presets button mirrors exactly the behavior of the >> button in the Main Controls rollout, including support for setting defaults.
- InterActive Mode: Supported, except when setting the value via the >> preset button.
Motion Blur Shutter Spinner
- The spinner to the right of the Motion Blur Segments spinner corresponds to the Motion Blur Shutter spinner in the Main Controls rollout.
- The >> presets button mirrors exactly the behavior of the >> button in the Main Controls rollout, including support for setting defaults.
- InterActive Mode: Supported, except when setting the value via the >> preset button.
Use Checkbutton and Matte Segments Spinner
- The Use checkbutton corresponds to the >Use checkbutton in the Main Controls rollout.
- When checked, the Matte Segments spinner will become enabled and can be used to decouple and adjust the number of samples taken when evaluating Matte Objects.
- The spinner to the right of the Use checkbutton corresponds to the Matte Segments spinner in the Main Controls rollout.
- The >> presets button mirrors exactly the behavior of the >> button in the Main Controls rollout, including support for setting defaults.
- InterActive Mode: Supported, except when setting the value via the >> preset button.
Matte Motion Blur Bias Spinner
- The spinner to the right of the Motion Blur Shutter spinner corresponds to the Matte Motion Blur Bias spinner in the Main Controls rollout.
- The >> presets button mirrors exactly the behavior of the >> button in the Main Controls rollout, including support for setting defaults.
- InterActive Mode: Supported, except when setting the value via the >> preset button.
Depth Of Field Checkbutton
- Corresponds to the >Enable Depth Of Field checkbutton in the Main Controls rollout.
DOF Sample Rate Spinner
- The spinner to the right of the DOF checkbutton corresponds to the Depth Of Field Sample Rate spinner in the Main Controls rollout.
- The >> presets button mirrors exactly the behavior of the >> button in the Main Controls rollout, including support for setting defaults.
- InterActive Mode: Supported, except when setting the value via the >> preset button.
Use Particles From Checkbuttons
- The 9 checkbuttons - PF Geo, PF Ph, PF BBox, Legacy, TP, FumeFX, PRT, Volume and Verts - correspond to the Use Particles From options in the Main Controls rollout.
- The >> presets button mirrors the functionality of the corresponding presets button in the Main Controls rollout.
- InterActive Mode: NOT Supported! This is because changing these options generally requires a reloading of particles, which is typically slow.
Percent… Button and Spinner
- The spinner corresponds to the Load Percentage spinner in the Main Controls rollout.
- The button corresponds to the >> presets button in the Main Controls rollout.
- InterActive Mode: NOT Supported! This is because changing the percentage requires the reloading of particles.
LCache Checkbutton
- Corresponds to the LCache checkbutton in the Main Controls rollout.
- Right-clicking opens the same context menu as in the Main Controls rollout.
- InterActive Mode: NOT Supported!
PCache Checkbutton
- Corresponds to the PCache checkbutton in the Main Controls rollout.
- Right-clicking opens the same context menu as in the Main Controls rollout.
- InterActive Mode: Changing the state of this checkbutton does NOT trigger InterActive updates, but it has to be checked for the InterActive mode to function!
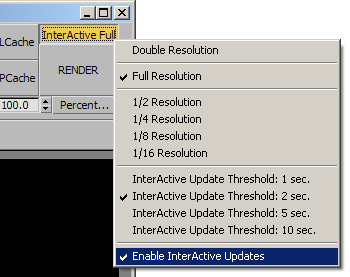
Iterative/InterActive Checkbutton
- Corresponds to the >Iterative checkbutton in the Main Controls rollout, but provides advanced functionality only available in the VFB in 3ds Max 2009 and higher.
- Right-clicking the button will open a context menu providing controls over the output image size AND InterActive Mode timing and state.
- Double Resolution - renders at double the resolution specified in the Render Scene dialog, while adapting the particle density correspondingly. See Iterative Mode Output Scaling for details.
- Full Resolution - renders at the resolution specified in the Render Scene dialog. This is the default mode.
- 1/X Resolution - where X is 2,4,8 or 16 - renders a fraction of the resolution specified in the Render Scene dialog, while adapting the particle density. See Iterative Mode Output Scaling for details.
- InterActive Update Threshold: N secs. - checking either of these options will set the Last Frame Time Threshold controlling whether an automatic redrawing will be performed or not to the given value.
- Enable InterActive Updates - when checked, the caption of the checkbutton will change to “InterActive”.
- If the last frame time was below the specified threshold, changing values of supported controls will trigger an automatic re-rendering.
- The last frame time can be seen in the upper left corner of the bottom VFB pannel.
- In version 1.1.x, the PCache had to be checked for this feature to operate. In version 1.5.0 and higher, the PCache does not have to be checked to perform interactive updates.
Bottom Panel - Left Side
- The controls on the left side of the bottom panel provide information about the last rendered frame and the cache/channels setup.
Last Frame Button
- Displays the render time of the last rendered frame.
- This value is also used but the InterActive mode to disallow auto-updates if the last frame took longer than a given threshold.
- Click the button to cycle through several manual and one automatic display modes:
- Milliseconds - shows the time as an integer in thousands of a second. This is useful when render times are very fast, for example below a second.
- Seconds - shows the time as a floating point number in seconds. This is useful when the render times are below a minute.
- HH:MM:SS - shows the time as integer hours, minutes and seconds. This is useful when the render times are longer than a minute.
- HH:MM:SS.XX - shows the time as integer hours and minutes and floating point seconds. This is useful when the render times are longer than a minute, but the precision of the Seconds mode is desired.
- The last display mode will be stored in the local INI settings and will persist between scenes and 3ds Max sessions.
- [Last Frame] - adapts the display using the above options depending on the amount to be displayed, e.g. when the value is below 1 minute, it shows seconds, when the value is below a second is shows milliseconds, otherwise it shows HH:MM:SS.
Bytes/Particle Button
- Displays the number of bytes a particle will occupy in memory based on the currently active channels. Corresponds to the readout in the Channels rollout of the Krakatoa GUI.
- Clicking the button currently has no effect.
Cached: Button
- Displays the particle count currently in the Particle Cache.
- Click the button to cycle through several manual and one automatic display modes:
- Number of particles as integer - useful when rendering few particles, typically less than 100,000.
- Number of particles as floating point in Thousands - useful when rendering thousands of particles but less than a million.
- Number of particles as floating point in Millions - useful when rendering millions of particles.
- [Cached] - adapts the display mode to the value to be displayed, e.g. when the value is below one thousand it shows particles as integer, when the value is above one million is shows millions etc.
- The last display mode will be stored in the local INI settings and will persist between scenes and 3ds Max sessions.
Memory: Button
- Displays the memory currently used by the Particle Cache.
- Click the button to cycle through several manual and one automatic display modes:
- Bytes - useful when rendering few particles and memory usage is below a Megabyte.
- Kilobytes - useful when rendering many particles but the memory usage is blow a Megabyte.
- Megabytes - useful when rendering millions of particles and the memory usage is above a Megabyte.
- [Memory] - adapts the display format to the value to be displayed, e.g. when the value is above 1MB it shows Megabytes, otherwise it falls back to Kilobytes etc.
- The last display mode will be stored in the local INI settings and will persist between scenes and 3ds Max sessions.
Channels List
- The listbox mirrors the right (used) channels list in the Channels rollout. It gives an overview of the channels required for rendering and whether they are already cached (+) or not (–), as well as their data format and size.
Bottom Panel - Right Side
- The right side of the bottom panel provides access to some important options in the other Krakatoa GUI rollouts except for the Main Controls already exposed by the two Top Panels.
- In general, the >> buttons open a context menu allowing the fast navigation to rollouts in the Krakatoa GUI.
- If a rollout is selected from the menu and the Krakatoa GUI is not open, it will be opened and the specified rollout will be expanded and set in focus, while all other rollouts will be collapsed.
Save History Checkbutton
- Corresponds to the Save Render History checkbutton in the Presets and History rollout of the Krakatoa GUI.
Save Images Checkbutton
- Corresponds to the Save Image Sample checkbutton in the Presets and History rollout of the Krakatoa GUI.
Global Values and Main Controls Button
- Opens a navigation menu to the
- Global Render Values rollout in the Krakatoa GUI.
- Main Controls rollout in the Krakatoa GUI.
Memory Channels & Saving Button
- Opens a navigation menu to the
- Memory Channels rollout in the Krakatoa GUI.
- Save Particles rollout in the Krakatoa GUI.
- Partitioning rollout in the Krakatoa GUI.
Krakatoa Explorers >> Button
- Opens a navigation menu to the
- Krakatoa Explorers floater.
- Krakatoa Schematic Flow Dialog.
- Krakatoa Particle Data Viewer Dialog.
- Krakatoa PRT Scanner Floater.
- Krakatoa Shadows Explorer Dialog.
Use Matte Checkbutton
- Corresponds to the >Enable Matte Objects checkbutton in the Matte Objects rollout of the Krakatoa GUI.
Save Layers Checkbutton
- Corresponds to the >Save Multiple Layers checkbutton in the Matte Objects rollout of the Krakatoa GUI.
Depth Files Checkbutton
- Corresponds to the >Use Depth Map File Sequence checkbutton in the Matte Objects rollout of the Krakatoa GUI.
Save Atten. Checkbutton
- Corresponds to the >Save Attenuation Maps When Rendering checkbutton in the Shadows On Geometry rollout of the Krakatoa GUI.
Use Ambient PME Checkbutton
- Corresponds to the >Use Ambient Participating Medium Extinction (APME) checkbutton in the Ambient PME rollout of the Krakatoa GUI.
Preferences Rollout Button
- Opens a navigation menu to the Preferences rollout in the Krakatoa GUI.
Log Window Button
- Opens the Krakatoa Log Window.
Preferences/Log Window >> Button
- Opens a navigation menu with the following options:
- Open Krakatoa Preferences Floater.
- Open Krakatoa Log Window.
- Open Notes Dialog.
- Open About Dialog.