Render Settings - Krakatoa For Maya
- Introduction
- User Interface
- Particle Sources panel
- Render Output And Passes panel
- Global Render Values panel
- Rendering Controls panel
- Phong Surface Shader panel
- Henyey-Greenstein Shader panel
- Schlick Shader panel
- Kajiya-Kay Hair Shader panel
- Marschner Hair Shader panel
- Lighting and Drawing Pass Density and Filtering panel
- Motion Blur and DOF panel
- Matte Objects panel
- Import Deep Shadows/Matte Renders panel
- Memory Channels panel
- Sanity Checks panel
- Miscellaneous Settings panel
Introduction
Krakatoa for Maya appears as a plugin-in renderer in the Maya Render Settings.
While some settings like Output File Name and Resolution will be taken from the settings in the Common tab of the Render Settings window , the majority of Krakatoa-related settings are located in the Krakatoa Settings tab.
The Krakatoa settings can be loaded and saved using the regular Presets option in the Maya Render Window menu.
User Interface
Particle Sources panel

Render Maya Particles checkbox
- Checked by default.
- When checked, particles generated by Maya’s native particle systems including nParticles will be respected and rendered or saved to disk by Krakatoa.
- When unchecked, Maya’s native particles will be ignored.
Render PRT Loaders checkbox
- Checked by default.
- When checked, particles provided by Krakatoa PRT Loaders will be respected and rendered or saved to disk by Krakatoa.
- When unchecked, PRT Loaders’ particles will be ignored.
Render PRT Volumes checkbox
- Checked by default.
- When checked, particles generated from meshes by Krakatoa PRT Volumes will be respected and rendered or saved to disk by Krakatoa.
- When unchecked, PRT Volume particles will be ignored.
Render PRT Surfaces checkbox
- Checked by default.
- When checked, particles distributed on mesh surfaces by Krakatoa PRT Surface objects will be respected and rendered or saved to disk by Krakatoa.
- When unchecked, PRT Surfaces’ particles will be ignored.
Render PRT Fractals checkbox
- Checked by default.
- When checked, particles generated procedurally by the Krakatoa PRT Fractals objects will be respected and rendered or saved to disk by Krakatoa.
- When unchecked, PRT Fractal particles will be ignored.
Render Output And Passes panel

Force Output to .EXR checkbox
- Checked by default.
- When checked, all output files will be forced to the OpenEXR file format using the advanced compression and data settings below.
- When unchecked, output files will respect the file type specified in the Maya Render Settings > Common tab.
- Note that some Krakatoa features like the ability to save multiple layers in a single file might not be supported unless saving to OpenEXR files is forced!
EXR compression type drop-down list
- This option as added in Krakatoa v2.3.
- This option controls the data compression when forcing the rendered output to OpenEXR using the built-in implementation of Krakatoa (Force Output to .EXR checked)
- The available options are:
- No Compression
- Run Length Compression
- Zlib Compression (one scan line at a time) - default
- Zlib Compression (in blocks of 16 scan lines)
- Piz-Based Wavelet compression
- Lossy 24-bit Float Compression
- Lossy 4-by-4 Pixel Block Compression (fixed compression rate)
- Lossy 4-by-4 Pixel Block Compression (flat fields are compressed more)
RGBA bit depth drop-down list
- This option was added in Krakatoa v2.3.
- This option controls the bit depth of the “beauty” pass (RGB and Alpha).
- Possible values are
- UInt - unsigned integer
- Half - Half-float (default)
- Float - use for highest precision, at cost of file size.
Save Normal Pass checkbox
- Unchecked by default.
- When checked, a Normal pass will be generated and saved as a layer in the OpenEXR output file.
- If the Normal channel was not requested by another feature of Krakatoa (like Phong Surface shading), the Normal channel will be added to the render-time memory layout.
Normal bit depth drop-down list
- This option was added to Krakatoa v2.3.
- This option controls the bit depth of the Normal pass stored as a layer when Force Output to EXR is checked.
- Possible values are
- UInt - unsigned integer
- Half - Half-float (default)
- Float - use for highest precision, at cost of file size.
Save Velocity Pass checkbox
- Unchecked by default.
- When checked, a Velocity pass will be generated and saved as a layer in the OpenEXR output file.
- If the Velocity channel was not requested by another feature of Krakatoa (like Motion Blur), the Velocity channel will be added to the render-time memory layout.
Velocity bit depth drop-down list
- This option was added to Krakatoa v2.3.
- This option controls the bit depth of the Velocity pass stored as a layer when Force Output to EXR is checked.
- Possible values are
- UInt - unsigned integer
- Half - Half-float (default)
- Float - use for highest precision, at cost of file size.
Save Z-Depth Pass checkbox
- Unchecked by default.
- When checked, a Z-Depth pass will be generated and saved as a layer in the OpenEXR output file.
Velocity bit depth drop-down list
- This option was added to Krakatoa v2.3.
- This option controls the bit depth of the Velocity pass stored as a layer when Force Output to EXR is checked.
- Possible values are
- Half - Half-float - use for smaller files, at cost of depth precision
- Float - default
Save Occluded Particles Pass checkbox
- Unchecked by default.
- When checked, an Occluded Particles pass will be generated and saved as a layer in the OpenEXR output file.
- The Occluded Particles pass includes all particles that are partially or completely occluded by matte objects, while the main Beauty RGBA pass will contain all the particles completely in front of matte objects.
Occluded bit depth drop-down list
- This option was added to Krakatoa v2.3.
- This option controls the bit depth of the Occluded Particles pass stored as a layer when Force Output to EXR is checked.
- Possible values are
- UInt - unsigned integer
- Half - Half-float (default)
- Float - use for highest precision, at cost of file size.
Global Render Values panel
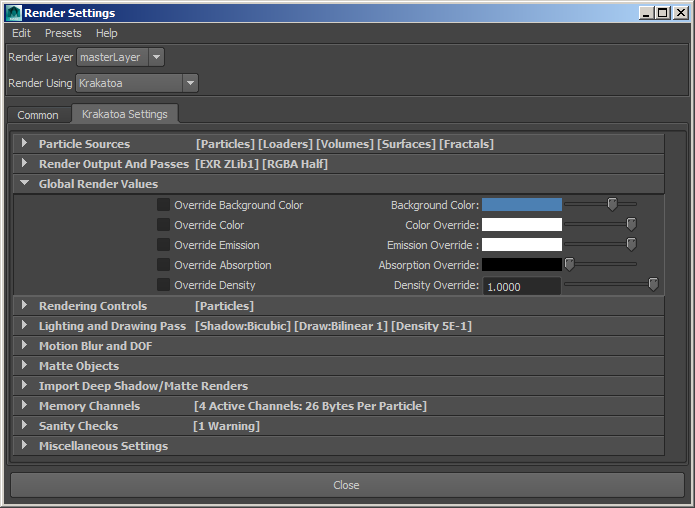
Override Background Color checkbox
- Default is unchecked
- When unchecked, the image background will be black
- When checked, the image background will be set to the color value specified by the Background Color swatch.
Background Color color and slider
- Defaults to blue
- Specifies the background color to be used when the Override Background Color checkbox is checked.
Override Color checkbox
- Default is unchecked
- When unchecked, the incoming particle color will be used.
- When checked, the color of all particles will be overidden and set to the value specified by the Color Override swatch.
Color Override color and slider
- Default is white.
- Defines the color to be used for all particles when the Override Color checkbox is checked.
Override Emission checkbox
- Default is unchecked
- When unchecked, the incoming Emission color will be used.
- When checked, the Emission color of all particles will be overidden and set to the value specified by the Emission Override swatch.
Emission Override color and slider
- Default is white.
- Defines the color to be used for all particles when the Override Emission checkbox is checked.
Override Absorption checkbox
- Default is unchecked
- When unchecked, the incoming Absorption color will be used.
- When checked, the color of all particles will be overidden and set to the value specified by the Absorption Override swatch.
Absorption Override color and slider
- Default is black.
- Defines the Absorption value to be used for all particles when the Override Absorption checkbox is checked.
Override Density checkbox
- Default is unchecked
- When unchecked, the incoming Density color will be used.
- When checked, the Density of all particles will be overidden and set to the value specified by the Density Override field / slider.
- Note that some external particle sequences like certain RealFlow BIN or PRT files could contain a Density channel with a value of 0.0 - in that case, using an override is the only way to make those particles visible. In most other cases, using the Final Pass Density controls to scale the incomign Density instead of overwriting it is recommended.
Density Override value and slider
- Default is 1.0.
- Defines the Density value to be used for all particles when the Override Density checkbox is checked.
- Overriding the Density can be useful when rendering RealFlow BIN files containing a Density channel with a value of 0.0 - in these cases, the particles would fail to appear in the final image.
- NOTE:
- All the above overrides apply to ALL scene particles. They are useful when there is only one particle source in the scene, or when all particles from all sources need to have the same value. For example, checking the Override Color option is a quick way to render all particles in the scene in the same color, like white.
- When the changes must be localized, for example when there are two or more particle sources in the scene, but only one of them needs to be modified, consider using the Krakatoa Modifiers system to set/override a channel per source!
Rendering Controls panel
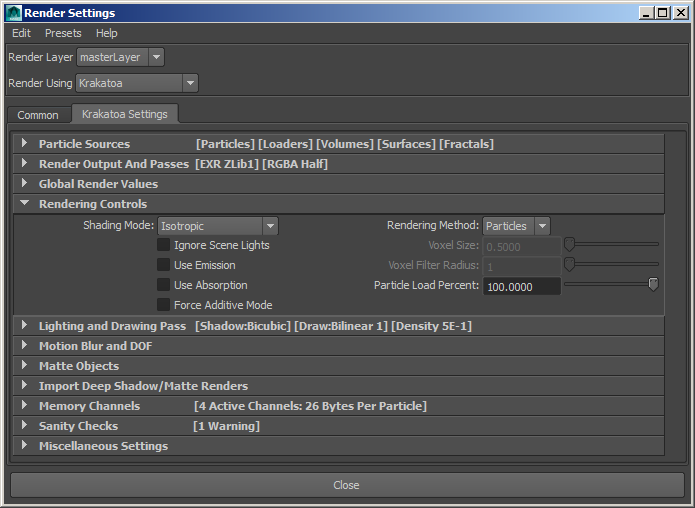
Shading Mode list
- This drop-down list selects the light scattering algorithm (also known as Phase Function) to be used when illuminating particles for volumetric rendering.
- It has no influence on pure Additive rendering.
- When a mode other than the default Isotropic is selected, an additional panel with shader-specific controls will become visible - see further below for details.
- Possible options are:
- Isotropic (default)
- Phong Surface Shading
- Henyey-Greenstein
- Schlick
- Kajiya-Kai Hair
- Marschner Hair
Ignore Scene Lights checkbox
- Default is unchecked.
- When unchecked, the Maya scene lights will be used to illuminate the particles and cast volumetric shadows.
- When checked, the Maya scene lights will be ignored - this is useful when rendering self-illuminated (emissive) particles.
- NOTE that hidden lights will be considered OFF by Krakatoa MY to comply with the Maya’s scene lighting paradigm. This is different in 3ds Max / Krakatoa MX where hidden lights are still active and must be turned off explicitly using their On property.
Use Emission checkbox
- Default is unchecked.
- When unchecked, the Emission channel will not be allocated and no emission will be calculated.
- When checked, the Emission channel will be allocated and used when rendering.
Use Absorption checkbox
- When unchecked (default), the Absorption channel will not be allocated and no absorption will be calculated.
- When checked, the Absorption channel will be allocated and used when rendering.
Force Additive Mode checkbox
- When unchecked (default), the additive vs. volumetric rendering of particles will be controlled by the per-particle Color, Emission and Absorption channels, allowing for the mixing of these rendering modes.
- When checked, the Emission channel will be set to the Color channel, the (scatter) Color and Absorption channels will be set to black, producing pure Additive rendering which is fully emissive without scattering and absorption.
- Note that no final pass sorting of the particles will be performed since additive rendering is order-independent - this makes forced Additive rendering faster than per-particle-channel-controlled Additive rendering.
Rendering Method list
- Particles - the particles will be drawn as pixel-sized points, filtered over multiple pixels according to the Filtering settings.
- Voxels - the particles will be registered on a voxel grid and the voxels will be rendered using a plane marching at half-way angle between the view direction and the light direction, once per light.
Voxel Size value and slider
- Defaults to 0.5.
- This is the world units spacing of the voxel grid, defining the X, Y and Z size of a voxel.
Voxel Filter Radius value and slider
- Default is 1.
- This is the number of neighbor voxels to interpolate over to produce filtering.
Phong Surface Shader panel
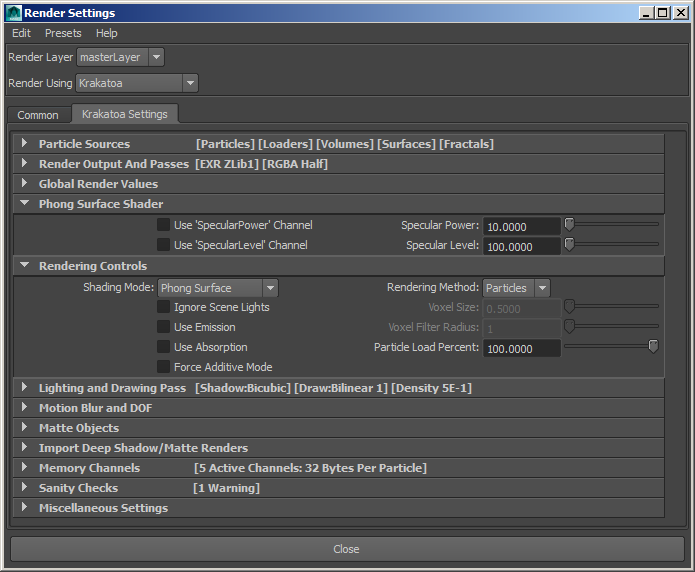
Use ‘SpecularPower’ Channel checkbox
- This option was added in Krakatoa v2.3
- Unchecked by default.
- When unchecked, the static value defined by the Specular Power value located to the right of the checkbox will be used for all scene particles, and no dedicated SpecularPower memory channel will be allocated during rendering.
- When checked, a dedicated SpecularPower channel will be allocated at render time. It will be initialized to the static Specular Power value, but if a SpecularPower channel is found in the particles, the per-particle value will be loaded instead.
Specular Power value and slider
- This value controls the shape of the specular highlight - higher values produce smaller and sharper specular highlights.
- The value will be used directly for all particles if the Use ‘SpecularPower’ Channel checkbox is unchecked.
- It will be used to initialize the ‘SpecularPower’ channel if the Use ‘SpecularPower’ Channel checkbox is checked, but the value can later be overwritten by Magma or other Channel Modifiers.
Use ‘SpecularLevel’ Channel checkbox
- This option was added in Krakatoa v2.3
- Unchecked by default.
- When unchecked, the static value defined by the Specular Level value located to the right of the checkbox will be used for all scene particles, and no dedicated SpecularLevel memory channel will be allocated during rendering.
- When checked, a dedicated SpeculaLevel channel will be allocated at render time. It will be initialized to the static Specular Level value, but if a SpecularLevel channel is found in the particles, the per-particle value will be loaded instead.
Specular Level value and slider
- This value controls the intensity of the specular highlight - higher values produce stronger specular highlights.
- The value will be used directly for all particles if the Use ‘SpecularLevel’ Channel checkbox is unchecked.
- It will be used to initialize the ‘SpecularLevel’ channel if the Use ‘SpecularLevel’ Channel checkbox is checked, but the value can later be overwritten by Magma or other Channel Modifiers.
Henyey-Greenstein Shader panel
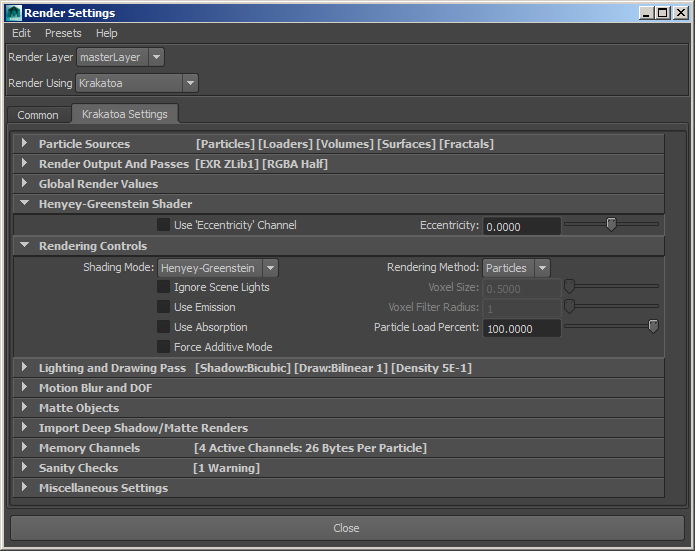
Use ‘Eccentricity’ Channel checkbox
- This option was added in Krakatoa v2.3
- Unchecked by default.
- When unchecked, the static value defined by the Eccentricity value located to the right of the checkbox will be used for all scene particles, and no dedicated Eccentricity memory channel will be allocated during rendering.
- When checked, a dedicated Eccentricity channel will be allocated at render time. It will be initialized to the static Eccentricity value, but if an Eccentricity channel is found in the particles, the per-particle value will be loaded instead.
Eccentricity value and slider
- This value controls the Phase Eccentricity of the Henyey-Greenstein effect.
- The value range is from -1.0 to +1.0.
- The default value of 0.0 produces the same output as Isotropic shading - light will be diffused in all directions equally.
- When the value is not 0.0, the light will be diffused differently depending on the angle beteen the light direction and the view direction.
- The value will be used directly for all particles if the Use ‘Eccentricity’ Channel checkbox is unchecked.
- It will be used to initialize the Eccentricity channel if the Use ‘Eccentricity’ Channel checkbox is checked, but the value can later be overwritten by Magma or other Channel Modifiers.
Schlick Shader panel
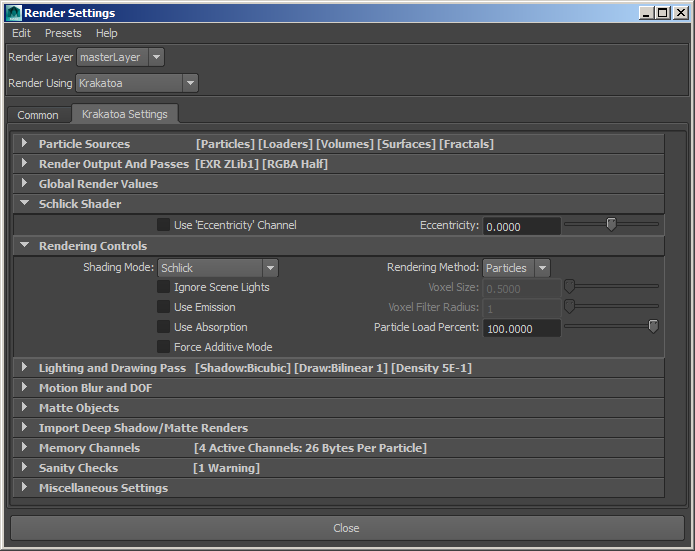
Use ‘Eccentricity’ Channel checkbox
- This option was added in Krakatoa v2.3
- Unchecked by default.
- When unchecked, the static value defined by the Eccentricity value located to the right of the checkbox will be used for all scene particles, and no dedicated Eccentricity memory channel will be allocated during rendering.
- When checked, a dedicated Eccentricity channel will be allocated at render time. It will be initialized to the static Eccentricity value, but if an Eccentricity channel is found in the particles, the per-particle value will be loaded instead.
Eccentricity value and slider
- This value controls the Phase Eccentricity of the Schlick effect.
- The value range is from -1.0 to +1.0.
- The default value of 0.0 produces the same output as Isotropic shading - light will be diffused in all directions equally.
- When the value is not 0.0, the light will be diffused differently depending on the angle beteen the light direction and the view direction.
- The value will be used directly for all particles if the Use ‘Eccentricity’ Channel checkbox is unchecked.
- It will be used to initialize the Eccentricity channel if the Use ‘Eccentricity’ Channel checkbox is checked, but the value can later be overwritten by Magma or other Channel Modifiers.
Kajiya-Kay Hair Shader panel
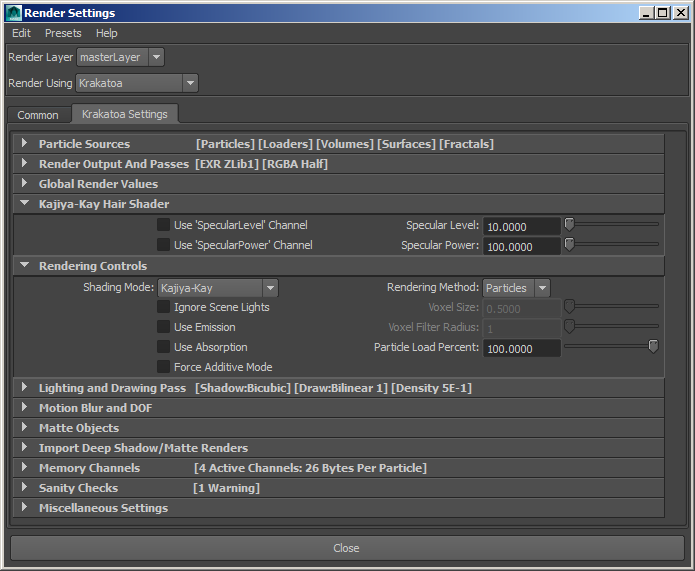
- This shader is meant for simple hair shading, but hair rendering support is not enabled in Krakatoa MY yet.
Marschner Hair Shader panel
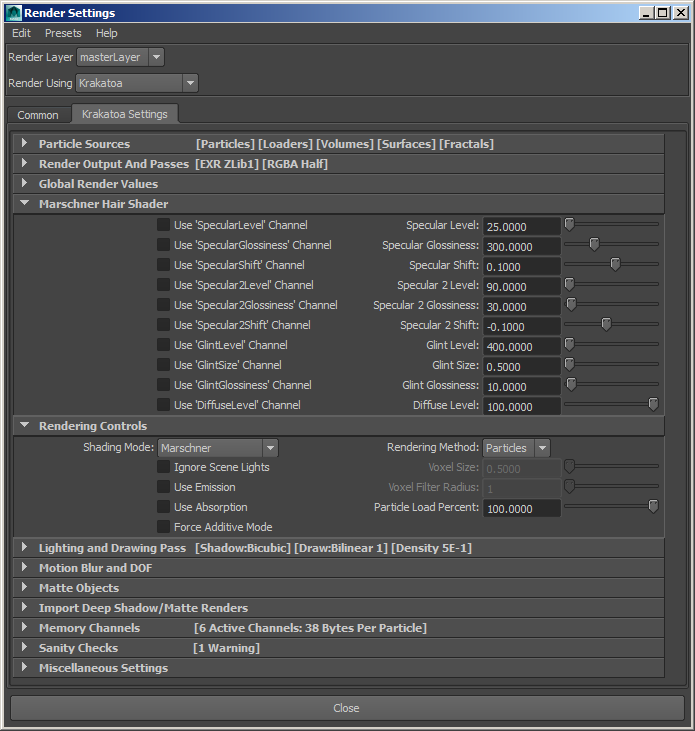
- This shader is meant for advanced hair shading, but hair rendering support is not enabled in Krakatoa MY yet.
Lighting and Drawing Pass Density and Filtering panel
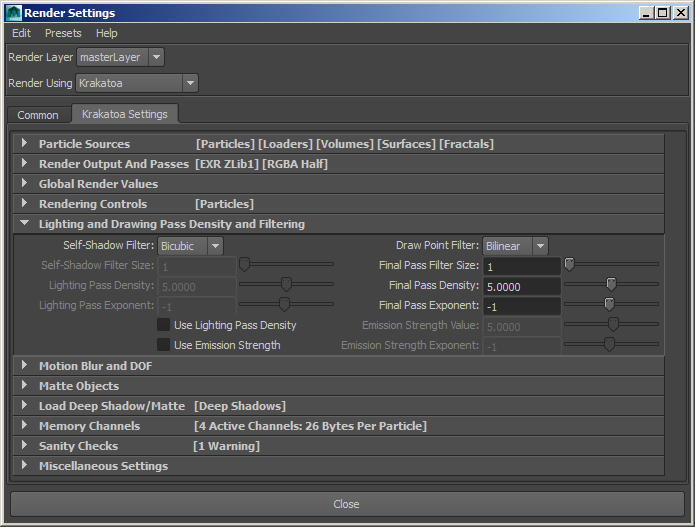
Self-Shadow Filter list
- Nearest - Draws the particle in exactly one pixel by using the pixel that has the maximum coverage.
- Bilinear - When Filter Size is 1, draws the particles into 2x2 pixels using bilinear filtering. When the Filter Size is higher than 1, covers respectively more pixels, producing smoother results.
- Bicubic - Default. Draws the particles into 3x3 pixels using bicubic interpolation.
Self-Shadow Filter Size value
- Default is 1.
- This is the Size of the Bilinear Self-Shadow Filter.
- A value of 1 draws the particle into the closest 2x2 pixels.
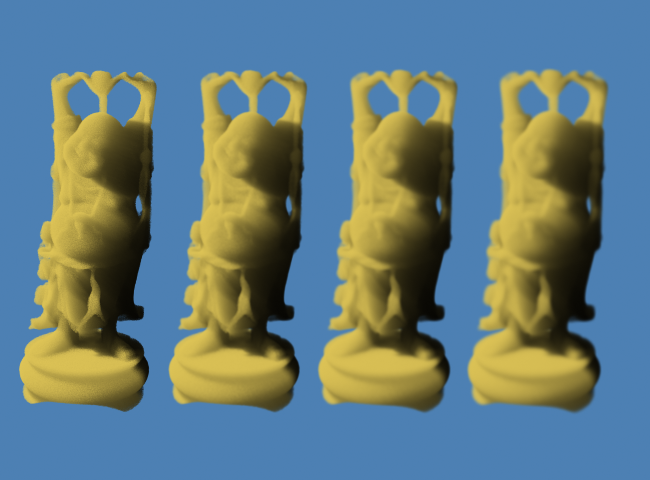
- Higher values produce blurrier shadows - in the image below, the same PRT Volume particles were rendered using Filter Size of 1,2,4 and 8.
- Here is a scaled up portion of the rendered image showing the difference between Filter Size of 1,2,4 and 8 - the higher the filter, the more diffuse the shadow:
Lighting Pass Density and Lighting Pass Exponent values and sliders
- These two values are used to define a single render property = (Lignting Pass Density) * 10 ^ (Lighting Pass Exponent).
- This makes it easy to increase/decrease the value by orders of magnitude or express very small or very large numbers. For example, instead of entering 0.00000005, the user can enter 5.0 and -8.
- They define the global Lighting-pass Density scale for all particles used when the Use Lighting Pass Density option is checked.
Use Lighting Pass Density checkbox
- When unchecked (default), the Final Pass Density will also be used for the calculation of particle lighting and self-shadowing - this is the “physically correct” approach where lights and camera “see” particles the same way.
- When checked, the Lighting Pass Density controls become available and will be used by the renderer to decouple the particle Density scaling when calculating the particle lighting and self-shadowing - this is a “non-physical” approach for achieving higher artistic control.
Draw Point Filter
- Nearest - Draws the particle in exactly one pixel by using the pixel that has the maximum coverage.
- Bilinear - Default. When Final Pass Filter Size is 1, draws the particle into the closest 2x2 pixels using bilinear filtering. Covers more pixels as the Filter Size increases.
- Bicubic - Draws the particle into the closest 3x3 pixels using bicubic filtering.
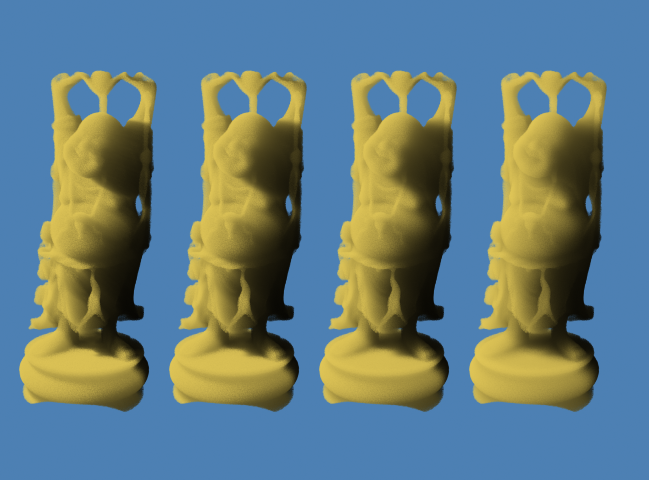
Final-Pass Filter Size value
- Default is 1.
- This is the Final Pass Bilinear Filter Size - higher values produce blurrier rendering. The image below shows the result of applying a Bilinear Filter with sizes of 1, 2, 3 and 4 to the same PRT Volume particles while illuminating with Shadows set to Bilinear Filter Size 1:
As you can see, the image gets more and more blurred as the Filter Size increases.
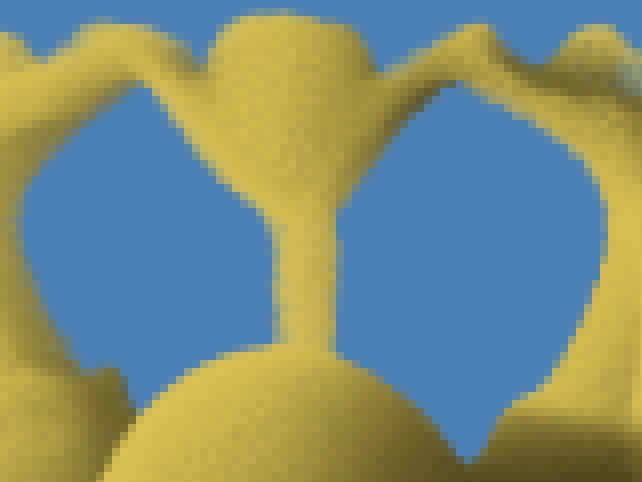
Here is a fragment of the same rendering, zoomed in 8 times:

Final Pass Density and Final Pass Exponent values and sliders
- These two values are used to define a single render property = (Final Pass Density) * 10 ^ (Final Pass Exponent)
- This makes it easy to increase/decrease the value by orders of magnitude or express very small or very large numbers. For example, instead of entering 0.00000005, the user can enter 5.0 and -8.
- They define a global Density scale for all particles.
- Default values are 5.0 and -1.
Use Emission Strength checkbox
- When unchecked (default), the Final Pass Density values also control the Emission Strength scaling.
- When checked, the separate Emission Strength controls become available and allow the independent control of Final Pass Density and Emission Strength scaling.
Emission Strength Value and Emission Strength Exponent values and sliders
- These two values are used to define a single render property used when the Use Emission Strength checkbox is checked.
- Default values are 5.0 and -1.
Motion Blur and DOF panel
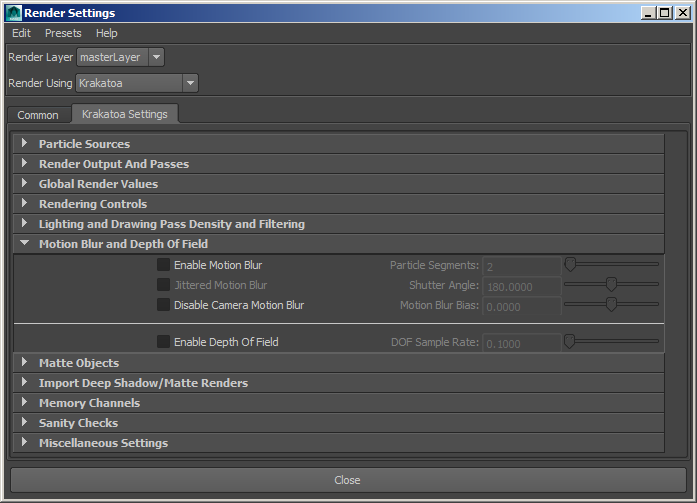
Enable Motion Blur checkbox
- When unchecked (default), no motion blur will be calculated.
- When checked, motion blur will be calculated - the lighting will be calculated once at the center of the Shutter interval, then multiple passes will be rendered by shifting the particle Position along the Velocity vector.
Jittered Motion Blur checkbox
- When unchecked (default) and if Enable Motion Blur is checked, the particle Position will be shifted along the Velocity vector at equal intervals within the Shutter range, potentially producing visible stepping.
- When checked, an additional MotionBlurTime channel will be allocated and the sorting of particles will be a bit slower, but the Position will be shifted at random intervals within the Shutter range, producing jittered placement.
Particle Segments value
- Default is 2.
- It defines the number of Motion Blur segments (passes) to render.
- Note that setting the value to 1 and checking Jittered Motion Blur will render a single pass with particle Positions randomized along the Velocity vector.
Shutter Angle value
- Default is 180.0
- This value defines the shutter opening time, where 360.0 degrees represent one frame interval.
- In real-world mechanical camera shutters, only values below 360.0 are possible, but Krakatoa allows arbitrary values above 360.0 for non-physical effects.
Enable Depth Of Field checkbox
- When unchecked (default), no Depth Of Field effect will be calculated.
- When checked, each particle will be drawn multiple times within a circle of confusion according to the f-step and focal distance of the camera.
DOF Sample Rate value
- Default is 0.1.
- This value defines the number of samples to be drawn within the circle of confusion - higher values produce higher quality and require more time to calculate.
Matte Objects panel

Tag Selected Objects As Matte button
- Select one or more polygon mesh objects and press this button to add a Krakatoa Matte Object attribute and set it to True.
- If the attribute already exists, it will be set to True.
Disable Selected Matte Objects button
- Select one or more polygon mesh objects and press this button to set the Krakatoa Matte Object attribute to False (if available).
- If the attribure does not exist, no changes will be made.
Enable Matte Objects checkbox
- When unchecked (default), Matte Objects will be ignored.
- When checked, polygon meshes with a Krakatoa Matte Object Attribute set to True will will be rasterized into a depth buffer and used to occlude particles behind them.
Super-Sampling value
- Default is 1.
- This value is used only when Enable Matte Objects is checked.
- It defines the depth buffer scale factor relative to the final render image.
- By default, the depth buffer will have the same resolution as the final image and each pixel in it will correspond to exactly one pixel in the image buffer.
- When set to higher values, the depth buffer will contain multiple pixels (2x2, 3x3 etc.) corresponding to a single render image buffer. This can be useful for detecting particles that are semi-occluded at the edge of an object. When the Save Occluded Particles Pass option is checked under the Render Passes panel, particles that are benind even one the depth buffer pixels will be considered occluded and sent to the Occluded Particles Pass image, allowing for correct anti-aliasing of the Krakatoa rendering when composited with geometry rendering from another renderer (e.g. Maya Software or mental ray).
Import Deep Shadows/Matte Renders panel
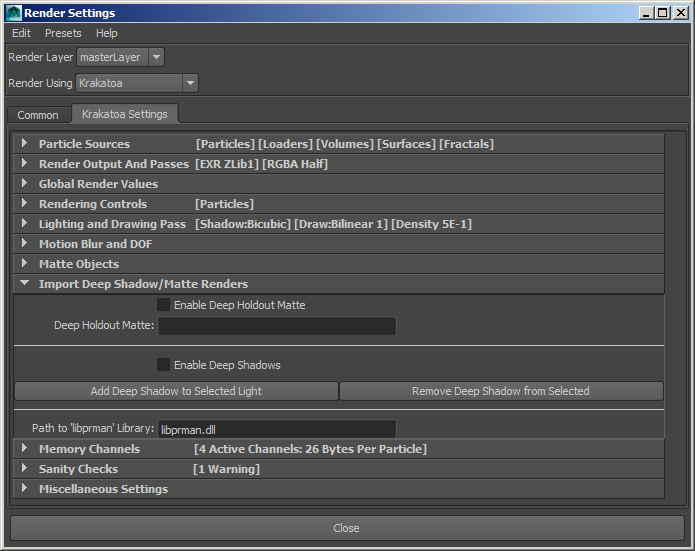
Enable Deep Holdout Matte checkbox
- When checked (default), and if a valid Deep Holdout Matte sequence is provided in the following text field, the depth information from it will be used to occlude particles instead of using scene geometry.
- This is useful for occluding particles with data saved from Renderman-compliant renderers like prMan or 3Dlight.
Deep Holdout Matte text field
- Empty by default.
- Paste the path to a valid Deep Holdout Matte file sequence to be used by Krakatoa.
- See above for details.
Add Deep Shadow to Selected Light button
- Pressing this button will assign Deep Shadows to the selected lights.
Remove Deep Shadow from Selected button
- Pressing this button will remove the Deep Shadows from the selected lights.
Path to ‘libprman’ Library text field
- Default is libprman.dll
- This text field specifies the name of the DTEX implementation module.
Memory Channels panel
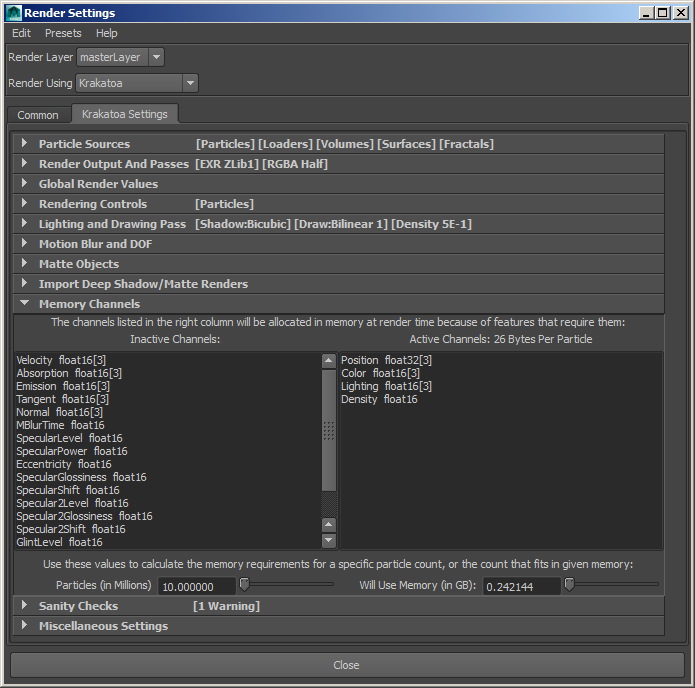
Inactive/Active Channels lists
- The Inactive Channels list on the left shows channels that are currently not used by Krakatoa.
- The Active Channels list on the right shows the channels that have been requested by enabling certain features of Krakatoa, or are vital to particle rendering. The latter include Position, Color and Density which are always allocated.
- The content of the two lists changes dynamically as you enable and disable options in the UI. Krakatoa will allocated only those channels that are required to perform the rendering operations requested by the user. For example, if no Motion Blur is enabled, the Velocity channel will not be allocated and populated with data.
- The label of the right list also shows the total memory footprint of a single particle, e.g. 32 Bytes Per Partice. This value is used to estimate the memory usage for particle storage during rendering. Note that more memory could be needed for internal frame buffers, attenuation maps, matte geometry processing etc.
Memory / Particle Count Calculator values
- The value on the lelf lets you define the number of particles you intend to render. When the value is changed, the right value will show the expected memory usage in Gigabytes.
- The value on the right lets you define the amount of memory you intend to use/have installed on your machine. When the value is changed, the left value will show the number of particles that could fit in that memory amount given the currently requested Memory Channels.
- If you enable or disable features and thus change the Memory Channels / Bytes Per Particles requirements, the right (memory in Gigabytes) value will change dynamically based on the specified particle count.
- This calculator is for estimation purposes only. It does not take into account any other memory that might be required by the Krakatoa renderer or by Maya.
- The actual memory used by Krakatoa for particles will be reported in the Maya Log during rendering and should be generally very close to the estimated amount.
Sanity Checks panel
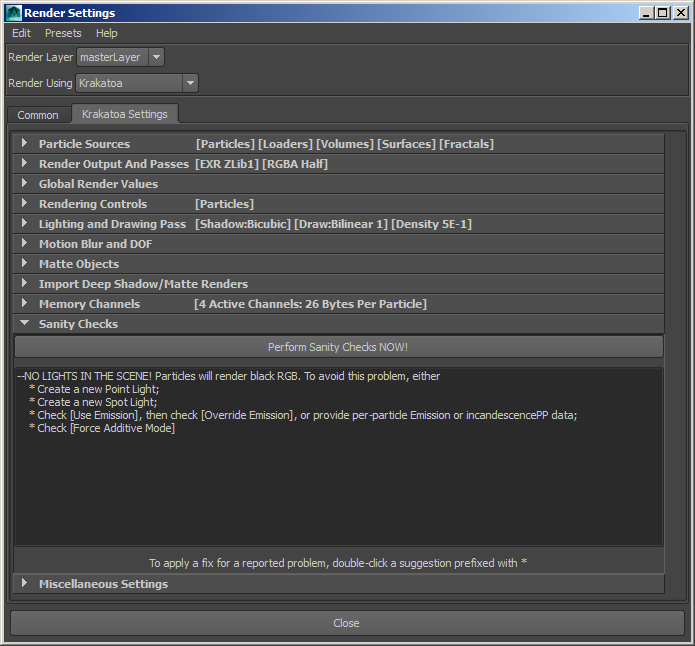
Perform Sanity Checks NOW! button
- Press this button to perform all sanity checks and repopulate the list.
Sanity Checks list
- This list displays the description of potential problems with the current scene and render settings.
- For each problem, one or more possible solutions might be presented.
- Double-clicking a line prefixed with * will apply the suggested solution to the render settings or the scene content - for example if the error says that there are no lights in the scene, double-clicking the first solution will create a Point light, while the 4th solution will switch the renderer to Force Additive mode which does not require scene lighting.
Miscellaneous Settings panel
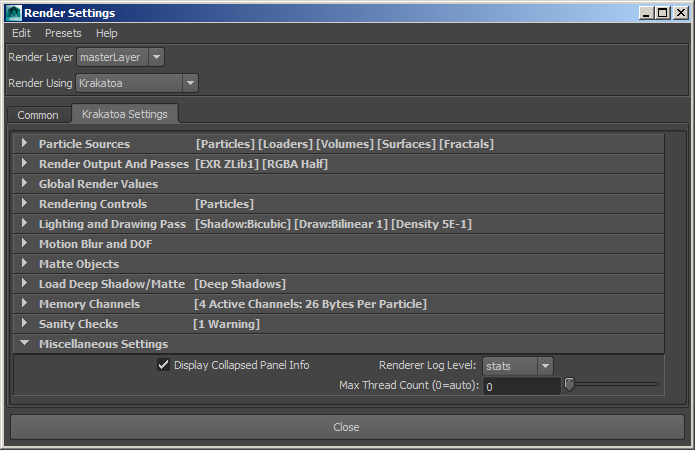
Display Collapsed Panel Info checkbox
- This option was added in version 2.3.
- Default is checked.
- When checked, the title bars of collapsed panels in the Krakatoa Settings tab will display an overview of their current settings. This is useful to see all major settings at a glance without expanding all panels.
- When unchecked, only the panel titles will be displayed, resulting in the look of versions prior to v2.3.
Renderer Log Level dropdown list
- Default is stats . In this mode, log entries tagged as errors, warnings, progress and statistics will be printed to the Maya Log window.
- In none mode, no output will be sent to the Maya Log window, not even error messages.
- In errors mode, only error messages will be printed to the Maya Log window.
- In warnings mode, only error and warning messages will be printed to the Maya Log window.
- In debug mode, all messages including errors, warnings, progress, stats and debug prints will be set to the Maya Log window. This is useful primarily for debugging by the Krakatoa developers.
Max Thread Count (0=auto) value and slider
- Default is 0.
- When set to 0, the Krakatoa renderer will use all available threads (cores/CPUs) to sort. light and render particles.
- When set to a non-zero value, the renderer will use up to the specified number of threads (cores/CPUs).
- Limiting the number of threads is useful when rendering very large images on machines with many cores (e.g. 24, 32 and more).
- Since every thread allocates its own image buffer to perform lighting or final drawing in parallel, rendering at high resolutions can quickly lead to very high memory usage due to excessive image buffer allocations.
- Also, performance does not increase linearly as you add more threads, so it is a good idea to limit the threads to 8 or 16 and use the rest for other tasks.