Krakatoa MY Saving And Loading Particles
Introduction
- In the previous tutorial, we rendered 34K Maya Particles directly from the simulation.
- But in practice, Krakatoa is rarely used with less than one million particles.
- Typical counts are usually in the dozens or even hundreds of millions.
- Obviously, waiting for a dynamic simulation to preroll to frame 100 with a million particles can take a while.
- Simulating hundreds of millions of particles in one go is usually out of the question.
- For that reason, the typical rendering workflow of Krakatoa involves the baking of particles to disk using the Krakatoa PRT file format (which is compressed and is supported by several other 3rd party applications like RealFlow, Naiad etc.) and then rendering a PRT Loader object which reads the data from disk.
- Additionally, Krakatoa MY provides a tool to Partition a particle system (in other words, save multiple Wedges with slightly different initial states) multiple times to increase the final particle count. As a side effect of this, you also get a smaller proxy representation of the whole system for the viewport display and a much higher count for rendering.
- In this tutorial, we will Partition our particle system from the previous tutorial and render the resulting sequences using a PRT Loader object.
Saving Partitions To Disk
- Click the PRT SVR icon in the Krakatoa shelf to open the Krakatoa PRT Saving and Partitioning window.
- The particleShape1 object will be selected for saving automatically.
- Change the Sequence Filename Prefix to “Plasma”.
- Set the Total Partitions Count to 10
- Make sure Increment Emission Random Seeds is checked, Enable Channels Randomization is unchecked. Since our simulation is emitting particles dynamically, we will be incrementing the Emission Random Seed of the particle system, causing each iteration to place the newly born particles at slightly different initial locations. When we combine the multiple partitions in a single PRT Loader, they will fill out the gaps and produce a more uniform density.
- Make sure the Velocity and Color channels are checked for saving as float16[3], all other channels are unchecked. Position is always checked, defaults to float32[3] and cannot be changed.
- Press the SAVE PARTICLE OBJECTS TO PRT FILES… button.
- Wait a few minutes until all 10 partitions are written to disk - you can press Esc at any point to cancel.
Creating A PRT Loader Object
- Now that we have baked the particle system to multiple PRT files, we can load them for rendering:
- Click the PRT icon in the Krakatoa shelf to create a PRT Loader at the origin.
- In the Attribute Editor, click the Load PRT File button in the Files panel of the PRTLoader1 object.
- Navigate to the PRT subfolder, then to the v001 subfolder and pick the first frame of the first partition.
- A prompt will appear asking you if you want to load all 100 partitions potentially saved to disk.
- A window showing one frame of all other partitions will be shown. Select the first 10 (which actually exist on disk) and click Add Selected Sequences. Note that by default, only the first sequence will be shown in the Viewport, the other 9 will be disabled in Viewport and only used when rendering!
- Change the Percentage Of Render from 1.0 to 100.0 to show all particles of the first partition in the viewport.
- You can hide the original Maya particle system so it does not display in the viewport.
- If you move the time slider, you will see the 34K particles of the first partition drawn as small dots in the viewport, including the saved RGB PP colors.

Rendering The PRT Loader
- Now let’s render these particles using the same settings as in the previous tutorial and compare the results.
- Open the Render Settings window and change the Final Pass Exponent from -1 to -2. This is because we are loading and rendering 10 times more particles, so we need 10 times less density per particle. Changing the Exponent by -1 does exactly that!
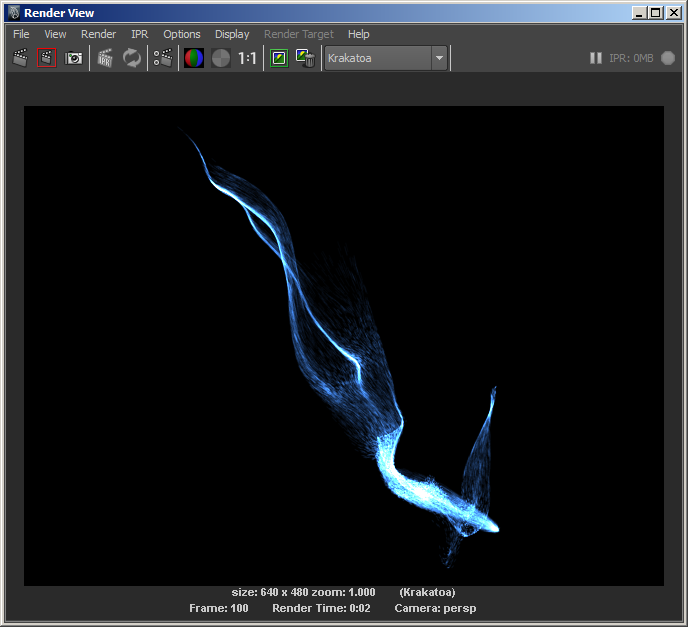
- Click the Redo previous render (Krakatoa) icon - the blue/white plasma rendering with 8 passes Motion Blur we produced in the previous tutorial will be rendered again, but it will be significantly smoother:

- Here is the old rendering (equivalent to rendering only the first Partition) for comparison:
- Since some of the particles are jittered to slightly new positions due to the Partitioning, it turns out that 10 times less Density does not produce exactly the same look. Here is the result of Final Pass Density 1.0 with Exponent of -1 which is 5 times less Density:

And here is the same without the Color Override, using the saved RGB PP gradient colors:

Further Steps To Improve Quality
- Even though we are rendering only 349,650 particles, the results are already much more pleasant.
- Saving 100 partitions would bring the total particle count to about 3.5 million and would allow us to render at higher image resolutions…