Creating Walkthrough Animations
- In addition to animating a Camera object to perform 360 degrees Turntable animations, SEQUOIA provides tools to allow the creation of Walkthrough animations.
- This system lets you position the Camera at key points within the 3D World of the current Document and record the Camera’s Transforms similar to the way the SEQUOIA Bookmarks system works.
- This will create so-called Keyframes stored in a dedicated TransformKeyframes animation controller.
- A Keyframe will define the Duration of the animation from the previous Keyframe.
- It will be displayed in the Timeline Panel as a thumbnail similar to the ones in the Bookmarks panel.
Creating A Camera Object
- Click the Create a New CAMERA At The Current Viewer Location icon
![[CAM]](../../_images/icon_new_camera2.png) in the Create Objects toolbar.
in the Create Objects toolbar. - Alternatively, use the Create menu > New Camera item.
RESULT:
- A Camera object will be created with the same position and orientation as the current Viewport’s View.
- The View and the Camera will be locked together, so navigating the Viewport will move the Camera, and animating the Camera will update the Viewport.
- If no Timeline panel is open in the SEQUOIA Layout, a new Timeline Panel will be opened automatically.
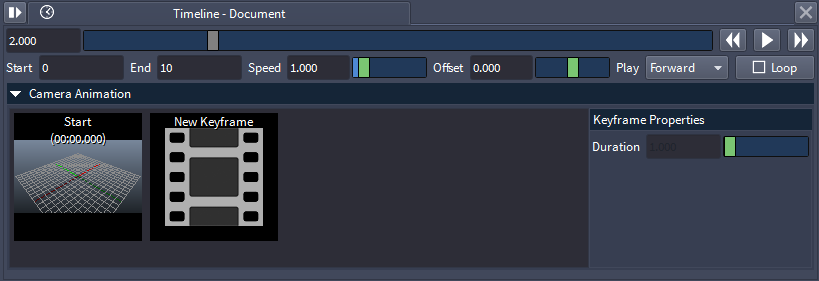
- The Camera will be assigned a TransformKeyframes animation controller, and a first Keyframe at time 0.0 with Duration of 0.0 and the current Transforms will be created in it.
- The Camera will be selected automatically, and its first Keyframe will be displayed as a thumbnail.
Animation With One Keyframe?
- At this point, the Camera will not move because it has only one Keyframe with its current Transforms.
- Playing back the animation in the Timeline will result in no Camera motion.
- However, the existing Keyframe will keep the Camera at its current location and orientation.
- For example, if you try to adjust the Viewport (and thus the Camera linked to it) using the Viewport Navigation controls (mouse, keyboard etc.), the Viewport and the Camera will follow, but the moment you move the time slider, they will snap back to the first Keyframe’s value.
NOTE: In general, any changes to the current Camera/Viewport transforms will be reverted on a time Time changes if no Keyframe was created explicitly in the Timeline to store them permanently.
Setting A Keyframe With Default Duration
- Make sure the Timeline slider is set to time 0.0.
- Move the Camera using the Viewport navigation controls - for example orbit at about 30 degrees about the world origin and zoom out a bit.
- To create a new Keyframe, you can
- Click the New Keyframe icon inside the Camera Animation thumbnal strip of the Timeline panel
- Or alternatively click the “Create an animation KEYFRAME for the currently selected objects” icon in the Animation Settings Toolbar.
RESULT:
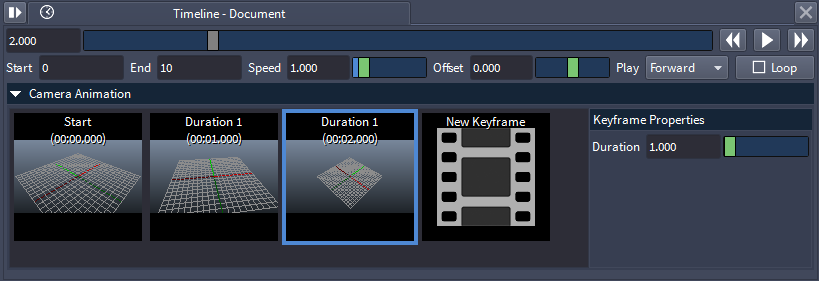
- A new Keyframe thumbnail showing the current view of the Camera will be created.
- The Duration of the Thumbmail will be set to the default value of 1.0 second, resulting in Absolute Time of 00:01.0000.
- The Time Slider will be moved automatically to time 1.0.
NOTE:
- Creating a Keyframe when the Current Time is less or equal to the absolute time of the last Keyframe in the animation will add a new Keyframe to the end of the animation, and give it a default duration of 1.0 second.
Setting A Keyframe At A Specific Time
- Alternatively, we can set a Keyframe at a specific time by adjusting the Current Time to a value higher than the last Keyframe’s absolute time.
- For example,
- Type in 5.123 in the Current Time field.
- Adjust the Viewport using the Mouse controls to produce a new unique Camera Transform.
- Click the New Keyframe icon.
RESULT:
- This time, the Keyframe will be created with a Duration of 4.123, producing an Absolute Time of 5.123 as desired.
Reordering Keyframes
- Since each Keyframe stores its Duration relative to the previous Keyframe instead of the actual Absolute Time, it is very easy to reorder the animation through the Keyframes without losing the existing animation length and dynamics.
- For example,
- Right-click the 3rd Keyframe with Duration of 4.123 and select the Move Keyframe LEFT menu item.
RESULT:
- The second and third Keyframes will swap places, but they will retain their Durations, still producing an animation of 5.123 seconds.
- However, the order of the “waypoints” during the animation will be swapped, passing through the previously third keyframe first, then through the previously second keyframe.
Changing The Duration Of Keyframes
- The Duration of one or more Camera Keyframes can be changed easily using the Keyframe Properties sub-panel.
- For example,
- Select both the second and the third Keyframes by holding down CTRL
- Enter 3.0 in the Keyframe Properties > Duration value field.
RESULT:
- Both animation segments (from the beginning of the animation to the second Keyframe, and from the second to the third Keyframe) will now last 3 seconds each.
- The total length of the animation will now be 6.0 seconds.
Holding Before The Animation Starts
- The first Start Keyframe always calculates its Duration relative to Time 0.0 and does not have a preceding Keyframe to interpolate from.
- The default Duration value for it is 0.0.
- This means that changing its Duration can be used to hold the animation before the interpolation of the second Keyframe kicks in.
- Select the Start Keyframe
- Change its Duration to 4.0 seconds in the Keyframe Properties panel.
RESULT:
- Now the animation will hold the initial Camera Transform for 4.0 seconds before playing the rest of the Keyframes from time 4.0 to 10.0.
Jumpting To A Keyframe’s Time
- To set the Current Time to the Absolute Time of a Keyfrmae, you can either:
- Double-click the thumbnail in the Camera Animation strip to jump to its time directly, or
- Hold down the CTRL key while clicking the Backward/Forward bottons around the Play button to jump to the previous/next Keyframe’s time.