Timeline Panel

- The Timeline panel controls the Animation playback in SEQUOIA.
- The Timeline panel defines
- The Time Source (Timer) used for a Viewport.
- The Current Time in seconds represented numerically and by a slider.
- The Start Time and End Time expressed in seconds.
- The Playback Speed relative to the system Frame Rate.
- The Time Offset of the Viewport relative to the active Timer.
- The Playback Mode (Forward, Backward, Ping-Pong)
- The Loop Mode checkbox
Current Timer
- The Timeline Panel represents the settings of a specific Timer.
- Each Document provides a Document Timer, and all Viewports displaying that Document’s content will use it by default. This means that changing the time using the Timeline Panel will generally advance the time in all Viewports of the Document.
- Each Viewport provides its own Viewport Timer, allowing independent settings and playback of every Viewport.
- The SEQUOIA session provides its own Global Timer, and any Viewport of any Document can be switched to use it instead of the Document or Viewport Timers, allowing the time synchronization of multiple Viewports of multiple Documents.
Switching The Current Timer
- The Timer of a Viewport can be selected from the Options menu.
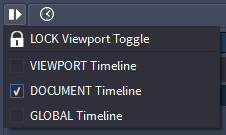
- Possible values are:
- VIEWPORT Timeline - independent per-Viewport time settings
- DOCUMENT Timeline - (default) per-Document time settings that can be shared between Viewports of the same Document
- GLOBAL Timeline - global SEQUOIA time settings that can be shared between Viewports of one or more Documents.
- The Timer of a Timeline Panel will be displayed in the title bar, e.g. “Timeline - Viewport”, “Timeline - Document” or “Timeline - Global”.
Locking A Timeline Panel To A Viewport
- Normally, the Timeline Panel will display the settings of the Timer associated with the Active Viewport.
- Thus, a single Timeline Panel can be used to adjust multiple Viewports by simply switching the Active Viewport.
- However, a Timeline Panel can be locked to a specific Viewport so it always displays its Timer settings, and multiple Timeline Panel instances can be created.
- This makes it possible to have any number of Timeline Panels associated with any number of Viewports.
- To lock a Timeline Panel to a specific Viewport, use the LOCK Viewport Toggle menu item in the Options menu of the Timeline Panel.
- When locked, the Options menu icon will change into a Lock icon.
Current Time Value And Time Slider
- The Time Slider represents the current time of the current Timer.
- The value is displayed in floating point seconds.
- The value can be entered in the value field, or set by moving the slider.
- The value entered can be outside the Start and End values - the slider handle will turn orange.
- The slider handle will turn green when set to the default time (0.0)
- The slider handle will turn gray when on any other value within the playback range defined by the Start and End values.
- Clicking to the left or right of the handle will move the time slider by a small value proportional to the current value.
- Holding SHIFT and clicking the slider’s background or dragging the slider handle will set the current time to a value rounded to the nearest full second.
- Holding CTRL and clicking the slider’s background or dragging the slider handle will set the current time directly to the clicked value.
- Right-clicking the Time Slider provides the same context menu options available in regular sliders, including
- Set to Default, Minimum and Maximum value - using 0.0, the Start and End time values.
- Add the clicked value as Preset
- Add the current value as Preset
- Delete a preset (if the current value matches the preset value)
- Set the time to the preset value (if any)
Start / End Values
- The Start value defines the beginning of the current Timer’s playback range, default is 0.
- The End value defines the end of the current Timer’s playback range, default is 10.
- The values are in full seconds.
- These values only control the playback range of the timeline, but SEQUOIUA animation can exist outside of the range.
Speed Value And Slider
- Controls the playback speed.
- Default is 1.0, playing back 1 scene second per real-world second.
- Higher values speed up the playback, lower values slow it down.
- The slider range is from 0.001 (1 millisecond per second) to 10.0 (10 seconds per second).
- The value range is from 0.0 (no playback) to ant positive value.
Offset Value And Slider
- The Offset value can be used to shift the current time by the given amount without adjusting the Start and End values of the current range.
- Also, it can be used to show different times under the control of the same Document or Global timer in two viewports playing back the same animation.
- This value is stored per Viewport, regardless of the current Timer source (Viewport, Document, or Global)
- The value is in seconds and can be positive or negative.
- The slider range is from -10.0 to +10.0, but values outside the range can be entered.
- The default value is 0.0.
Play Dropdown List
- Controls the direction of the playback.
- Possible options are:
- Forward - plays back from the current time to the End time, then repeats again from Start if Loop is checked.
- Backward - plays back from the current time to the Start time, then repeats again from the End time if Loop is checked.
- Ping-Pong - plays back from the current time to the End time and then back to Start, then repeats again if Loop is checked.
Camera Animation Rollout
- The Camera Animation rollout will be populated with additional controls when the Active Viewport is locked to a Camera object.
- When the Active Viewport is not locked to a Camera, the “No Camera Attached” text will appear in the rollout.
Camera Keyframes Strip
- The Camera Keyframes strip contains the
- New Keyframe icon,
- Thumbnails representing every Camera Transform Keyframe, overlayed by the Duration and Absolute Time.
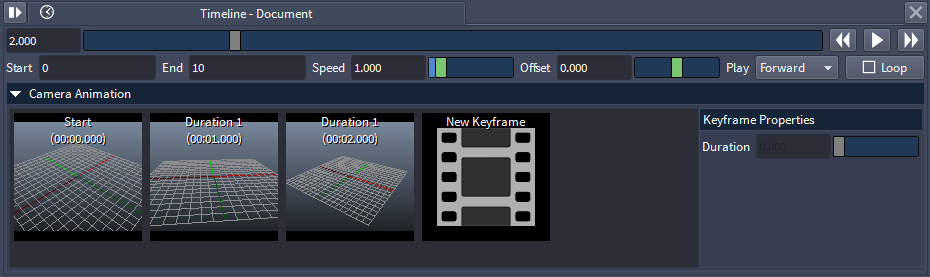
Keyframe Properties sub-panel
- The Keyframe Properties sub-panel displayes the properties of the currently selected keyframe.
- Currently it only exposes the Duration of the Keyframe.
- If multiple Keyframes are selected at the same time, changing the property willl adjust them all at once.