Push Modifier Recreation
Introduction
The Push modifier is one of the simplest modifiers in 3ds Max, but it is very useful. It takes the original position of every vertrx and shifts it at a specified distance along the vertex’ Normal vector.
The 3ds Max Push modifier works really well out of the box, so recreating its standard functionality serves only as an easy demonstration of the basic steps for Deformation Modifier creation in Genome.
- Start a new 3ds Max scene and create a Teapot with Radius 30 and 16 Segments.
- Add a Genome modifier to the stack and press the “Open Magma Editor” button.
- Press Ctrl+[R] to toggle on the Auto-Reorder mode.
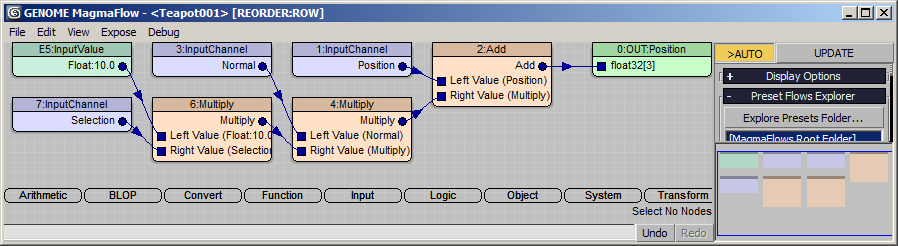
- Press Ctrl+[O] to create a new Output node. Make sure it is set to Position channel output.
- Press Ctrl+[P] to create an InputChannel: Position node.
- With the Position input still selected, press the [+] key on the Numeric Pad to insert an Add operator.
- With the Add operator selected, press SHIFT+[N] to add a Normal channel input node and connect it to the second input socket of the Add operator.
- With the Normal channel input selected, press the [*] key to insert a Multiply operator into the flow between the Normal input and the Add operator.
- With the Multiply operator still selected, press Ctrl+[0] (zero on the top row of the main keyboard) to add a Float Value input with value of 0.0 and connect to the second socket of the Multiply node.
- Rename the InputValue node to “Push Value”.
- Check the “Exposed” option in the Float Value’s user interface.

RESULT: In the 3ds Max Modify Panel, you can now play with the value spinner to push the vertices along their normals:


You can replace the Genome modifier with a 3ds Max native Push modifier and you will get the same result.
Soft-Selection Channel Support
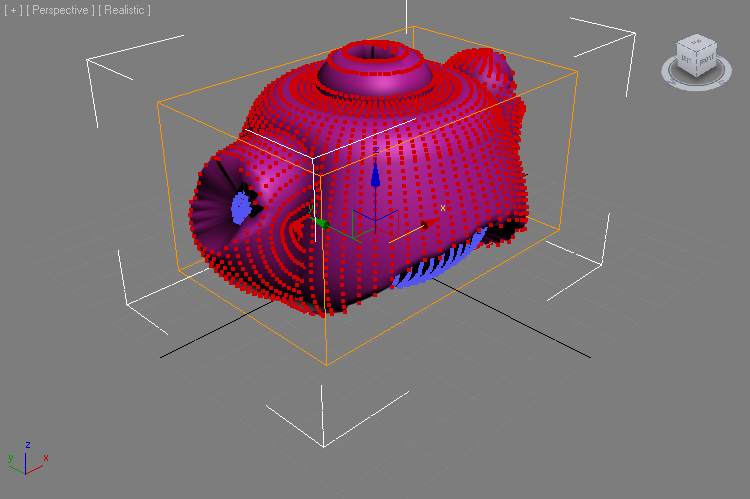
The 3ds Max Push modifier supports the vertex selection and soft-selection data passed up the modifier stack. But the current Genome setup does not respect the Selection channel yet.
- Add a VolSelect modifier below the Genome modifier.
- Switch it to Vertex mode.
- Switch to Sphere Gizmo.
- Go into Gizmo sub-object level and scale the Sphere Gizmo to about 50% of its size.
- Check Soft-Selection.
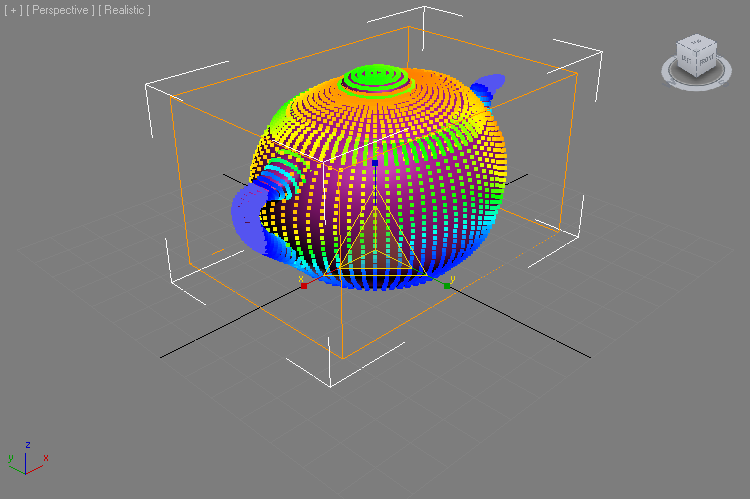
RESULT: You should get a soft-selection on the vertices, but the Genome Push will not be affected:

Adding Selection support to the Genome version takes just three clicks!
- Select the InputValue node defining the Push Value
- Press the [*] key on the Numeric Keypad to insert a Multiply operator into its outgoing wire
- Press SHIFT+[S] to create a Selection channel input node and connect it to the Multiply node.
RESULT: Now the vertices will be offset proportionally to the Soft-Selection value (left image)
If you would disable the Soft-Selection option in the Vol.Select modifier and hit the Fit button to fit the Sphere Gizmo to the mesh, you will get a hard selection that also works with the Genome modifier (right image):