Creating a Frost Object
Overview
- There are several ways to create a FROST object in the 3ds Max scene:
- Using the 3ds Max Create tab in the Command Panel
- Using the FROST Menu in the 3ds Max Main Menu
- Using a custom Toolbar, Keyboard Shortcut, or QuadMenu via the included Action Items.
Creating a FROST object via the Command Panel:
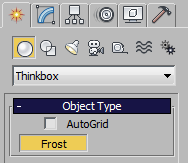
- Go to the Command Panel of 3ds Max
- If necessary, switch to the Create tab
- If necessary, switch to the Geometry group
- Navigate to the “Thinkbox” category in the drop-down list
- Press the “Frost” button.
- Click in the viewport and hold the left mouse button while dragging the mouse to define the size of the FROST object’s icon.
- Release the left mouse button to end creation or hit the right mouse button to cancel creation.
The FROST Action Items
- All versions of FROST include a set of UI Actio Items implemented as MacroScripts.
- These Action Items can be used to accelerate the process of
- creating FROST objects,
- adding particle sources to FROST object,
- interacting with the FROST Log dialog,
- switching the FROST Meshing modes.
- The Action Items can be accessed via the automatically-created Main Menu item, or can be assigned manually to Keyboard Shortcuts, Toolbars, or QuadMenus.
The FROST Main Menu
- FROST 2.0 introduced a menu item in the 3ds Max Main Menu bar.
- It features all Action Items described later on this page, and requires no manual customization.

CREATE FROST - Select Source(s) and Click to Create, or Hold SHIFT to Create Manually in the Viewport
- Creates a new FROST object.
- If no scene objects are selected, or if objects are selected in the scene but the SHIFT key is held, a new empty FROST object will be created.
- If valid particle sources are selected in the scene, they will be added to the newly created FROST object.
AUTO-FROST - Select a Frost Object and Toggle to Add Newly Created Objects Automatically
- Unchecked by default.
- When checked, any newly created valid particle sources created in the scene will be added to the active FROST object automatically.
- The active FROST object is specified by selecting it before activating the AutoFrost mode.
- If no FROST object is selected when activating this mode, the last created FROST object (if any) will be used.
- If no FROST objects exist, an error will be shown.
- Selecting this menu item again will toggle the AutoFrost mode off.
FROST LOG - Toggle the Log Window On and Off
- Unchecked by default.
- Selecting this option will toggle the Log Window on and off.
LOG ON ERROR - Open the Frost Log Window on Errors
- Checked by default.
- When checked, the Log Window will open automatically when an error is reported by a FROST object.
- When unchecked, the Log Window woll only open when requested manually via the previous menu item, or via the FROST object’s UI.
SWITCH Selected Frost Objects To…
- Select one or more FROST objects and pick a sub-menu item to switch them to the specified Meshing Mode:
- GEOMETRY Meshing Mode
- UNION OF SPHETRES Meshing Mode
- METABALLS Meshing Mode
- ZHU/BRIDSON Meshing Mode
- ANISOTROPIC Meshing Mode
- VERTEX CLOUD Meshing Mode
- If the scene selection contains non-FROST objects, they will be ignored automatically.
- If nothing is selected, these actions will have no effect, and no error messages will be displayed.
Adding the FROST Action Items to a 3ds Max Toolbar, Keyboard Shortcuts, or a QuadMenu:
- If you prefer to use a different UI system - Keyboard shortcuts, Toolbar icons, or QuadMenu items - you can add the Frost MacroScripts manually.
- Go to 3ds Max Main Menu > Customize > Customize User Interface.
- Select the tab representing the desired UI area (Keyboard, Toolbar, QuadMenu tab) to customize.
- Locate the “Frost” category in the Category drop-down list.

- Drag the Frost icons to the respective Toolbar, QuadMenu or assign to Keyboard Shortcuts.
- Optionally, locate the MacroScript “Sphere Gizmo (Atmospheres)” in the “Objects Helpers” category and drag it into the same toolbar or menu or assign a keyboard shortcut.
- This will come handy when using the AutoFrost feature described further on this page.
- Save the Customized User Interface.
- Here is a custom “Frost” toolbar with the shipping FROST Action Items:
Using The FROST Action Items
Creating an empty FROST object using the Action Item:
- Click the Frost menu item in the 3ds Max Main Menu bar.
- If there are any objects selected in the scene, hold down the SHIFT key; if nothing is selected, this is not necessary.
- Select the CREATE FROST… menu item
- Alternatively, activate the “FROST Particle Mesher…” Action Item by pressing the toolbar icon, invoking the Keyboard Shortcut, or selecting from a QuadMenu.
- Click in the viewport to define the pivot point of the object and while holding the left mouse button pressed, drag to define the icon size.
- Release the left mouse button to end creation or hit right mouse button to cancel.
RESULT:
- A FROST object without any sources will be created in the scene at the specified position with the specified size.
- You can then use the controls in the Modify Panel to add particle sources or files to populate the object and produce a mesh.
Creating a populated FROST object from scene selection using the MacroScript:
- Select one or more valid particle sources (e.g Particle Flow or other particle systems, geometry objects, Krakatoa PRT objects, Atmospheric SphereGizmos etc.)
- Click the Frost menu item in the 3ds Max Main Menu bar.
- Select the CREATE FROST… menu item.
- Alternatively, activate the “FROST Particle Mesher…” Action Item by pressing the toolbar icon, invoking the Keyboard Shortcut, or selecting from a QuadMenu.
RESULT:
- A new FROST object will be created with all valid selected objects already added to its Particle Objects list.
- The location of the icon will be in the center of the selection, the icon size will be set to 50.0 and the object color will be the average of the selected objects’ wireframe colors.
Automatically adding particle objects to an existing FROST object:
- Select a FROST object in the scene, or don’t select anything to use the last created FROST object.
- Select the AUTO-FROST… menu item from the 3ds Max Main Menu bar to activate the AutoFrost mode.
- Alternatively, click the toolbar icon, select the QuadMenu item or invoke the Kayboard Shortcut if customized manually.
- The name of the FROST object will be shown in the status panel of 3ds Max and it will be switched to “Viewport Update When Particles Change” and “Use Radius Channel”.
- Start creating supported objects like SphereGizmos, Geometry, Particle Flows, Legacy Particle Systems etc.
RESULT:
- Any supported Particle Objects will be added to the FROST object automatically and will be meshed using the current settings.
- This turns FROST into an interactive Metaball Modeling system.
- Note that the AUTO-FROST menu item / toolbar icon will be checked / unchecked respectively.
- To turn off the AutoFrost mode, repeat the activation steps above.
- Note that the AutoFrost mode will turn off automatically if the active FROST object is deleted from the scene.
Creating a FROST object using MAXScript:
- FROST objects can also be created using MAXScript by calling the constructor
Frost()
