Frost Particle Sources
Particle Sources
- FROST accepts data from the following sources:
- 3ds Max Particle Flow (whole system)
- Specific Particle Flow events
- 3ds Max legacy particle systems
- Cebas Thinking Particles
- Krakatoa PRT Loader objects
- All Krakatoa PRT objects including PRT Volume, PRT FumeFX, PRT Maker, PRT Source etc.
- 3ds Max Geometry objects’ vertices including Geometry Primitives, Editable Mesh, Editable Poly, Patches, NURBS, Renderable Splines and other FROST Objects.
- 3ds Max Shape primitives and Editable Splines’ knots (vertices)
- 3ds Max SphereGizmo Atmospheric Helpers.
- Thinkbox PRT files or file sequences loaded directly into the FROST object.
- Next Limit RealFlow 3, 4 and 5 and higher particle BIN files or file sequences
- ASCII CSV files or file sequences.
- The above sources can be combined to produce the final point cloud to be meshed.
- The particle files can be rescaled globally (one control for all files) to match the file scale to the scene scale. See File Units Scaling for more information. In addition, the FROST object’s transforms (position, rotation and scale) will be applied to the particles loaded from files or file sequences.

- The particle file sequences can be retimed globally (one control for all files) to change the speed, time flow, offset or valid time range.
- Particles coming from Krakatoa’s PRT objects can be modified using Krakatoa’ Magma (Channels) Modifiers, 3ds Max Deformation Modifiers, 3ds Max Vol.Select and Krakatoa Delete modifiers before arriving in the FROST object, allowing for a very flexible data pipeline.
Picking Sources from the Scene
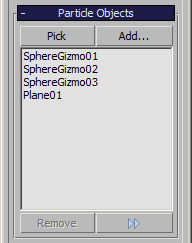
- The Particle Objects rollout provides controls for adding and removing supported scene objects.
- To add a particle source to FROST:
- Switch the 3ds Max Command Panel to Modify tab.
- Select the FROST object in the scene.
- Click the “Pick” button in the Particle Objects rollout.
- Click a valid scene object in the viewport or alternatively hit the H key to select one object by name.
- To add multiple particle sources to FROST by name:
- Switch the 3ds Max Command Panel to Modify tab.
- Select the FROST object in the scene.
- Click the “Add…” button in the Particle Objects rollout.
- Highlight one or more supported objects on the Select By Name dialog.
- Click the “OK” button to confirm.
- To remove one or more particle sources from FROST:
- Switch the 3ds Max Command Panel to Modify tab.
- Select the FROST object in the scene.
- Highlight one or more objects on the list in the Particle Objects rollout.
- Click the Remove button.
Loading Particle Files from Disk
FROST can load source data previously cached to disk in various file formats. While it is possible to use a Krakatoa PRT Loader as an intermediate object to access the same file formats, using the built-in loading features of FROST is recommended in the following cases:
- The particle data is very large - loading particles into PRT Loader first before meshing in FROST would require more memory, while meshing directly in FROST removes the intermediate storage of particle data.
- The source data was stored in a different scale than the scene - while it is possible to scale a PRT Loader to convert the data from, say, meters to inches, the FROST file loading UI provides easier to use controls to select the desired scale factor or to enter your own without using the Scale tool on scene objects.
- It is recommended to use the Krakatoa PRT Loader in the following situations:
- The particle data has to be modified live before being passed to the FROST object - the PRT Loader supports Deformation modifiers, selection and deletion modifiers and Krakatoa Channels Modifiers which can read, modify, write and create new particle data channels which allows for an advanced level of control over the FROST meshing.
- The particles have to be culled against geometry volumes before meshing in FROST.
- The world space positions stored in multiple file sequence have to be transformed differently by multiple PRT Loader - each PRT Loader can be used to move, rotate and/or scale its own particles. When loading particle files directly into FROST, the FROST object’s transforms will be applied to all files’ particles. If you want to transform each sequence independently, you must load each sequence into its own PRT Loader and pick the PRT Loaders in the FROST object.
- To add a particle file or file sequence to FROST:
- Switch the 3ds Max Command Panel to Modify tab
- Select the FROST object in the scene
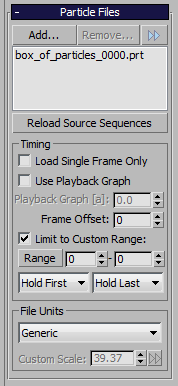
- Expand the Particle Files rollout.
- Click the “Add…” button to open a file browser
- Navigate to the folder containing supported files of file sequences
- Select a single file to load - it will be added to the Particle Files list.
- Repeat steps 4 to 6 to add more files.
- By default, each file on the list will be assumed a file sequence - a frame number will be generated based on the current scene time and offset/playback graph/custom range controls and will be appended to the file name to load a different file on different frames. To always load the exact files specified on the list without modifying their file names to load different frames, check the “Load Single Frame Only” option.
- When “Load Single Frame Only” is unchecked, the frame to load will be determined by the current scene time and the Frame Offset, optionally clamped by the Custom Range.
- To provide your own arbitrary time flow, check the “Use Playback Graph” option and keyframe the “Graph” value over time to determine which frame to load at what scene time. Note that the Frame Offset value will still be applied to the playback graph value for easy time shifting without moving the graph’s keys.
- The Frame Offset value defines which frame to play on frame 0. Thus, when set to 0 (default), the playback will use the Scene time or Playback Graph values without any changes. When a value of 100 is entered, the files will be moved backwards so that frame 100 will play back on frame 0. When the Frame Offset is set to -100, frame -100 will play back on frame 0, and frame 0 will actually start playing back on frame 100.
- When a frame is requested by the time controls but there is no corresponding file found on disk, an error message will be printed in the FROST Log Window and the FROST object will not generate any geometry. To avoid this, you can enable the “Limit To Custom Range” option and specify the first and last frames actually existing on disk using the two spinners. Alternatively, you can press the “Range” button to let FROST detect the available range automatically.
- When the “Limit To Custom Range” option is checked, if a frame outside of the specified range is requested, it will be replaced with the frame defined by the Start or End spinner. This is because by default, the out-of-range behavior is set to “Hold First” and “Hold Last” via two drop-down list controls. These controls can be set to “Blank” instead, which will cause an empty particle data stream to be loaded instead of holding the range border frame. This mode is useful when the first or last frame in the range contains very few particles and you want to transition from/to empty particle cloud without actually saving an empty file as the first or last file in the sequence.
File Units Scaling
- The particle files contain position and velocity data in generic units based on the system units setup in the origin application. For example, particles saved out of a physically-based fluid simulator like RealFlow, Naiad or Flood will have their position data in meters, PRT files saved by Krakatoa will represent the system units of 3ds Max at the time of saving, typically 1 generic unit = 1 inch, and so on.
- The “File Units” group of controls in the “Particle Files” rollout provides several useful presets for scaling the incoming files, as well as a Custom Scale option which lets you enter an arbitrary scaling value. This scaling will be applied to both the Position and Velocity channels. For example, if a RealFlow BIN file sequence is selected, setting the File Units drop-down list to “Meters” will scale the particles to match the current 3ds Max System Units settings. If the scene units is set to 1GU = 1 Inch, the particles will be scaled 39.37 times since this is the number of inches in one meter. If the 3ds Max System Units were set to 1 GU = 1 Meter, the scale value will be taken as 1.0 and so on.
- The default setting is “Generic” and will cause the units from the file to be loaded without any scaling. Thus, if 1 GU = 1 Inch in 3ds Max, a simulation in meters will appear as 39.37 times smaller.
