Region Of Interest Meshing
Overview
- The Region Of Interest Meshing feature was first introduced in FROST MX 2.0.
- It lets you define a custom box-shaped, world-oriented spatial region in which the meshing will be performed.
- The Region Of Interest (ROI) can be applied individually to the Viewport meshing, to the Render-time meshing, or to both.
Benefits
- A typical usage case of the Region Of Interest would be adjusting the mesh settings for a very large particle system (for example a fluid simulation containing millions of particles).
- In that case, a small Region Of Interest could be defined around a representative area of the simulation, and the meshing parameters could be adjusted much faster without the need to wait for the whole mesh to be generated.
- Another usage case would be the removal of the bottom part of the mesh when only the top portion of the mesh is of interest for rendering.
Activating the Region Of Interest
- The Region Of Interest meshing is controlled via the Region Of Interest rollout in the FROST MX UI.
- To activate the ROI, check the Use Region Of Interest checkbox
RESULT:
- This will check both the Render and Viewport checkboxes in the FROST MX UI
- A white bounding box will be drawn with world space center placed at the location specified by the X,Y and Z values in the Region Center group of controls, and size equal to the values specified in the Region Size group of controls.
- If there are any valid particles inside the ROI bounding box, they will be used for meshing next time the FROST mesh is updated.
- Any particles ouside of the bounding box will not be meshed.
- The Show Manipulator checkbutton will become enabled.
EXAMPLE:
- In the following screenshots, a Naiad waterfall simulation containing 17 million particles has to be meshed by Frost.
- Creating Frost with default settings (Union Of Spheres, Radius of 5.0) took 72 seconds, and the output shows that the Radius is too large.
- Activating the Region Of Interest reduced the meshing time to about 6.3 seconds.
- Reducing the Radius to 1.0 produced a much better result in about 4.2 second.
- Switching the Meshing Mode to Zhu/Bridson meshed in about 3.1 seconds.
- Further reducing the Radius to 0.5 produced an even finer mesh preview in 3.5 seconds.
- Increasing the Zhu/Bridson Blend value from the default 1.7 to 2.2 produced a different mesh in about 4.5 seconds.
- In the end, if every step above had to be performed with the whole mesh to determine the quality of the output, the total meshing time would have been over 6 minutes.
- Instead, enabling the Region Of Interest allowed 5 different iterations to be performed in about 22 seconds in total:
Waterfall dataset courtesy of Adam Guzowski, Evermotion.com
Enabling the Region Of Interest Manipulator
- FROST MX ships with a dedicated Region Of Interest Manipulator.
- It will be visible only when the 3ds Max Select And Manipulate mode is active, a FROST object is selected, and it has either the Render or Viewport checkbox (or both) checked.
- To enable the Select And Manipulate mode, you can either
- Click the Show Manipulator checkbutton in the Region Of Interest rollout of the FROST object, or
- Click the Select And Manipulate icon in the 3ds Max Main Toolbar.
RESULT:
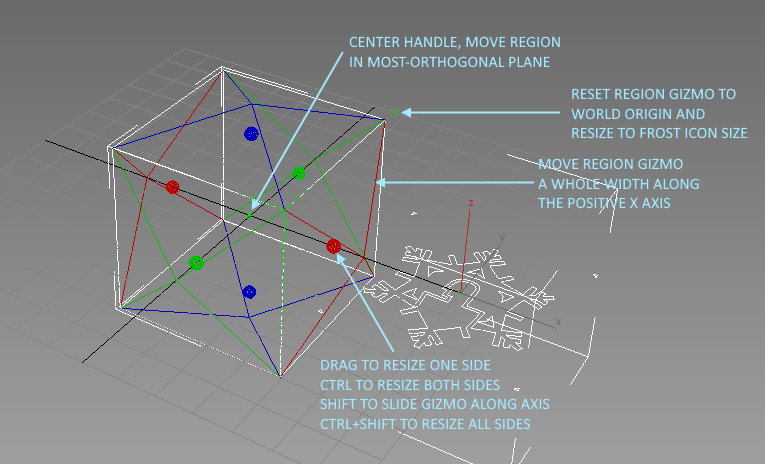
- A Region Of Interest Manipulator will be drawn around the Region Of Interest gizmo. It will contain:
- Red, green and blue ball-shaped handles on each of the six sized which can be used to control the size and position of the gizmo,
- Red, green and blue pyramid-shaped arrows on each side of the gizmo for moving the bounding box a full length along each of the 6 axes,
- A green, asterisk-shaped center handle for moving the center of the gizmo in the most-orthogonal plane relative to the current view.
- A green, X-shaped handle next to the bounding box’ maximum corner for resetting the Center to zero and resizing the Region to a cube with the size of the Frost Icon.
Resizing The Gizmo Along A Single Axis
- To resize the gizmo along a single axis (+X, -X, +Y, -Y, +Z or -Z), you need to use the ROI Manipulator ball-shaped handles.
- Place the mouse cursor over the desired handle, click and drag it to resize the respective size of the gizmo.
RESULT:
- Only the one side of the gizmo will be moved, and the center and size values in the FROST UI will be adjusted accordingly.
Resizing The Gizmo Symmetrically Along An Axis
- To resize the gizmo on both sides along the positive and negative directions of a world axis, you can either
- Adjust the respective Region Size value in the FROST UI
- Hold down the CTRL key and drag the ball handle on either side of the gizmo using the Manipulator.
RESULT:
- The center of the gizmo will remain unchanged, and both sides of the gizmo will move symmetrically relative to the center.
Moving The Gizmo Along An Axis
- To move the gizmo along a single axis in the positive or negative direction, you can either
- Adjust the respective Region Center component value in the FROST UI, or
- Hold down the SHIFT key and drag the ball handle on either side of the gizmo using the Manipulator.
Resizing The Gizmo Symmetrically Along All Three Axes
- To resize the gizmo along all three axes and set the bounding box to a cube,
- Hold down the CTRL and SHIFT keys at the same time and drag any of the six ball-shaped handles to define the size of the cube.
RESULT:
- All three values of the Region Size will be adjusted at once to the same value.
- They could be adjusted manually by entering the same value in all three value spinners.
Moving The Gizmo Along Two Axes At Once
- To move the gizmo within the plane most orthogonal to the current view,
- Click and hold the center asterisk-shaped handle of the ROI Manioulator and drag it to adjust two components of the Region Center at once.
- Orbit the viewport to look along any world axis to move along the plane defined by the other two axes.
RESULT:
- Two of the three components of the Region Center will be adjusted.
- They could be adjusted manually by entering values or spinning the arrows of the value spinners.
Moving The Gizmo A Full Size Along A Single Axis
- To shift the gizmo along any of the six world directions by the same amount as its size along that axis,
- Click the pyramid-shaped arrow on the desired side of the gizmo
RESULT:
- The Region Center component will be incremented or decremented by the Region Size component matching the specified axis.
Enabling Interactive Region Of Interest Updates
- By default, changing or manipulating the Region Of Interest Center and Size values will not update the FROST Mesh interactively.
- To enable automatic updates,
- Check the existing When Particles Change checkbox in the Frost rollout > Viewport Update group of controls.
RESULT:
- Dragging the ball handles, the center handle, or clicking the pyramid-shaped arrows will update the mesh inside the region automatically.
- Note that if the particle count is very high, the gizmo is very large or the mesh density is very high, interactive updates might still be too slow even when the Use Region Of Interest option is checked.
- In such cases, keeping the When Particles Change option unchecked and pressing the Force Viewport Update form time to time might be a better workflow.
