PRT Volume (Mesh Particle Source)
Introduction
- The Krakatoa renderer provides the ability to fill the volume of an arbitrary mesh object with particles.
- The provided mesh is converted to a LevelSet first, then the voxels of the LevelSet are filled with one or more particles to create a dense cloud.
Creation
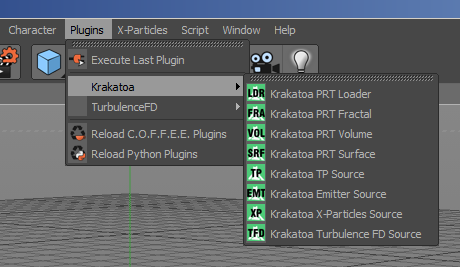
To create a new PRT Loader, select the Menu > Plugins > Krakatoa > Krakatoa PRT Volume item.
User Interface
Mesh Tab

Mesh From drop-down list
- Controls the source of the mesh to be sent for conversion to particles.
- Possible values are
- Scene (default)- a mesh object must be picked from the scene.
- File - an .OBJ or .XMESH file must be picked from disk.
File Path filename picker
- Enabled only when Mesh From is set to File.
- Provides the filename of the mesh cache on disk to be sent to the renderer for filling with particles at render time.
- Possible file formats include Wavefront .OBJ files and Thinkbox Software .XMESH file format (currently available as Saver plugin for Maya and 3ds Max)
Object picker
- Enabled only when Mesh From is set to Scene.
- Provides the scene mesh object to be sent to the renderer for filling with particles at render time.
Use World Space checkbox
- When unchecked (default), the level set will use the object space of the source mesh and can be transformed independently. This is useful when you want to clone the PRT Volume multiple times while using the same mesh as source. You can also parent the PRT Volume to the mesh source if you want it to follow it.
- When checked, the particles will be created in the world space mesh of the source object. This way, you can avoid parenting the PRT Volume to the mesh source and still let it follow the transforms of an animated mesh. If you have multiple copies of PRT Volumes using World Space of the same object, their particles will coincide though and you won’t be able to move them to create arrays.
Voxel Spacing In Renderer value and slider
- Defines the spacing used to convert the mesh to a LevelSet voxel grid at render time.
- It defaults to 2 cm in order to produce a reasonable amount of particles from standard geometry primitives. The minimum value allowd is 0.1 cm.
- The provided mesh will be raytraced at the given spacing to determine how the surface passes through the voxel grid.
- Small values cause more rays to be shot and result in much higher detail at cost of slower processing time, and more memory usage as more voxels are generated for the LevelSet.
- As a rule of thumb, the Voxel Spacing should be selected so that it allows the capturing of the smallest detail of the surface without oversampling the mesh.
- Once the details of the mesh are captured correctly by the LevelSet, use the Voxel Subdivisions and Jittered Particles Per Voxel values to produce more particles.
Voxel Spacing In Viewport value and slider
- Defines the spacing used to convert the mesh to a LevelSet voxel grid in the viewports.
- This value will be set up automatically when a new Object is picked based on the object’s bounding box extents to ensure the viewport count will not be too high.
Use Viewport Spacing checkbox
- When checked (default), the Voxel Spacing In Viewport value will be used to decouple the render time from the viewport particle distribution.
- When unchecked, the Voxel Spacing In Renderer will also be used for the viewport, providing a WYSIWYG control but potentially slowing down the interactive experience.
Voxel Subdivisions value and slider
- Defines the number of subdivisions to perform in each voxel after the LevelSet is generated.
- The default value is 0 and leaves the original LevelSet Voxel Grid unchanged.
- A value of 1 performs one subdivision along each of the three axes, resulting in 2x2x2=8 sub-regions in each Voxel.
- A value of 2 performs two subdivisions along each of the three axes, thus resulting in 3x3x3=27 sub-regions in each Voxel.
- A value of 3 performs three subdivisions along each of the three axes, thus resulting in 4x4x4=64 sub-regions in each Voxel, and so on.
- Once the sub-regions are defined, each sub-region will generate one particle in its center if the Enable Jittering option is off, or one or more particles at random positions within the sub-region if Enable Jittering is on.
Use Subdivisions In Viewport checkbox
- When unchecked (default), the Voxel Subdivisions value will be ignored in the viewports and will only apply at render time to ensure fast interactive performance.
- When checked, the Voxel Subdivisions will be used in the viewport.
Enable Jittering checkbox
- When unchecked (default), each sub-region created by building the LevleSet and applying Subdivisions to it will receive exactly one particle at its center.
- When checked, each sub-region will receive one or more randomly distributed particles according to the Jittered Particles Per Voxel, Random Jitter Seed and Well Distributed Jittering options.
- Enabling jittered distribution is very useful to avoid obvious grid lines in the final particle cloud when looking along certain directions.
Jittered Particles Per Voxel value and slider
- Default is 1, creating exactly one particle in each sub-division region created according to the Voxel Spacing and Voxell Subdivisions controls.
- Higher values are only allowed when the Enable Jittering checkbox is checked, because placing two or more particles in a regular grid would not always be possible, while placing them at random positions within a cube is always an option.
- NOTE that the highest allowed value per sub-division is currently set to 1024.
- The PRT Volume code pre-calculates various distributions (especially in Well Distributed Jittering mode) to reduce the possibility of too many particles getting too close around the sides of the voxel and increase performance.
- This pre-calculation is currently set to generate 1024 particles for each variation.
- In Krakatoa MX and Krakatoa MY, this maximum value is customizable, but is very rarely changed.
- If you require more particles in your mesh volume, simply increase the number of Subdivisions.
Random Jitter Seed value
- This value defines the random distribution pattern to be used for the Jittered particles.
- The default is 42 (for the same reason CINEMA 4D allows 42 days of evaluation testing ;) ) and can be changed or even animated to produce changing random distribution over time and avoid static noise patterns.
Well Distributed Jittering checkbox
When unchecked (default), the random positions of the particles in each voxel will be generated based solely on the Random Seed and pseudo-random number generation, without taking into account the distribution in the neighboring sub-regions.
When checked, a number of Poisson-Sphere-based distributions will be generated that guarantee no particle overlapping or higher densities at the sides where adjacent to neighboring sub-regions. This calculation introduces a slight performance cost, and is thus not the default option.
In most cases, purely random distribution should be good enough and can save some preparation time.
To determine the performance hit of this option on your machine, you can try rendering with both the Enable Jittered and Well Distributed options checked, then look at the [STAT] sections in the Console.
The stats will look similar to this:
[Krakatoa | STAT] Poisson Sphere sample generation timing:
[Krakatoa | STAT] Section "Corner Regions":
[Krakatoa | STAT] Total 00h 00m 00.140s Called 1 times Avg 00h 00m 00.140s
[Krakatoa | STAT] Section "Edge Regions":
[Krakatoa | STAT] Total 00h 00m 00.531s Called 1 times Avg 00h 00m 00.531s
[Krakatoa | STAT] Section "Face Regions":
[Krakatoa | STAT] Total 00h 00m 00.561s Called 1 times Avg 00h 00m 00.561s
[Krakatoa | STAT] Section "Entire Cube":
[Krakatoa | STAT] Total 00h 00m 00.187s Called 1 times Avg 00h 00m 00.187s
[Krakatoa | STAT] Section "Total":
[Krakatoa | STAT] Total 00h 00m 01.419s Called 1 times Avg 00h 00m 01.419s
In other words, on this particular machine using Well Distributed adds about 1.5 seconds to the total render time. When rendering 100 million particles, a second and a half is negligible, but when rendering 10,000 particles, it is an eternity.
Enable Shell checkbox
- When unchecked, the whole volume of the mesh will be filled with particles.
- When checked, only particles within the range defined by the Shell Start and Shell Thickness values will be generated.
Shell Start value and slider
- Used when the Enable Shell checkbox is checked
- Default is 0.0, which corresponds to the surface of the LevelSet generated from the source mesh.
- Higher values offset the beginning of the cloud inwards away from the surface.
- The value can be animated to produce animated growth and shrinking effects.
Shell Thickness value and slider
- Used when the Enable Shell checkbox is checked
- Default is 10.0 which produces 10 units thickness inside the surface starting at the Shell Start value.
- Higher values increase the Thickness of the particle band generated between the Shell Start and (Shell Start + Thickness) distances from the LevelSet surface.
- The value can be animated to produce animated growth and shrinking effects.
Viewport Percent Limit value and slider
- Default is 100%
- When set to lower values, a fraction of the particles will be displayed in the viewport.
- This value does not affect the render count at all - see the Reduce Number Of Particles option in the Setup tab for a reduction that affects both viewport and rendering.
Enable Viewport Particle Limit checkbox and Viewport Limit (x1000) value
- When the checkbox is checked (default), the value (default is 1000) will be multiplied by 1000 and will limit the number of particles displayed in the viewport. In other words, by default a PRT Volume will not attempt to draw more than 1 million points in the viewport.
- When unchecked, any number of particles requested by the viewport settings will be drawn, even if it means very slow interactive performance when navigating thew viewports.
- This option does not affect the rendering, only the viewport display.
Viewport Display Mode drop-down list
- Controls the display of the viewport particles.
- Display As Small Dots (default) - the particles will be drawn as pixel-sized points
- Display As Large Dots - the particles will be drawn as 4x4 pixels recrangles.
- Display Normals - the particles will be drawn as lines with length of 10 units according to the surface normal of the closest point on the mesh surface.