Depth Of Field Effects
Available in Krakatoa v1.0.0 and higher
Anamorphic Squeeze and Bokeh controls available in Krakatoa v2.6.1 and higher
Introduction
Quote from the Wikipedia Depth Of Field Article :
“In optics, particularly as it relates to film and photography, the depth of field (DOF) is the portion of a scene that appears acceptably sharp in the image. Although a lens can precisely focus at only one distance, the decrease in sharpness is gradual on each side of the focused distance, so that within the DOF, the unsharpness is imperceptible under normal viewing conditions.”
- In 3ds Max and Krakatoa, the Depth of Field effect is designed to simulate the behavior of the camera’s lens and produce the same sharpen / unsharpen appearance of the final rendered image.
Depth Of Field Methods
- Krakatoa supports both the 3ds max Multi-Pass Depth Of Field effect and provides its own implementation which is based on real-world camera physics using the camera target distance, the camera field of view and f-stop value.
3ds Max Multi-Pass Depth Of Field Effect
- The 3ds Max Multi-Pass Depth Of Field effect is generally slower and provides inferior quality compared to the built-in Krakatoa Depth Of Field effect.
- It is based on rendering the scene multiple times using a varying view transformation matrix with the camera’s position jittered in a circular or star shape while the focal center being kept constant, then combining all rendered samples into a final image.
- When using the Multi-Pass effect, all particles will be reloaded and relit for each pass, resulting in a significant time penalty.
- The 3ds Max Multi-Pass DOF Effect can be used for compatibility when compositing with elements rendered in other renderers using the 3ds Max DOF effect.
- In most other cases, the built-in method should be preferred.
Krakatoa Depth Of Field Effect
- Since the 3ds Max standard Camera does not provide an f-stop value, it is necessary to add a Krakatoa Camera modifier to the Camera. You can add the modifier to Spot Lights too if you want to render a light view instead of a camera view.
- Note that in Krakatoa 1.0.x, the user had to use the “Depth Of Field - mental ray” Multi-Pass Effect to provide an f-stop value.
- Brazil r/s and V-Ray cameras have an f-stop value and are supported directly.
- The Krakatoa Depth Of Field calculates the disk area a single particle would occupy based on the current camera settings and then draws this particle multiple times (depending on the settings dozens or even hundreds of times) at random positions within that area.
- This means that if Krakatoa had to render one million particles and the Depth Of Field settings require each particle to be drawn on the average 10 times (some more, some less, depending on their distance to the camera), the renderer would have to draw 10 million particles.
- Thus, while drawing points is relatively inexpensive, using Depth of Field with high quality settings or extreme lens settings could cause significant slow down.
Krakatoa Depth Of Field And Multi-Threading
Applicable to Krakatoa v1.6.0
- When drawing the final pass particles, Krakatoa v1.6.0 will split the already sorted particles into multiple chunks based on the distance to the camera.
- The number of chunks is controlled by the Preferences > System Preferences > Multi-Thread Particle Sorting and Drawing settings and defaults to the number of CPUs.
- When splitting the particles into chunks, Krakatoa does NOT take into account the potential difference in drawing times that could be caused by the different number of Depth Of Field samples.
- As result, some of the threads might take significantly longer to render than others, thus slowing down the total render time.
- The Multi-Threading settings allow for higher thread counts than the installed number of CPUs - for example you might have 8 cores, but specify 16 or even 32 threads to be used.
- This does not speed up sorting, but with Depth Of Field enabled can affect the drawing time significantly.
- For example, if you use 16 instead of 8 threads on an 8 core machine, the slowest chunk with the most samples to draw will be split into two chunks that can be processed by two cores in parallel.
- In a simple test scene with 4 PRT Volume objects disappearing in the distance and providing 8.3 Million Particles,
- Drawing from PCache and LCache with DOF Sample Rate 1.0 an one thread took 161.125 seconds
- Drawing with default 8 threads took 34.953 seconds
- Drawing with 16 threads took 27.485 seconds
- Drawing with 32 threads took 24.814 seconds
- Note that more threads use more memory since each one requires its own image buffer to draw to.
Depth Of Field Quality
- The quality of the Depth of Field effect depends mainly on the Depth of Field Sample Rate value found in the Main Controls rollout.
- This value scales the amount of samples used per particle.
- The default value of 0.1 is very low quality but usually adequate for testing.
- A value of 1.0 is relatively high quality and can take a bit longer to calculate (especially with millions of particles).
- A value of 0.0 practically disables the effect.
- Values close to 0.0 like 0.001 will jitter the actual particles around without doing coverage of the area and could be used for very quick previews.
- The following examples were produced using a single-threaded build of Krakatoa v1.1.x.
- Krakatoa v1.6.0 will render the same examples several times faster due to multi-threading (see above).
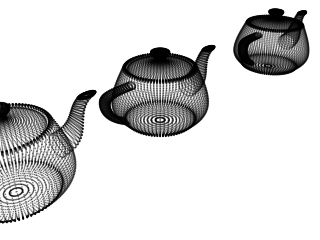
- This is a scene with 3 teapots, 20 segments each.
- Filtering is set to Bicubic.
- Depth Of Field is disabled.
- (Enabling DOF and setting the Sample Rate to 0.0 results in the SAME image).
- Render time is 0.484 sec.
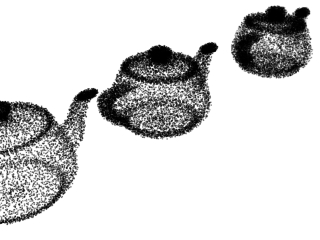
- This is the same scene rendered with DOF on and Sample Rate of 0.001.
- The particles do not get drawn multiple times because the resulting sample count is too low and mostly clamped to 1 sample, but each particle is drawn at a random position within the calculated disk area.
- Render time is 0.515 sec.

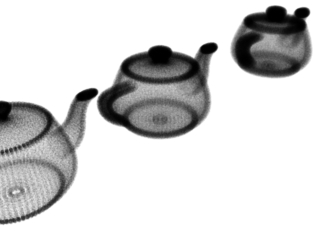
- This time the Sample Rate of 0.01.
- The result is similar, but the pattern is different and the farthest teapot is slightly more smoothed.
- Render time is 0.515 sec.

- This is the default Sample Rate of 0.1.
- It is still rather rough, but gives a better idea of the final result without taking much longer to render.
- Render time is 0.594 sec.

- This is the result from Sample Rate of 1.0
- It is relatively high quality, but is already taking longer than a second to render.
- Render time is 1.422 sec.
- This is the result from Sample Rate of 2.0
- Looks better than the previous version, but also takes twice as long to render.
- Render time is 2.344 sec.

- This is the result from Sample Rate of 3.0
- We start to see a pattern here - adding one to the Sample Rate adds one second to the render time.
- Render time is 3.234 sec.

- This is the result from Sample Rate of 5.0
- This confirms the pattern - a sample rate of 5.0 results in a render time of 5 seconds.
- This is of course specific to this scene, but in general increasing the Sample Rate affects the render time in a linear fashion.
- Render time is 5.078 sec.