Krakatoa MY Apply Texture Modifier Node
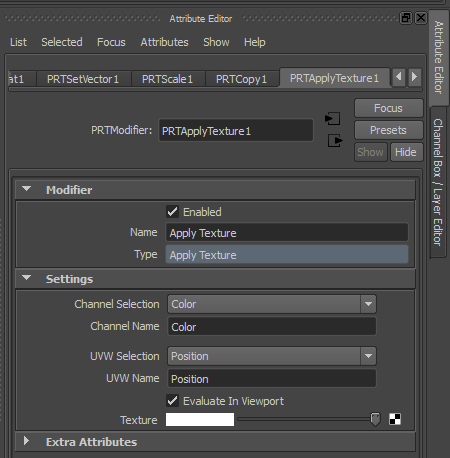
- The Apply Texture node exposes the following controls:
- Checked by default.
- When checked, the node will be evaluated by the Krakatoa renderer.
- When unchecked, the node will be skipped completely by the Krakatoa renderer as if it was not connected to the Particle Source at all.
- This attribute can be used to temporarily toggle a node on and off without removing it completely from the scene.
- Its state can also be toggled by double-clicking the modifier’s entry on the Modifier Editor’s list.
- This text field provides a user-defined name for the modifier.
- The name is used only for reference/user notes and does not affect the modifier’s functionality.
- This name will also be displayed in the Modifiers Editor, so it should be set to a helpful text reflecting the function of the modifier.
- This read-only text field shows the type for the modifier.
- It cannot be changed by the user.
- This checkbox is checked by default.
- When unchecked, the texture will not be evaluated in the viewports.
- When checked, the texture will be evaluated
- if the object the modifier is applied to is a Krakatoa PRT object and the Channel is “Color”, its results will be reflected by the viewport particles
- If the object is a Maya native particle system, or the channel being set is not “Color”, the viewport will not reflect the modifier’s contribution.
- This drop-down list provides a list of typical channel names to quicky set the Source Name value without typing.
- The default selection is “Color”.
- The top entry on the list is <Custom Channel>
- It will be selected automatically when a new value is entered in the Source Name field (see below) that does not exist on the list.
- This text field defines the particle data channel to be replaced by the result of the shader evaluation.
- The default is “Color” which will set the Color of the particles to the rgb output of the shader.
- Any relevant channel like “Emission” or “Absorption” can be specified here.
- This drop-down list provides a list of typical channel names to quicky set the Source Name value without typing.
- The default selection is “Color”.
- The top entry on the list is <Custom Channel>
- It will be selected automatically when a new value is entered in the Source Name field (see below) that does not exist on the list.
- This text field provides the name of the Mapping Coordinates Channel to be used per particle to evaluate the texture.
- It defaults to “Position”, thus evaluating the texture in object space.
- It can be set to any valid particle data channel that can be used as mapping coordinates.
- This control provides the texture to be evaluated for each particle.
- If no texture node has been selected, the single color will be used for every particle, resulting in the same behavior as Set Vector Channel, but using a more convenient color picker.