Loading A Point Cloud
Creating A Point Loader
- A Point Loader object is required to read Point Cloud data from a file.
- To create a Point Loader in the current Document, you can use one of the following workflows:
- Click the Create A New POINT LOADER Object... icon on the Main Toolbar;
- Or select Create > New POINT LOADER menu item from the Main Menu;
- Or click the default keyboard shortcut CTRL+ALT+P, or the currently defined shortcut if it has been remapped manually;
- Or drag a supported Point Cloud file from from an OS explorer window into a SEQUOIA Viewport representing the desired target Document.
- In the first three cases, once the Point Loader is created, a file dialog will open automatically, letting you select the file to load.
- If you click Cancel in the file dialog, no Point Loader will be created.
- If the selected file is in Thinkbox SPRT file format, it will be loaded immediately.
- If the selected file is not in SPRT format, then
- If an SPRT file with the same filename as the source file does exist already, and its metadata shows that it was created from the same source file, it will be loaded as cache.
- If an SPRT file is found, but its metadata does not match the filename, date or size of the source file, the SPRT file will still be loaded, but a warning will be displayed that the cache must be rebuilt - see further below for details.
- If no SPRT file can be found in the same folder, the source file will be loaded for preview, and a new SPRT cache must be created - see further below for details.
- In the case of dropping from the OS explorer window, the file(s) to load are already defined by the drag&drop.
- If the dropped files are not in SPRT format, the Batch > CONVERT POINT Files dialog will open and will be populated with the dropped file names.
- If the dropped files are in SPRT file format, the Batch > IMPORT POINT Files dialog will open.
- If the dropped files are a mixture of SPRT and non-SPRT files, the Batch > CONVERT POINT Files dialog will open and will be populated only with the non-SPRT file names.
File Format Support, Conversion And Caching
- SEQUOIA supports several industry standard Point Cloud data file formats including .CSV, .E57, .LAS, .LAZ, .PLY, .PTG, .PTS, .PTX, .TXT and .XYZ, as well as Thinkbox .PRT, RealFlow .BIN and .RPC files.
- The point data can be
- Previewed in the SEQUOIA Viewports by reading directly from the source file;
- Converted to the native Thinkbox Spatial PRT (.SPRT) file format via the Build Cache function of the Point Loader;
- Converted using the Batch > CONVERT POINT Files dialog of SEQUOIA, including the ability to to combine multiple source files into one file.
Previewing The Data
- When a non-SPRT file is selected to be loaded in a Point Loader object, the Point Loader will show the source file in the File field, and populate the Cache field with the same filename, but with .SPRT extension.
- It will then search for the SPRT cache file in that folder.
- If a matching SPRT Cache file cannot be found in the folder, the Status line will show “MISSING CACHE FILE” on red background,
- In this case, the Point Loader’s Load SPRT Cache option will be unchecked and the source file’s data will be read and shown in the viewport for previewing.
- You can press the Build Cache button to create the SPRT Cache file.
- If the SPRT Cache file exists, it will contain Metadata describing the source file it was produced from.
- If a matching SPRT Cache file is found in the folder,
- and it contains matching metadata, the Status line will show “CACHE UP TO DATE” on green background.
- and the metadata does not match, the Status line will show “CACHE METADATA MISMATCH (See Log)” on red background, and the Log file will describe the mismatch.
- and the metadata contains the correct filename, but shows the source has been updated after the cache was created, the Status line will show “CACHE OUTDATED” on red background.
- In the above cases, the Point Loader’s Load SPRT Cache option will be checked and the Cache file’s data will be loaded in the viewport for previewing.
- You can uncheck the Load SPRT Cache option manually and press the Update Point Loader button to force the loading from the original source.
- You can navigate the Viewport to explore the data, load a fraction of it as needed and decide whether you want to build a Cache file and what settings to use.
- You can press the Rebuild Cache button to re-create the SPRT Cache file in all these cases.
Building The Cache
- The conversion to SPRT can be performed “in-core” if the available memory and the Options > Data Cache options allow, or “out-of-core” (OOC) if the memory is not enough.
- The conversion includes the creation of Octree voxels, allowing the selective view-dependent loading of various Levels Of Detail (LOD).
Remapping Point Data To Data Channels
- Some file formats like .CSV, .TXT, .PTS, .XYZ can contain multiple columns of data beyond the XYZ Position data without any additional information what this data might be.
- When a file containing multiple data columns is detected, a dialog will be displayed allowing the remapping of the additional channels to known data channels including Intensity, Color, Normal, TextureCoord and Radius.
- The dialog will attempt to propose a Best Guess remapping.
- You can change the mapping by looking into the first N records of the file displayed in the dialog and selecting the channel or channel component for each column:
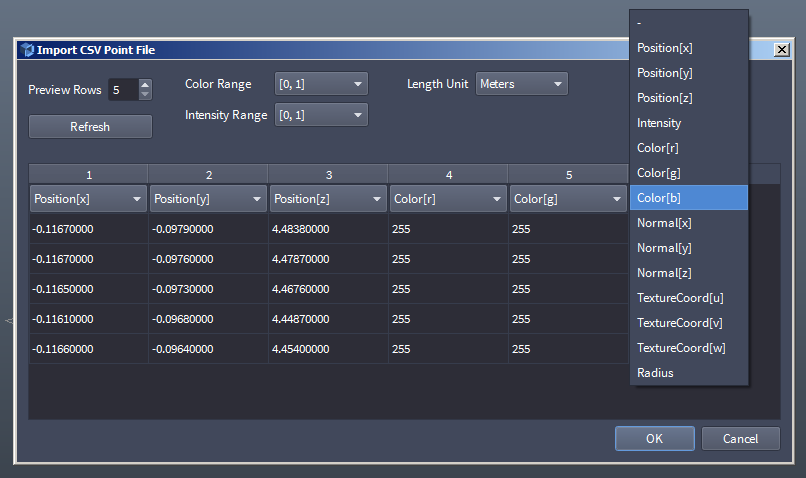
- To see more or less data record rows, change the Preview Rows value and press the [Refresh] button.
- The Color channel (if defined) can be rescale to the [0,1] range, or left in the [0,255] range using the Color Range drop-down list.
- The Intensity (the signal strength returned by the laser sensor) value can be rescaled to the [0,1] range, [-2048,2048], or [-4096,4096] range using the Intensity Range drop-down list.
- Click on the Column Header drop-down list to select the channel or channel component the data column should be mapped to.
- To skip a data column and not import it, set the drop-down list to the top “-” entry.
- If the same channel component is selected a second time, the other entry will be switched to “-” automatically.
- If a channel definition is incomplete (for example, only the R and G components of Color have been defined without a B channel), a “Missing column mapping for channel” warning prompt will appear when the OK button of the Import dialog is pressed.
- Answering the prompt with [Yes] will ignore the error and assume 0 as the missing component.
- Answering with [No] will return to the Import dialog so you can fix the issue.
Working With Heavily Offset Point Clouds
- In many cases, the Point Cloud data is stored in coordinates offset from the World Origin by hundred thousands or even million units, while the Point Loader would be placed at the Origin.
- In such cases, it is often convenient to move the Point Cloud temporarily or permanently to the World Origin.
- To center the Point Cloud at the World Origin, make sure the Point Loader is selected, then click the
![[]>](../../_images/options_icon_gray3.png) Options button of the Transform panel and select CENTER At World ORIGIN from the menu.
Options button of the Transform panel and select CENTER At World ORIGIN from the menu. - Alternatively, select SIT At World ORIGIN from the same Options menu to place the bottom of the Point Cloud’s bounding box at the Ground Plane.
- To center the Point Cloud at the World Origin, make sure the Point Loader is selected, then click the
- As result, the Point Loader’s pivot will be translated in the opposite direction, and the points will be centered around the 0,0,0 point in space.
- You can reset the object back to its original coordinates at any time by simply selecting RESET Transform from the Options menu of the Transform panel.