Timeline Panel
Overview

The Timeline panel controls the Animation playback in SEQUOIA.
The Timeline panel defines
The Time Source (Timer) used for a Viewport.
The Current Time in seconds represented numerically and by a slider.
The Start Time and End Time expressed in seconds.
The Playback Speed relative to the system Frame Rate.
The Time Offset of the Viewport relative to the active Timer.
The Playback Mode (Forward, Backward, Ping-Pong)
The Loop Mode checkbox
Concepts And Workflows
Current Timer
The Timeline Panel represents the settings of a specific Timer.
Each Document provides a Document Timer, and all Viewports displaying that Document’s content will use it by default. This means that changing the time using the Timeline Panel will generally advance the time in all Viewports of the Document.
Each Viewport provides its own Viewport Timer, allowing independent settings and playback of every Viewport.
The SEQUOIA session provides its own Global Timer, and any Viewport of any Document can be switched to use it instead of the Document or Viewport Timers, allowing the time synchronization of multiple Viewports of multiple Documents.
Switching The Current Timer
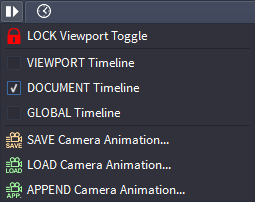
The Timer of a Viewport can be selected from the Options menu.
Possible values are:
VIEWPORT Timeline - independent per-Viewport time settings
DOCUMENT Timeline - (default) per-Document time settings that can be shared between Viewports of the same Document
GLOBAL Timeline - global SEQUOIA time settings that can be shared between Viewports of one or more Documents.
The Timer of a Timeline Panel will be displayed in the title bar, e.g. “Timeline - Viewport”, “Timeline - Document” or “Timeline - Global”.
Locking A Timeline Panel To A Viewport
Normally, the Timeline Panel will display the settings of the Timer associated with the Active Viewport.
Thus, a single Timeline Panel can be used to adjust multiple Viewports by simply switching the Active Viewport.
However, a Timeline Panel can be locked to a specific Viewport so it always displays its Timer settings, and multiple Timeline Panel instances can be created.
This makes it possible to have any number of Timeline Panels associated with any number of Viewports.
To lock a Timeline Panel to a specific Viewport, use the LOCK Viewport Toggle menu item in the Options menu of the Timeline Panel.
When locked, the Options menu icon will change into a Lock icon.
Current Time Value And Time Slider
The Time Slider represents the current time of the current Timer.
The value is displayed in floating point seconds.
The value can be entered in the value field, or set by moving the slider.
The value entered can be outside the Start and End values - the slider handle will turn orange.
The slider handle will turn green when set to the default time (0.0)
The slider handle will turn gray when on any other value within the playback range defined by the Start and End values.
Clicking to the left or right of the handle will move the time slider by a small value proportional to the current value.
Holding SHIFT and clicking the slider’s background or dragging the slider handle will set the current time to a value rounded to the nearest full second.
Holding CTRL and clicking the slider’s background or dragging the slider handle will set the current time directly to the clicked value.
Right-clicking the Time Slider provides the same context menu options available in regular sliders, including
Set to Default, Minimum and Maximum value - using 0.0, the Start and End time values.
Add the clicked value as Preset
Add the current value as Preset
Delete a preset (if the current value matches the preset value)
Set the time to the preset value (if any)
Camera Animation Saving And Loading
When the Camera is animated using Keyframes, the animation can be saved and loaded via an external .SQCA (SEQUOIA Camera Animation) file.
When the Camera is set to use a procedural Turntable animation, saving and loading will have no effect.
The SQCA file is stored in JSON format, and can thus be used to also share data with other applications that can read and write text files via a scripting language.
SAVE Camera Animation…
Selecting this menu item will open a “Save Animation Keyframes” file dialog to specify the SQCA file name.
A new filename and path can be specified via the dialog.
If the save file dialog is confirmed, and the Camera has valid keyframe amimatiom, a new SQCA file will be saved to disk.
If the save file dialog is canceled, no file will be saved.
LOAD Camera Animation…
Selecting this menu item will open a “Load Animation Keyframes” file dialog to specify the SQCA file to read.
An existing SQCA file name can be selected from disk.
If the open file dialog is confirmed,
If the Camera has an existing unsaved animation, a prompt to save it will appear to save it to SQCA first.
A Yes/No prompt will appear asking about loading the Camera settings (like Field Of View etc.) from the saved file.
If answered with Yes, the Camera will be changed to match the saved Camera.
If answered with No, only the animation keyframes will be loaded, but the Camera will retain its other settings.
If the open file dialog is canceled, the file will not be loaded.
APPEND Camera Animation…
Selecting this menu item will retain any existing animation keyframes.
The keyframes loaded from the SQCA file will be added to the end of the previous animation.
This can be used to combine multiple saved animation files to a single keyframe sequence.
User Interface
Step Back / Playback / Step Forward Buttons
Pressing the Step Back button to the right of the time slider will step backwards through time by 1/10 of the time range defined by the Start and End values.
Pressing the Playback button will toggle the playback on and off; when playback is on, the button will show the Pause icon.
Pressing the Step Forward button will step forward through time by 1/10 of the time range defined by the Start and End values.
Start / End Values
The Start value defines the beginning of the current Timer’s playback range, default is 0.
The End value defines the end of the current Timer’s playback range, default is 10.
The values are in full seconds.
These values only control the playback range of the timeline, but SEQUOIUA animation can exist outside of the range.
Speed Value And Slider
Controls the playback speed.
Default is 1.0, playing back 1 scene second per real-world second.
Higher values speed up the playback, lower values slow it down.
The slider range is from 0.001 (1 millisecond per second) to 10.0 (10 seconds per second).
The value range is from 0.0 (no playback) to ant positive value.
Offset Value And Slider
The Offset value can be used to shift the current time by the given amount without adjusting the Start and End values of the current range.
Also, it can be used to show different times under the control of the same Document or Global timer in two viewports playing back the same animation.
This value is stored per Viewport, regardless of the current Timer source (Viewport, Document, or Global)
The value is in seconds and can be positive or negative.
The slider range is from -10.0 to +10.0, but values outside the range can be entered.
The default value is 0.0.
Play Dropdown List
Controls the direction of the playback.
Possible options are:
Forward - plays back from the current time to the End time, then repeats again from Start if Loop is checked.
Backward - plays back from the current time to the Start time, then repeats again from the End time if Loop is checked.
Ping-Pong - plays back from the current time to the End time and then back to Start, then repeats again if Loop is checked.
Loop Checkbutton
When unchecked, the playback will be performed just once.
When checked, the playback will be repeated forever until the Playback button or the Loop checkbutton is unchecked.
Camera Animation Rollout
The Camera Animation rollout will be populated with additional controls when the Active Viewport is locked to a Camera object.
When the Active Viewport is not locked to a Camera, the “No Camera Attached” text will appear in the rollout.
Camera Keyframes Strip
The Camera Keyframes strip contains the
New Keyframe icon,
Thumbnails representing every Camera Transform Keyframe.
Each Keyframe is overlayed by
Duration - the time in seconds to interpolate from the previous Keyframe.
Absolute Time - the current time of the Keyframe based on all previous Durations.
Interpolation symbol - [C], [L] or [S] for Constant, Linear or Smooth.
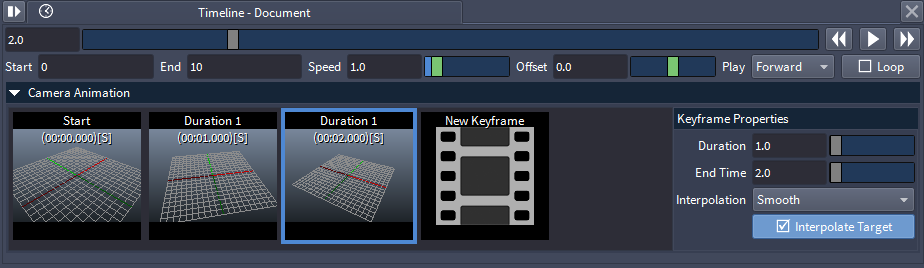
Keyframe Properties Sub-panel
The Keyframe Properties sub-panel displays the properties of the currently selected keyframe.
Duration Value And Slider
This value represents the time it will take to interpolate to this Keyframe from the previous Keyframe (if any).
Changing this value will extend or shorten the time between the Keyframe and the previous Keyframe, while automatically shifting the timing of all following keyframes accordingly.
If multiple Keyframes are selected at the same time, changing this value will adjust the Duration of all selected Keyframes at once.
End Time Value And Slider
This value represents the end time of the selected Keyframe based on its Duration and the Duration of all previous Keyframes.
Changing the End Time value will automatically adjust the Duration of the selected Keyframe.
If multiple Keyframes are selected at the same time, changing this value will adjust the Duration of all selected Keyframes at once to the value calculated for the first Keyframe in the selection.
Interpolation Dropdown List
This property controls the interpolation type of the Keyframe.
Possible values are:
Constant - the value of the previous Keyframe will be held as constant until the current Keyframe is reached.
Linear - the Camera’s transform will be interpolated linearly between the values of the previous and current Keyframes.
Smooth - the Camera’s transform will be interpolated smoothly between the values of the previous and current Keyframes.
Interpolate Target Checkbutton
This property controls whether the Camera’s Target position will be used to interpolate the Camera’s transforms.
When unchecked, the Target will be ignored and only the Camera’s transforms (position and rotaion) will be interpolated.
When checked,
The position of the Target will be interpolated first based on the Camera transforms interpolation and the Target Distance value,
Then the Camera transforms will be reevaluated based on looking at the Target.
This produces a smoother animation, especially when the Target position is not changing over time (for example in the case of Camera Turntable animations).
Camera Keyframes Context Menu
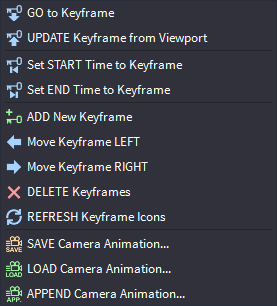
This menu appears when a Keyframe is right-clicked with the mouse.
It contains several actions not available elsewhere in the UI, as well as a few duplicates with the Options menu of the panel.
GO to Keyframe
Moves the Time Slider to the absolute time of the Keyframe that was clicked.
Equivalent to double-clicking the Keyframe icon.
UPDATE Keyframe from Viewport
Sets the Keyframe’s Transform data to the current Camera Transform.
This can be used to update the Keyframe’s value without changing its timing.
Set START Time to Keyframe
Sets the animation range’s Start value to the value of the clicked Keyframe.
Useful for quickly defining a subset of the timeline for playback.
Set END Time to Keyframe
Sets the animation range’s End value to the value of the clicked Keyframe.
Useful for quickly defining a subset of the timeline for playback.
ADD New Keyframe
Adds a new Keyframe to the end of the Timeline.
Same as the New Keyframe large icon in the Timeline itself.
Move Keyframe LEFT
Moves the clicked Keyframe to the left, swapping the order with the previous Keyframe.
This operation retains the Duration values of both Keyframes, and recalculates their absolute times.
Move Keyframe RIGHT
Moves the clicked Keyframe to the right, swapping the order with the next Keyframe.
This operation retains the Duration values of both Keyframes, and recalculates their absolute times.
DELETE Keyframes
Deletes one or more selected Keyframes.
Equivalent to pressing the DEL key on the keyboard.
REFRESH Keyframe Icons
Updates the thumbnails of one or more selected Keyframes with new viewport screenshots.
If no Keyframe is selected and the right-click is performed outside of the Keyframe icons, all icons will be updated.
Animation Loading And Saving
The menu also features duplicates of the SAVE Camera Animation…, LOAD Camera Animation…, and APPEND Camera Animation… actions available in the Options menu and documented earlier on this page.
SQCA File Format Example
{
    "animation": {
        "playback_end_time": 10,
        "playback_loop": false,
        "playback_mode": "forward",
        "playback_offset": 0,
        "playback_speed": 1,
        "playback_start_time": 0
    },
    "camera": {
        "distance_clipping_far": 77.881157548604378,
        "distance_clipping_near": 0.01,
        "fov": 0.72397653488703106,
        "projection": "perspective",
        "target_distance": 20,
        "use_distance_clipping": true
    },
    "keyframes": [
        {
            "duration": 0,
            "interpolate_at_target": false,
            "interpolation_mode": "constant",
            "transform": [
                -0.50143051147460938,
                0.86519789695739746,
                5.8111005785121961e-08,
                0,
                -0.29966360330581665,
                -0.17367185652256012,
                0.93810439109802246,
                0,
                0.8116459846496582,
                0.47039413452148438,
                0.34635269641876221,
                0,
                5.5640349388122559,
                3.0625698566436768,
                529.37481689453125,
                1
            ]
        },
        {
            "duration": 1,
            "interpolate_at_target": true,
            "interpolation_mode": "spline",
            "transform": [
                -0.73839277029037476,
                0.67437088489532471,
                6.6103368112635508e-08,
                0,
                -0.25005039572715759,
                -0.27378919720649719,
                0.92871648073196411,
                0,
                0.62629938125610352,
                0.68575751781463623,
                0.37079069018363953,
                0,
                12.52598762512207,
                13.715149879455566,
                7.4158134460449219,
                1
            ]
        },
        {
            "duration": 3,
            "interpolate_at_target": false,
            "interpolation_mode": "linear",
            "transform": [
                -0.99234342575073242,
                -0.12350935488939285,
                7.6581883945436857e-08,
                0,
                0.053686052560806274,
                -0.43134328722953796,
                0.90058910846710205,
                0,
                -0.11123114824295044,
                0.89369368553161621,
                0.43467140197753906,
                0,
                -2.2246243953704834,
                17.873872756958008,
                8.6934280395507812,
                1
            ]
        }
    ]
}