Creating Turntable Animations
The Sequoia Animation System
SEQUOIA provides an Animation System which can evaluate an object at a different time with varying property values.
The major components of this system are
Timer - provides the time context for evaluating the objects
Timeline Panel - exposes the Timer and the time-related settings to the User Interface
Animation controller - provides procedural or explicit animation data to define a property value over time.
Currently, the SEQUOIUA Animation System is mainly aimed at the creation Object and Camera Turntable animations (see further on this page), as well as Camera Walkthough animations, so it provides dedicated animation controllers to set Object Transforms.
Creating A Turntable By Animating A Camera
The main approach to creating a Turntable Animation in SEQUOIA is by animating a Camera to orbit static Point Clouds and Meshes.
Creating A Camera Object
By Default, SEQUOIA uses virtual cameras (Views) for its Viewports.
These Views do not exist as objects in the Document and can only be manipulated using the Viewport Navigation tools via mouse and keyboard.
To create a Camera Turntable animation, SEQUOIA offers a dedicated Camera object that can be assigned the a Turntable Animation controller.
To create a Camera,
Click the Create a New CAMERA At The Current Viewer Location icon
![[CAM]](../../_images/icon_new_camera3.png) in the Create Objects toolbar.
in the Create Objects toolbar.Alternatively, use the Create menu > New Camera item.
RESULT:
A Camera object will be created with the same position and orientation as the current Viewport’s View.
The Viewport and the Camera will be locked together via the Camera’s Lock Viewport To Camera option, so navigating the Viewport will move the Camera, and animating the Camera will update the Viewport.
If no Timeline panel is open in the SEQUOIA Layout, a new Timeline Panel will be opened automatically.
The Camera will be selected automatically, allowing the assignment of Turntable animation with a single click as described below:
Setting Up Turntable Animation
By default, the Camera object will be pre-assigned a Keyframes animation controller, and a first Keyframe will be set at time 0.0.
To assign a Turntable Animation controller to the Camera, click the Create a New TURNTABLE Animation For The Currently Selected Objects icon
![[TTBL]](../../_images/icon_new_turntable.png) in the Animation Settings toolbar.
in the Animation Settings toolbar.Play back the animation using the Play button
![[PB]](../../_images/animation_playback_button.png) in the Timeline Panel.
in the Timeline Panel.
RESULT: The Camera will now orbit the World Origin at the distance defined by its initial position when the Turntable Animation was created.
Changing The Turntable Distance
The Radius of the Camera’s trajectory and the distance to the center of the animation (in this case to the World Origin) depends on the initial position of the Camera.
Stop the animation by clicking on the Play button which now shows the Pause symbol
![[PSE]](../../_images/animation_pause_button.png) .
.Press SHIFT and click the Backwards button
![[BACK]](../../_images/animation_backwards_button.png) next to the Play button in the Timeline panel to go back to Time 0.0.
next to the Play button in the Timeline panel to go back to Time 0.0.Adjust the position and orientation of the Camera using the Viewport Navigation controls.
Note that if the Timeline is set too a different time than 0.0, the adjusted Camera transforms will be used as the initial transforms at time 0.0 regardless.
Play back the animation again.
RESULT: The animation will start with new adjusted position and orientation of the Camera at time 0.0.
Looping The Animation
Check the Loop checkbutton in the bottom right corner of the Timeline Panel to make the animation repeat continuously,
RESULT: The animation will repeat forever until the Play button which now shows the Pause symbol is pressed again.
Changing The Animation Speed
There are two possible approaches to changing the speed of the animation:
Change the Playback Speed In The Timeline Panel
This approach simply changes how many seconds per second to play back in the Active Viewport.
The default value of 1.0 means that for each second of real time playback, one second of animation data will be played back.
To make the animation run faster, simply change the Speed value from 1.0 to 2.0 and it will play back two seconds of animation within one second of real time.
This approach has the benefit of speeding up all animations in the Active Viewport without touching their respective Animation controllers settings.
Change the Turntable Animation Period
This approach modifies the Turntable animation controller settings, so it applies to the specific object only.
The Object Properties panel will display the Turntable Animation controller’s parameters when it is first assigned.
If it is not displayed because the selection changed after that,
Expand the Animation item of the object in the Document Explorer panel.
Select the Turntable entry to show its properties in the Object Properties panel.
The default Period of the Turntable matches the length of the Timeline playback range (0.0 to 10.0 seconds).
Change the Period from 10.0 to 5.0 and the animation will play back within 5.0 seconds, or 2x faster.
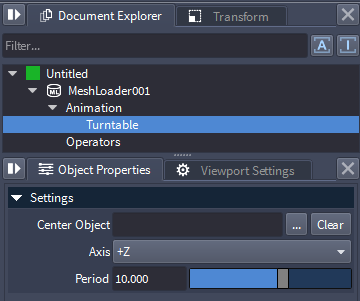
Changing The Center Of The Turntable Animation
By default, the Turntable animates in World Coordinate System, rotating the object from its current Transforms about the World Origin using the specified World Axis.
The Turntable controller exposes a Center Object property that lets you pick another object as the Reference Coordinate System.
The picked object will be used as Center of the rotation, and its local axes will be used to define the axis of rotation.
Create a Marker object
Using the Transformation Panel, or the Move tool, move the Marker to Position -10.0,0.0,0.0
In the Document Explorer, in the Turntable’s Properties, click the
![[COP]](../../_images/animation_turntable_center_object_pick.png) button and select the Marker from the dialog.
button and select the Marker from the dialog.Play back the animation
RESULT: The object will now rotate about the Marker.
Moving the Marker or the Mesh Loader will change the radius of the rotation - their relative position at time 0 will define the Turntable’s initial parameters.
To switch back to World Coordinates, press the Clear button to remove the Center Object selection.
Creating A Turntable By Rotating An Object
Instead of animating the Camera around static objects, you can opt to rotate an object while
Create an object at the World Origin, for example a Mesh Loader showing some previously saved mesh data.
With the object selected, click the
icon in the Animation Settings toolbar.In the Timeline Panel, press the Play
button.
RESULT: The object will rotate at 360 degrees about the vertical (Z) axis over the course of 10 seconds, then the animation will stop.
Changing The Axis
The 6 major coordinate system Axes are exposed via a drop-down list.
Select a different Axis to change the rotation.
Animating Multiple Objects About Each-Other
Adding a Turntable Animation to the Marker in the above case would cause the Marker to orbit the World Origin, while the Mesh Loader is orbiting the Marker.
Adjusting the axes and periods of the multiple animations can produce more and more complex motion.
Assigning Multiple Turntable Animations To The Same Object
You can add multiple Animation controllers to the same object.
Each one of them will be evaluated in the space generated by the previous controller(s).
Converting Procedural Animation To Keyframes
Both Camera and Object Turntables can be converted to explicit Keyframes animation.
You can either right-click the Animation component in the Document Explorer and select Convert to Keyframes, or
In the case of a Camera animation, click the Convert to Keyframes button in the Camera Animation rollout of the Timeline panel.
Deleting Animation
To remove an Animation controller from an object, right-click the controller entry (e.g. “Turntable”) in the Document Explorer and select Delete from the context menu.
The operation can be undone and redone as any other Document operation.