Stoke Procedural Velocity Field Driving FumeFX Simulation
Applicable to Stoke MX 2, Last Edited March 7, 2014
Overview
In the previous tutorial, we discussed the creation of a custom helix-like Velocity Field using the Field Magma object introduced in Stoke MX 2.
Stoke MX 2 not only supports FumeFX data as an input in the Stoke Particle Simulator and Stoke Field objects, but it can also influence a FumeFX simulation via a Field Force Space Warp, and output directly to the FumeFX .FXD file format and thus specify the actual Velocity Field directly.
In this tutorial, we will use the same simple sine wave to apply a custom Velocity Field to a FumeFX simulation using both approaches.
The Base Scene
We will start with the last step of the previous tutorial, and will make a few small adjustments:
- Select the Field Magma object and change the Grid Size to X: -100 | 100, Y:-100 | 100, Z: 0 | 300.
- Open the Magma editor and change the Power operator from 0.8 to 0.2 to make the radius grow slower with the Z height increase.
- Select the last Multiply by 100.0 operator and press Ctrl+P to disable it.
- Creating the FumeFX Simulation
- Create a FumeFX Grid with size 200x200x300 at the origin to match the Field Magma grid.
- Set Spacing to 3.0 to produce finer detail.
- Go to Create tab of the Command Panel > Helpers > FumeFX and create a Simple Src helper with Shape set to Sphere, Radius 10.0, Smoke Amount 50.0.
- Open the UI of the FumeFX Simulator and go to the “obj/src” tab.
- Pick the Simple Src as source.
- Click the Start Default Simulation icon to simulate the FumeFX
- Rendering The Result
- Add a Spot light source to the scene and pick it in the Illum. tab of FumeFX.
- Enable Shadows and Atmospheric Shadows in the Spot light.
- Enable Cast Shadows and Receive Shadows in the rend. tab of FumeFX > Smoke rollout.
- Render the whole range in Default Scanline renderer or another renderer of your choice.
RESULT: The Simple Source will create a burning flame. The smoke will rise up without doing anything special…
Using The Field As Force
First, let’s apply the Velocity Field as a Force using the Field Force Space Warp. A Force provides Acceleration data. Acceleration is the CHANGE in Velocity, so we won’t control the actual Velocity Field in the FumeFX simulation directly, but just “blow the smoke in the general direction” defined by the Field Magma…
- Select the Field Magma object.
- Create a Field Force Space Warp using the Stoke menu - the Field Magma will be picked automatically as the source object!
- Select the Velocity channel from the list of Vector Channel Names.
- In the FumeFX object, pick the Field Force SpaceWarp as a source.
- Check the Smoke display option to see the results of the FumeFX simulation in the viewport.
- Click the Start Default Simulation icon to simulate the FumeFX again.
RESULT: The smoke will rise according to both its own velocity due to temperature and buoyancy, and will be somewhat influenced by the Field Magma through the Field Force.
But what if we wanted to have the smoke follow the custom Sine Wave field exactly?
Exporting The Velocity Field To FumeFX
In order to load Stoke Field Velocity data in FumeFX, we have to cache it out as FXD files first.
- From the Stoke menu, select the “Open the FIELD DATA EXPORTER Dialog…” option.
- The dialog should show the Field Magma object already selected.
- Enter “SineWave” in the Project field, leave all other settings at their defaults.
- Press the “EXPORT Stoke Field Data To FumeFX .FXD Files…” button and wait for the process to finish.
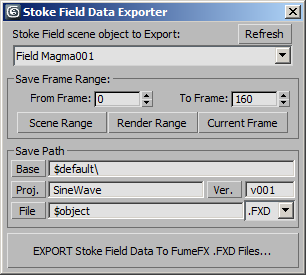
RESULT: A file sequence of FXD files containing the SineWave field generated by the Field Magma will be saved to disk.
Loading The Velocity Field In FumeFX
FumeFX exposes a FumeFX Source object which can be used to inject data from one FumeFX simulation into another. We will use this ability to create one FumeFX grid that reads the data from our FXD sequence created in the previous step, then create a second FumeFX grid for the actual simulation where the first Grid will be used as a Source!
Creating The FumeFX “Loader”
- Create another FumeFX Grid with size 200x200x300 at the origin to match our Field Magma grid.
- Set the Spacing to 5 to match the Spacing of the Field Magma grid.
- In the Stoke Field Data Exporter, click on the “File” button and select the “Copy FILENAME To Windows Clipboard” item from the menu to grab the location of our FXD file sequence.
- Open the FumeFX UI and paste the path copied in the previous step.
- Go to Create tab of the Command Panel > Helpers > FumeFX and select FumeFX Src.
- Create the FumeFX Src object in the viewport, then pick the FumeFX001 object as its source.
- Switch the type to Box.
- Check the Free Flow option.
- Enter Width: 200.0, Length: 200.0, Height: 300.0.
- Set all channels except for Velocity to Disabled.
- Place the FumeFX Src at the origin 0,0,0, then enter 150.0 for its Z position to center to the other Grids.
- Pick the FumeFX Src as a source in the first FumeFX Simulator - it will be the explicit source of Velocity.
- Select and disable the Field Force Space Warp in the list of FumeFX sources.
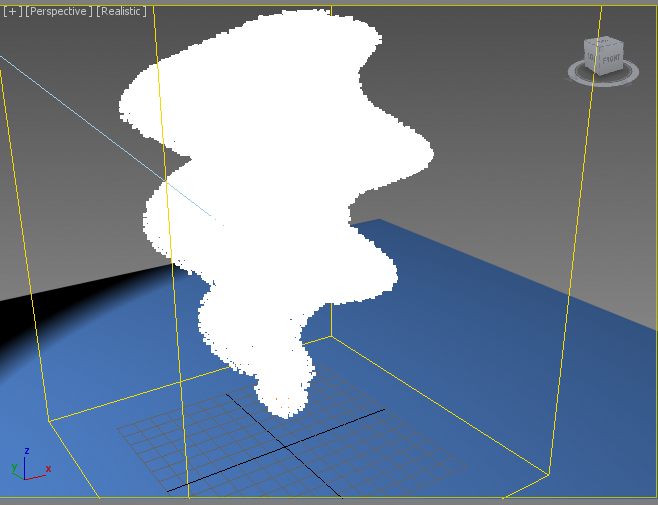
RESULT: The burning produces smoke which rises in the precise helical pattern defined by the Stoke Field Magma object!
Obviously, this looks too precise and artificial, but it proves we have complete control over the velocity of the simulation at any given point in the grid.
Adding Noise To The Sine Wave
Now let’s randomize our Sine Wave in the Field Magma by adding a Vector Noise component.
- Select the Field Magma object and open the Magme Editor.
- Select the disabled Multiply operator and press Del to delete.
- Select the last Add operator before the Velocity output and press the Numpad + key to output to insert another Add operator.
- Drag a connection from the second socket of the Add operator and release over an empty area of the Editor. Select Function > VecNoise.
- Uncheck the Normalize option of VecNoise.
- Connect the Vector input of the VecNoise to the existing Position InputChannel node.
- Select the new connection and press the Numpad + key to insert another Add operator.
- Press CTRL+SPACEBAR or the `/~ key to open the ActiveType field, then type “down” and press Enter to create a Vector InputValue with value 0,0,-1.
- Press Numpad * to add a Multiply node.
- Open ActiveType again and type in “frame” then press Enter to create an InputScript with a value of “currentTime.frame as float” which advances as the scene time changes. This will shift the position of the Noise vertically as time passes.
- Select the connection from the Add operator going into the VecNoise operator and press Numpad / to insert a Divide operator.
- Enter 15.67 as the Divisor to increase the scale of the Noise pattern. You can adjust this in the future to tweak the size of the noise…
- Select the VecNoise operator and press Numpad * to insert another Multiply node.
- Enter 2.0 as the default value of the second input to make the VecNoise 2 times stronger. You can change this value to adjust the amount of noise as you want.

- In the Stoke Field Data Exporter, click the Ver. button and select NEW Version [v002].
- Press the EXPORT… button to save the new FXD sequence.
- Select the “loader” FumeFX object and pick the new sequence version 002.
- Resimulate the main FumeFX simulation.
- Render in Scanline to a new output version.
RESULT: The smoke still rises along the procedural hilical path, but with some additional noise shifting through the Velocity Field for a more interesting result…