|
 |
 |
 |
 |
 |
 |
 |
![]()
Mesh Loader Object
- The Mesh Loader object lets you load geometry data saved on disk using one of the supporting formats incl. .XMesh, .OBJ, .PLY and .STL.
General Properties Rollout
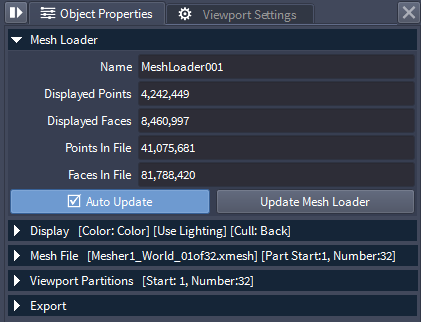
Name Field
- The Name field shows the name of the selected Mesh Loader.
- The default name is generated automatically in the form MeshLoaderNNN, where NNN is an integer padded to 3 digits, starting and 1 and incremented with each new Mesh Loader creation.
- The name can be edited by the user to reflect the purpose/functionality of the object.
Displayed Points Field
- Shows the number of points (Vertices) in the mesh that have been read for display.
- This number can be lower than the actual number of vertices in the file on disk, as Sequoia can load sub-sets of the data as needed.
- The field is Read-only - you can select and copy the value, but cannot change it.
Displayed Faces Field
- Shows the number of Faces that have beed read for display.
- This number can be lower than the actual number of faces in the file on disk, as Sequoia can load sub-sets of the data as needed.
- The field is Read-only - you can select and copy the value, but cannot change it.
Points In File Field
- Shows the number of points (Vertices) in the mesh file.
- This number can be higher than the number of vertices displayed in the viewport, as Sequoia can load sub-sets of the data as needed.
- The field is Read-only - you can select and copy the value, but cannot change it.
Faces In File Field
- Shows the number of Faces in the mesh file.
- This number can be higher than the number of faces displayed in the viewport, as Sequoia can load sub-sets of the data as needed.
- The field is Read-only - you can select and copy the value, but cannot change it.
Auto Update Checkbutton
- When unchecked, the Mesh Loader will only update when the [Update Mesh Loader] button (see below) is pressed manually.
- When checked (default), any changes to the Mesh Loader’s properties will trigger an automated update, as long as the Use Auto Update option in the Task Manager panel is also checked.
- If a previous update task is already queued in the Task Manager, it will be cancelled and replaced with the new one.
Update Mesh Loader Button
- Press to force a reloading of the mesh file.
- Useful when the mesh file has been updated on disk.
Display Rollout
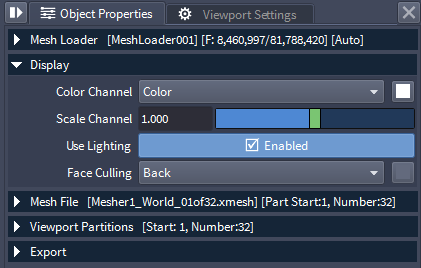
Color Channel Dropdown List
- Shows the available channels that can be used as source for the Color channel in the viewport.
- The list also includes the entry [User Color]. which allows a solid color selected by the user via the color picker to the right of the list to be used for the whole mesh.
Scale Channel Value Slider
- Scales the data copied into the Color Channel according to the above list.
- Default is 1.0, which leaves the color data unchanged.
- Negative values are allowed.
Use Lighting Checkbutton
- When checked (default), the mesh will be illuminated by the scene lights as long as Mesh Lighting is also enabled in the viewport.
- When unchecked, the mesh will be drawn unshaded, but fully self-illuminatet, revealing the specified Color Channel or [User Color].
Face Culling Dropdown List
- Possible values are:
- Back (default) - polygons whose normal points at the viewer will be displayed, while backfacing ones will be culled.
- Front - polygons whose normal points at the viewer will be culled, while backfacing ones will be visible.
- None - no culling will be performed, making both facing and backfacing polygons visible to the viewer.
- Tint Back - polygons will be colorized according to the Color Channel and Scale Channel values, and the backside color will be multiplied by the Tint Color value.
- Tint Front - polygons will be colorized according to the Color Channel and Scale Channel values, and the front side color will be multiplied by the Tint Color value.
Mesh File Rollout

File To Load Filename Field
- Specifies the path and file name of the mesh data file to load.
- The name can be entered manually, pasted in the field or picked through a file browser dialog by clicking the [...] button to the right.
- When the Mesh Loader is first created, the file browser dialog will pop up automatically at the last known folder location, saving you the click on the [...] button.
- If you enter or modify the name manually in the text field, you must press the [Update Mesh Loader] button to force an update. Changing the file name using the [...] button will update the file automatically.
- Currently supported mesh file formats are:
- .XMesh - Thinkbox Software’s own mesh caching format compatible with Autodesk Maya, 3ds Max and The Foundry’s Nuke.
- .OBJ - Wavefront OBJ mesh file, the least common denominator of mesh data exchange between 3D applications.
- .PLY - PoLYgon File Format, aka Stanford Triangle Format
- .STL - STereo Lithography File Format by 3D Systems - industry standard file used for 3D printing and manufacturing.
Multiple Partitions Checkbutton
- When the selected source file is not part of a Hacksaw-created Partition set, this checkbutton will be disabled and its caption will read (No Partitions Found).
- When the selected source file is part of a Partition set, this checkbutton will be enabled and checked by default
- The caption will change to Load.
- The following additional controls will become available:
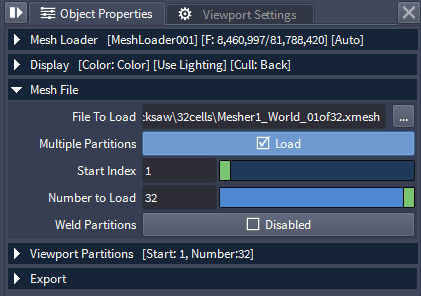
Start Index Value Slider
- Available only when the Multiple Partitions checkbutton (see above) is enabled and checked.
- Defines the index of the first Partition to load.
- Default is 1.
Number to Load Value Slider
- Available only when the Multiple Partitions checkbutton is enabled and checked.
- Defines the number of Partitions to load, relative to the Start Index (see above)
- Default is the number of partitions based on the file name signature (e.g. _01of32.xmesh shows that there are 32 partitions in the set).
- Keeping this value constant and changing the Start Index lets you quickly slide the range forward and backwards without having to adjust two values each time.
- For example, if the Hacksaw settings were 10x10x10, with order X-Y-Z, setting the Number to Load to 100 and then changing the Start Index to 1,11,21,31,41...91 will let you load any of the 10 horizontal 10x10 slices of the mesh.
Weld Partitions Checkbutton
- Available only when the Multiple Partitions checkbutton is enabled and checked.
- Unchecked by default.
- When checked, the coincident vertices of neighboring partitions will be welded to produce a single continuous mesh.
- When unchecked, each Partition mesh will remain a detached element of the final mesh.
- Welding is required by certain Operators that need a continuous mesh like RelaX.
- It could be enabled only on Export to produce a welded mesh on disk, while keeping the Partitions detached in Sequoia.
Viewport Partitions Rollout
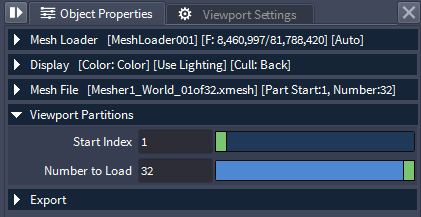
- Available only when the Multiple Partitions checkbutton is enabled and checked.
- The controls it exposes are similar to the Start Index and Number to Load found in the Mesh File rollout, but affect the Viewport Display only.
- In other words, a larger subset of Partitions could be loaded in memory, but only a sub-set thereof can be sent to the Viewport for performance reasons.
Start Index Value Slider
- Defines the index of the first Partition to be displayed.
- Default is 1.
Number to Load Value Slider
- Defines the number of Partitions to display, relative to the Start Index (see above).
- Default is the number of partitions based on the file name signature.
Export Rollout

- This rollout is always available.
- It can be used to export the mesh generated by the object to a supported disk file format in either world space or in object space.
Export Object Space... Button
- Pressing this button will open a save file dialog.
- Specify the output file name and format and press Save to export, or Cancel to abort.
- The data will be saved in object space relative to the object pivot, ignoring any world-space transformations.
Export World Space... Button
- Pressing this button will open a save file dialog.
- Specify the output file name and format and press Save to export, or Cancel to abort.
- The data will be saved in world space using all world-space transformations applied to the object.