|
 |
 |
 |
 |
 |
 |
 |
![]()
Surface Points Object
- The Surface Points object can be used to generate synthetic point clouds from scene geometry by distributing points on the surface of one or more meshes.
- The resulting point cloud will acquire relevant data like face Normals, Colors and UV coordinates from the source mesh.
Surface Points Rollout
- The Surface Points Rollout contains the general object controls including name, point count, and auto/manual updating.
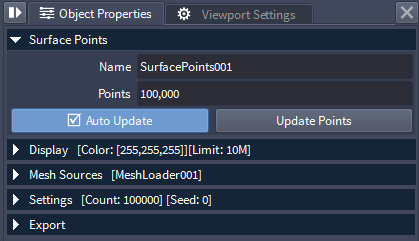
Name Field
- The Name field shows the name of the selected object.
- The name is generated automatically in the form SurfacePointsNNN, where NNN is an integer padded to 3 digits, starting and 1 and incremented with each new Surface Points creation.
- The name can be edited by the user to better describe the purpose/function of the object.
Points Field
- The Points field shows the number of points created by the object.
- The field is Read-only - you can select and copy the value, but cannot change it.
Auto Update Checkbutton
- When unchecked, the re-generation of the point data can be triggered only manually by pressing the [Update Points] button (see below).
- When checked (default), the point data will be recreated automatically after every change to the object’s properties, as long as the [Use Auto Update] global option in the Task Manager is also checked.
- If a previous update task is already queued in the Task Manager, it will be replaced by the new task.
- By default, the update will start 1 second (1000 ms) after the last change. This value can be modified using Options > Configuration > Auto Update Delay (milliseconds)
Update Points Button
- Pressing this button will force the re-creation of the points using the current settings.
- When pressed, a new Task will be added to the Task Manager and the loading will be performed asynchronously in the background without blocking the UI and Viewports.
- Note that selecting the onject and pressing F5 or picking the Main Menu > Display > Update Selected Object menu item will have a similar effect, but will also update any dependent objects (for example Meshers or Mesh Loaders) in addition to rebuilding the points.
Display Rollout
- The Display Rollout contains the controls over the viewport display of the points.
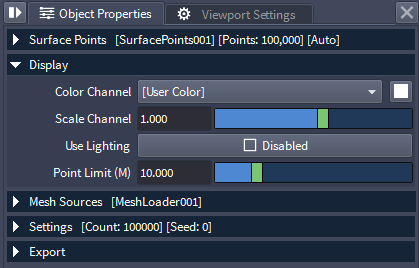
Color Channel Dropdown List
- The Color Channels list defines the data source to be used to draw the points in the Viewport.
- The Color Channel list contains the point data channels found in the file, plus a [User Color] entry which enables the override color swatch to the right.
- When the point data contains a valid Color channel, the list will default to it.
- The list typically contains one of the following color sources:
- [User Color] - overrides the color of all points with the User Color value defined by the swatch next to the list
- Color - uses the Color channel (will exist if the source mesh contained a vertex Color channel).
- Position - the Position channel defining the 3D positions of the point samples in object space.
- Normal - available in a Surface Points object with a valid mesh source, sampled from the face normals of the source mesh.
- Note that switching to any of the optional Channels like Position or Normal requires the rebuilding of the data by pressing the [Update Points] button for the change to take effect.
- Switching to [User Color] override does not require a rebuilding of the point data.
User Color Swatch
- Defaults to White.
- Defines a single override color to be assigned to all points when displaying in the Viewports.
- Clicking on the swatch to open the Color Picker will also automatically switch the Color Channel list to [User Color] for the change to take immediate effect.
Scale Channel Slider
- Scales the Color Channel values.
- Defaults to 1.0.
Use Lighting Checkbutton
- Only enabled when a Normal channel is found in the point data.
- When disabled, it will list the reason (Missing Normal Channel) in its caption.
- When enabled, it can be checked to allow the shading of the points using the scene lights (if enabled for the Viewport via the Viewport Lighting And Shading toolbar).
- When unchecked, no lighting will be performed.
Mesh Sources Rollout

- Lists the mesh source objects.
- Double-click an entry from the list to change the selection to the respective object.
Add Button
- Press to open the Object Picker Dialog listing all valid Mesh sources in the current document.
- Highlight one or more sources and press [OK] to add them as inputs.
- Objects that are already added to the Mesh Sources List will not appear in the Object Picker Dialog.
- Alternatively, press [Cancel] to dismiss the dialog without adding.
Remove Button
- Highlight one or more entries on the list and press the [Remove] button to disconnect the selected inputs.
Settings Rollout

Distribution Dropdown List
- Controls the distribution method.
- Possible values are:
- By Count - the total number of surface point samples will be specified via a dedicated Count slider (see below).
- By Spacing - the Spacing between the surface point samples will be specified via a dedicated Spacing slider (see below).
Count Slider
- Only visible when the Distribution dropdown list is set to By Count.
- Default is 100,000.
- The slider range is from 1 to 1,000,000, but higher values can be entered via the value field.
Spacing Slider
- Only visible when the Distribution dropdown list is set to By Spacing.
- Default is 1.0.
- The slider range is from 0.001 to 10.0, but higher and lower positive values can be entered via the value field.
Seed Slider
- Defines the random seed for the point distribution.
- The same seed value will produce the same random pattern from a specific mesh.
- Default is 0.
- The slider range is from 0 to 1024, but lower and higher values outside of the range can be entered by typing into the value field.
Export Rollout
- The Export rollout lets you export the Surface Point data to a supported file format on disk.

Export Object Space... Button
- Pressing this button opens an “Export Point File” file save dialog.
- Specify a file name and format and press the [Save] button to export, or [Cancel] to abort.
- The data will be saved in object space, ignoring any world space transformations.
Export World Space... Button
- Pressing this button opens an “Export Point File” file save dialog.
- Specify a file name and format and press the [Save] button to export, or [Cancel] to abort.
- The data will be saved in world space, taking into account world space transformations.