Stoke Field Loader Object
Available in Stoke MX 2.0 and higher. Last Edited on May 1, 2014.
Introduction
The Stoke Field Loader Object loads disk caches in FumeFX .FXD, OpenVDB .VDB and Field3D .F3D formats.
The Field Loader can be used as an optional alternative to directly loading field data from disk into the InputField operator in Stoke’s Field Magma flows. The main benefit is the ability to visualize the incoming data directly in the viewport without the help of a Stoke Field Magma or Simulator object, the ability to transform the data in world space, and the support for Stoke Field modifiers on the stack.
It can also be used as a source of Field data in other Stoke components like Stoke Field Force, Stoke Field Texmap, Stoke Field Follow ParticleFlow operator etc.
User Interface
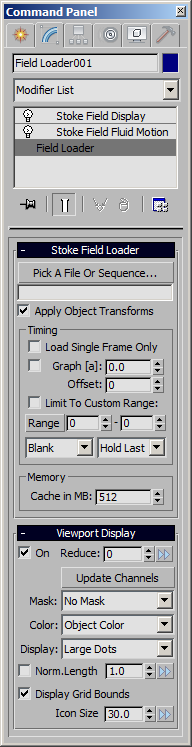
Stoke Field Loader Rollout
Pick A File Or Sequence… button and text field
- Click this button to open an open file dialog and pick a valid file or file sequence in one of the supported formats.
- The selected representative file will be displayed in the text field.
- If the file is part of a file sequence with a sequential frame number, the frame number will be automatically replaced with the current time’s frame number unless the “Load Single Frame Only” option is checked.
Apply Object Transforms checkbox
- When checked (default), the transformations of the Field Loader object will be applied to the incoming field data, allowing you to translate, rotate and scale the field as needed.
- When unchecked, the data will be loaded As Is in World Space without applying any transformations, regardless of the location, orientation or scale of the Field Loader object.
Load Single Frame Only checkbox
- When unchecked (default), the current time will be respected and the corresponding frame number will be loaded (if it exists).
- When checked, the exact file name specified in the text field will be loaded on every frame.
Graph checkbox and value spinner
- When unchecked (default), the current scene time plus the Offset value optionally clamped to the Custom Range will define the frame to be loaded.
- When checked, the Graph spinner’s animated value will be used instead of the current scene time. The other factors like Offset and Custom Range will also be applied.
Offset value
- When set to 0 (default), the current scene time or Graph value will be used to define the frame to be loaded.
- When set to a positive value, the specified frame will be loaded on frame 0 (this shifting the frame sequences time to the LEFT)
- When set to a negative value, the file sequence will be shifted to the RIGHT relative to the scene time, in other words the animation will start later.
Limit To Custom Range checkbox
- When unchecked, the frame specified by the above controls will attempt to load and could fail if the requested file does not exist.
- When checked, the custom range defined below will clamp the sequence to the specified values, preventing any attempts to load non-existent frames. This of course does not help if there are frames missing in the middle of the sequence.
Range button
- Pressing this button after selecting a valid file sequence will attempt to set the From Frame and To Frame Custom Range spinners to the first and last frames in the sequences.
- Note that this does not take into account any missing frames in the middle of the sequence, it only uses the min. and max. values found on disk.
From Frame and To Frame value spinners
- Define the first and last frames of the Custom Range.
Before Range Behavior drop-down list
- When set to “Blank” (default) and if Limit To Custom Range is checked, no data will be loaded on frames before the From Frame value.
- When set to “Hold First” and if Limit To Custom Range is checked, the data on the From Frame will be loaded at times before the From Frame value.
After Range Behavior drop-down list
- When set to “Hold Last” (default) and if Limit To Custom Range is checked, the data on the To Frame will be loaded at times after the To Frame value.
- When set to “Blank” and if Limit To Custom Range is checked, no data will be loaded on frames after the To Frame value.
Memory > Cache in MB value spinner
- Defines the memory cache allocated to the Field Loader.
- Default is 512 MB.
Viewport Display Rollout
The Viewport Display rollout contains the controls related to the visualization of the Field Loader data in the viewports.
On checkbox
- When checked (default), the loaded field will be represented in the viewports according to the settings of the other controls in the rollout.
- When unchecked, no samples will be drawn regardless of the other relevant controls’ values.
Reduce value spinner
- The Reduce value spinner defaults to 0.
- When set to 0, the Field Loader will draw all samples in the viewports, unless Auto-Reduce has kicked in to preserve reasonable performance.
- When set to a value higher than 0, and if Auto-Reduce has not enforced a higher reduction value, only every Nth sample will be drawn along each of the 3 axes.
Update Channels button
- Pressing this button will repopulate the drop-down lists below with the currently available channels.
Mask drop-down list
- This list provides the options “No Mask” as well as any Scalar Fields defined in the Magma flows.
- The Mask channel is used to determine where to display viewport samples.
- Samples (Dots or Vectors, depending on the Display list below) will only be drawn where the Mask channel has a positive value.
- When set to “No Mask”, no Dots will be drawn when Display is set to “Large Dots”, and all Vectors will be drawn when Display is set to a Vector channel.
Color drop-down list
- This list provides the options “Object Color” (default), as well as any Vector fields defined in the Magma flow.
- When “Object Color” is selected, the samples (Dots or Vectors) drawn in the viewports will use the object color of the Field Loader - either the wireframe color, or the Material color, if a material is assigned.
- When a Vector field is selected, the channel’s values will be used to colorize the samples.
Display drop-down list
- This list provides the options “Large Dots” (default), as well as any Vector fields defined in the files.
- When “Large Dots” is selected, the samples will be drawn as dots in the viewports.
- When a Vector field is selected, the samples will be drawn as lines in the viewport according to the direction and magnitude of the field at the sample point, unless overridden by the controls below.
Norm. Length checkbox
- When unchecked, the Vector display will draw the samples as lines with length equal to the Magnitude acquired from the field, multiplied by the Scale value.
- When checked, the Vector Magnitude will be normalized to length of 1.0, then scaled by the Scale value before displaying.
Scale value (unlableled, to the right of the Norm.Length checkbox)
- Defaults to 1.0 and is used to scale the Vector magnitude of Vector Display samples in the viewports as described above.
- Note that Velocity fields are stored as World Units Per Second, so the Vector Display will draw lines that are N times longer than the per-frame velocity where N is equal to the FPS settings. Thus, at 30 fps, you need to use 1.0/30.0=0.03333 Scale to display Vectors with Magnitude in World Units Per Frame!
Display Grid Bounds checkbox
- When checked, the Grid Bounds will be drawn in the wireframe color of the object in the viewports.
- When unchecked, the Grid Bounds will not be drawn in the viewports.
- The Grid Bounds bounding box can be used to select the object instead of clicking on the Icon or the Samples.
Icon Size value spinner
- The Icon Size defaults to 30.0 units and controls the display size of the object’s icon.
- There is no option to disable the Icon display to ensure the object is always easily selectable even if the On and Display Grid Bounds options are unchecked.
- The Icon Size can be set to 0.0 though if absolutely necessary to “hide” the icon.
Object Creation Workflow
The Stoke Field Loader object can be created using several methods:
Using A MacroScript On A Toolbar or Keyboard Shortcut
Alternatively, you can customize the 3ds Max UI to place the same MacroScript used by the Stoke menu on a toolbar, QuadMenu or assign to a dedicated Keyboard Shortcut.
- Simply use the Main Menu > Customize > Customize User Interface dialog to locate the “Stoke” category and assign the MacroScript as needed.
- The actual creation procedure will be identical to the one described in the Stoke Menu section above.
Using the 3ds Max Create Tab in the Command Panel
- You can also use the regular 3ds Max workflow for object creation which is similar, but slightly different from the Stoke Menu / MacroScript approach.
- Activate the Create tab of the 3ds Max Command Panel
- Make sure you are in Geometry mode.
- Select “Stoke” from the Category drop-down list
- Click the “Field Loader” button to enter creation mode
- Click in the viewport to define the position of the object and finish the current object’s creation.
- Note that 3ds Max will remain in Field Loader object creation mode and you can start creating another object immediately, or Right-Click to exit creation mode.
Using MAXScript
You can create a Stoke Field Loader object by executing the following code:
StokeFieldLoader()
The resulting object will appear at the World Origin with default settings unless specified explicitly via creation parameters.